

Introduction: Cherry Wood Table Lamp


I have always liked the work of Frank Lloyd Wright, so I decided to build a table lamp loosely based on his designs. It is made from cherry and walnut hardwood, and uses energy efficient LED light bulbs. The design is also somewhat modular and the lamp’s appearance can be changed a little depending on how you assemble the different reflectors. It is easy to scale the design to build a floor lamp as well. The lamp makes a nice wooden sculpture even when it is not lit.
Supplies
Hardwood; I used cherry and walnut
Wood glue
Candelabra lamp sockets, LED bulbs (60 W equivalent), power cord w/ in-line switch, misc. lamp and wiring hardware
Danish oil finish
Table saw
Bandsaw
Palm sander
Clamps, the more the better :-)
Step 1: Design Considerations

I wanted to build table lamp for a side table and/or night stand that should be about 30 inches tall, cast a pleasant indirect light, and have LED bulbs (rather than strips) that can easily be replaced as necessary. I started drawing a lamp using Fusion 360 so I could play with the appearance and dimensions before committing to a final design.
An image of the Fusion 360 design is attached, as is a pdf drawing for the post, supports, shades, and reflectors.
Attachments

Step 2: Making the Lamp Post


Cut four pieces of cherry, 30 inches long, 1/2” thick, 1-7/8” wide, 45 degree bevels on both long sides. I prepared these pieces on my table saw.
Cut 1/8” deep grooves along all of the beveled edges. I used my table saw so the width of the grooves is the blade kerf; 1/8 inch, see pictures. By gluing splines into these grooves you improve joint strength, ease the clamping assembly, and most importantly make the back side of the post removable (no glue on these splines) for access to the wiring later on.
Now cut some wood strips (splines) 1/4 inch wide, 1/8 inch thick. The splines should fit into the grooves along the beveled sides. You need enough spline material for the four grooves.
Glue the post together. You apply glue to two of the bevel sides and splines on the front piece. The back piece and splines will not be glued so you can slide it out later on.
Use blue tape and light clamp pressure to glue the post. I made some 3d printed corner clamp pads (red) that helped me during the assembly; but they are not required. If you are interested, I have included the 3d files so you could print your own for this and other projects.
Clean up any spilled glue, sand the post up to 220 grit, and confirm that you can slide the back piece in/out. Tape the back piece in place and trim both ends of the post flush.
Lay out and drill the 3/8 inch diameter holes for the four light sockets, refer to the drawings I provided in step 1. Two lights on the front, two offset lights on the right side. Drill another 3/8 inch hole 1 inch from the bottom of the post for the lamp cord.

Step 3: Base Plate


I made a 8.5 inch by 11 inch base plate by gluing two pieces of walnut together. When I looked at it afterwards I noticed some cupping. I should have been more careful during cutting & clamping. Oh well! I used my planer with an MDF sled to remove the cupping. Now the base lays flat without rocking!
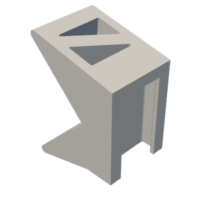
To strengthen the joint of the post to the base I cut two cherry support pieces with a couple of 'stair steps' as shown. I then laid out holes for 5/16 inch dowels to fix the supports to the base and the post. The support pieces are glued to the post. For the post-to base joint I will use a couple of screws from the bottom during final assembly.
Step 4: Shades


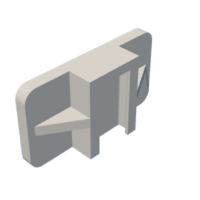
You will need to make four shades to cover the light bulbs. The shades are basically three sided open 'boxes' that slip onto the lamp post. They are made from 3/8 inch thick wood. Again I used cherry for its warm color. The width of the shade box should be slightly narrower than the lamp post so there is a friction fit when you slip the shade onto the post. The shade also has a 1.5 by 2 inch slot for mounting. A square pad (1.5 by 1.5 by 0.75 inches) glued to the post holds the shade in place. The pictures should make the mounting scheme a little clearer. You could glue the shade to the post, but that will make it more difficult to change bulbs in the future.
Build the four shades according to the pdf drawing, and make eight mounting pads; I choose walnut for the pads. Glue the pads to the post at the locations indicated in the drawing.
Step 5: Reflectors


In order to hide the light bulbs and provide indirect light you need to make five 'reflectors'. I used cherry wood again, this time about 1/4 inch thick. Like the shades, the reflectors are notched to slide onto the lamp post. The notch is 2-1/4 inches deep.
To fix the reflectors to the post I originally thought about cutting grooves into the post; but eventually decided that I would glue short rails to the post to receive the reflectors. Cut some strips of walnut to 1/4 inch square, then cut them to 1.75 inch length. You will need 30 pieces altogether. Each reflector will be supported at the post by a strip above and below, on three sides of the post. This way you can rotate the orientation of the reflectors vis-a-vis the shades. Lay out the location of the support pieces and glue them to the post. Use a cut-off from a reflector (same thickness) to space the support strips. Take a look at the pictures for clarification.
Step 6: Finishing


To close off the top of the lamp post I made a little stopper from cherry. I will leave it loose, so I can remove or replace it.
After some more detail sanding I used Danish oil to finish the cherry and walnut pieces.
Step 7: Wiring


Attach the light sockets to the post with pipe nipples screwed into the 3/8 inch holes. To make the internal wire connections I used WAGO 221 lever-nuts. A lamp cord with an in-line switch is fed into the post through a 3/8 inch hole near the post bottom. After completing and testing the wiring I slid the back piece of the lamp post in place to hide and secure the wiring.
Step 8: Assembly


Everything is ready to assemble. Slip the shades into place to cover the light bulbs. Then slip the reflectors into place above (or below) each shade.
Enjoy the warm indirect light from your new table lamp.

Runner Up in the
Lamps Challenge


