

Introduction: Pallet Wood Bird Feeder


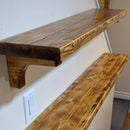

A bird feeder has been on my "to do" list for a very long time, and especially one made of pallet wood. When the slats are cut down into strips and laminated into full panels you end up with a beautiful alternating pattern that is completely unique.
However, an important point for my neighborhood was the eternal presence of squirrels who love eating bird seed as much as the birds themselves. So being able to stop them from eating it was a crucial point, and I found several examples online. One of the most notable examples was by Chris Notap, where access to the seeds is limited to the birds only by using entrance holes that are large enough for the birds but too narrow for the squirrels : https://www.youtube.com/watch?v=6F4k13Yx3w8
That design came across as a really elegant one, but I was looking for an approach that was as close as possible to being 100% wood, so my approach is a little different. It features the same 1.5" holes on both sides of the feeder so only birds can get in, and has a slanted roof that can be removed by sliding it back on rails attached to its underside. The rails are basically elongated trapezoids that fit into dovetail notches at the top of the walls. The feeder measures 12" wide (at its widest), 8" tall (at its tallest) and 16" long.
Supplies


Pretty much 99% of the project is composed of pallet wood, but there's also a small amount of 1/8" plexiglass for the sides. For attachment purposes, glue and dowels are used to attach the base and the walls, while the roof and the rails are attached with glue and wood screws. For the finish there's also outdoor-rated varnish.
Step 1: Creating the Panel Blanks


Preparation is a very straight forward part of the project and starts by simply taking the pallets apart. There are multiple ways of doing it: you could hammer them apart, use a reciprocating saw to cut through the nails, use a pry bar, a pallet buster, etc. In my case I've found that using the pallet buster is the easiest method and leaves the pallet slats in the best possible condition, but as mentioned - there are many ways to do this and plenty of other projects that deal with the subject.
Once the pallets have been dismantled and all metal removed, the slats get planed and cut to 1" wide strips, the strips are glued together to make boards, and voila - the bird feeder's base material is ready. For this project I ended up using three boards measuring roughly 20" by 14" and then cutting and refining their shapes further in the next steps.
Step 2: Designing the Shape


Playing around with the design in real time was one of the fun aspects of this project. I just took the floor panel and tried figuring out how I would like the walls to look by molding and cutting pieces of cardboard. The design definitely needed a wooden front and back, plexiglass sides and a sloped roof, but other than that there few criteria.
With the cardboard I was then able to try out a few designs, and settled on walls that flared outward since it seemed it would provide some protection from the wind and would simply look pretty good.
Step 3: Setting Up the Walls


With the overall design figured out, it was time to make the walls. They were basically the same shape, with the back wall being a bit taller so the roof would slant forward. With a taller wall, though, came the ability to have more holes in it so that design aspect ended up a little different between the two. The back wall ended up with six equally spaces holes while the front one only had three, but both sides have enough room for birds to easily get in and out of the feeder.
Once the holes were cut out and sanded down, the "wings" of both walls had to be made. I played with a few angles on the floor section, found one that I liked and measured it to see how the wings would be cut. It turned out to be 96.5 degrees, so the angles to cut on both the walls and the wings was 48.25 degrees.
The last step before gluing the walls together was to add the channel for the plexiglass to slide down. The channel was routed on the inside of both walls, and was done using a 1/8" bit, a Dremel and a makeshift inclined template so that the plexiglass would end up sliding into place and each the opposite wall properly. Small blocks of wood were then glued into the bottom of the channels to ensure the plexiglass did not slide all the way down to the floor (ensuring that any rain water that made its way into the feeder could easily drain out).
Finally, it was a simple matter of gluing the wings on by placing all three pieces next to each other (with the gap between them facing down), attaching them with a strip of masking tape, flipping the piece, adding glue, and then taping everything together and letting it dry. Since the joined surfaces were both side grain cuts, a simple glue joint offered plenty of strength and no mechanical supports (such as a dowel or screw) were needed.
Next came the roof and its rails. The angle for the roof was just a "what looks good to me" exercise, and once figured out the angle was set into the table saw and cut off. The rails were simple trapezoids that would let me slide the roof on and off but would not get lifted off by any gusts of wind. The rails were simply cut by angling the table saw at a good (a.k.a. "eyeballed") angle, and then traced on to the walls. Without changing the table saw angle, the slots for the rails were made in the walls by sliding the walls over the saw over and over until the gaps were slightly larger than the rails.
The last step in attaching the walls was using a dowel jig to mark to location for the alignment dowels, drill them out, apply masking tape to the outside of the glue area (to make cleanup easier), spread glue on both surfaces and then just clamp everything together for an overnight drying. Vertical clamping was a bit of a challenge since the tops of the walls were angled, so the cutoffs from those tops were used. They were just positioned back on top of the walls (making their tops parallel with the feeder's floor), held in place with blocks and side clamps, and long clamps were then used to hold everything together.
Step 4: Time for a Roof


Compared to the walls, adding the roof was a much quicker process. The walls already had the slots cut into them for the roof's runners, so all that was left to do here was to cut the roof to the right size and attach the runners.
The sides of the roof were set to match that of the floor, cut off and then rounded. The runners required precise positioning, so they were inserted into the wall slots, the roof was laid down on them, and their location was traced on to the underside of the roof. It was then all removed, predrilled, glued and screwed into place.
Finally, a stopper block was added to the roof to ensure it would not slide down too far and eventually fall off of the feeder.
Step 5: Finishing Steps


The finishing steps for the feeder were basically a lot of sanding (80 and then 120 grit) followed by varnish; four layers of it. The varnish used was a urethane outdoor varnish, which is designed to keep the wood in good condition under different weather conditions and avoid damage from the sun's UV rays.
Step 6: Adding a Feeding Station


For a feeding station there wasn't much in the way of a premade solution that would fit the feeder, and I was looking for something that would act as a reservoir that the birds could not reach but also slowly dispense the seeds as they are consumed.
The solution ended up being a shallow dish that they could eat from, and in the center of it a tall reservoir with holes at the bottom that would keep the dish full. The reservoir also had an open top to make refilling easier.
The entire thing was made from a lemonade bottle and an individual rice pudding container. The bottle was cut roughly in thirds (with the middle half being discarded). The pudding container was inverted and had four little "windows" cut out of its sides. The top third of the bottle was then inverted and put on top of the inverted pudding container so its opening could be traced. The trace was then cut out and the two were joined with hot glue.
The newly made reservoir was then hot glued inside the remaining third of the bottle (which was now basically a dish), and the whole thing was attached to the feeder by using velcro strips that were hot glued to both surfaces.

Second Prize in the
Home and Garden Contest


