

Introduction: Faceted Curved Wooden Chair


I've been itching to make something new for a while now and wanted to make something that would challenge me a bit more than normal. I'd seen some curved chairs that looked pretty cool so thought I'd have a go at something similar.
I had an idea to have five or six main rib section on which wooden chair section would sit upon, so mocked up a few ways of making the main curved ribs. I came up with a few options where I could cut all the rubs as singular curves on a full board of ply, divide the ribs in to a three sections and joint together with half lap joints or make the ribs out of trapeziums.
Material wise I thought that going with trapeziums would be best....I would be able to get much more out of my wood than with the other two options
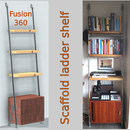
I also made a 3D model of how the ribs would be made in to a frame in Fusion 360 which gave me a good idea of how it was going to look. I'm not good at Fusion but the ribs were fairly easy to do but the rest I couldn't quite get my head around, with all 3D modelling I'm sure there's an easy way to do it but I couldn't find it!
That's as far as I went with my planning but had no idea how I would attach the seat parts to the ribs, but on to that later!
Attachments

Supplies


For this project I Used
3 No. 2000mm x 130mm x 25mm planks of Brown Oak
1 No 1000mm x 200mm x 25mm plank of Sapele
Approx. 40 angle braces
Approx. 80 No. 4.0 x 20mm screws
Step 1: Rib Wood


I wanted the width of the ribs to be around 70mm (3") but my oak wasn't quite wide enough to get two ribs out of each plank, so I decided to go for a stripy wood by edging the Oak with Sapele, this enabled me to use the whole oak plank.
I put all the slabs through a thicknesser (planer) to get everything to a uniform thickness. Once that was done I ripped the Oak to 50mm and the Sapele to 10mm and glued and clamped together to make the rib material.
Step 2: Cut the Rib Sections


I had worked out the top and bottom length of my trapeziums based on an 850mm diameter circle and calculated the angle I needed to cut the rib material. In the end it was pretty close to 10 degrees so I set my mitre saw to cut to this and chopped the end off my rib. Once that was cut I set a 'stop' to the right hand side of the saw so I could butt up the rib plank to the stop, cut, turn over and cut again. I then repeated this until I had 35 individual rib sections.
Step 3: Construct Main Ribs


I did have a few ideas about how to fix all the rib sections together but came up with the final idea to use quite thick, full length splines as I thought this would give me the most strength.
I started by cutting full length rebates in to both ends of most of the sections, approximately 5mm (0.2") wide, on my table saw, by cutting one saw width and then turning the piece around for a second cut, which made sure that my rebates were central on the ribs. For the end pieces only one side needed to be cut.
Once they were all cut, I ripped some pieces of oak on the bandsaw and passes these through the thicknesser (planer) until they were the same thickness as the rebates.
To fix the pieces together I glued the oak splines in the the rebates, clamped some pieces of pine to either side of the ribs (so the faces were parallel to each other) and then used the pine to clamp the rib sections together.
As a hobbyist woodworker I don't have loads loads of clamps so this step took days to complete as I could only glue two sections together at a time.
Step 4: Tidy Up Ribs


With all the five ribs complete I needed to tidy up the splines so started by trimming them on the bandsaw and finished the internal trimming with a chisel. The outer splines were brought flush with a sander.
I then sanded all the ribs with a random orbital sander with 80, 120 and 180 grit sandpaper.
Step 5: Fix the Main Ribs Together - Part 1


To create the curve between the ribs I decided to use two rows of support pieces (see the Fusion model in the introduction). I started with the widest parts closest to the front of the chair eyeing in a good looking distance and angle between the ribs. I cut one section first to check how it was going to look and once I was happy I cut the remaining three sections.
Once my front sections were done I clamped two ribs together with the support piece in between to find the dimensions of the smaller top pieces. These were a bit more fiddley to do as I needed to determine and cut compound angles for the side faces. With quite a bit of adjustment to the first piece I eventually found the correct angles so carried on with the remaining cuts.
I then cut pocket holes to each part, offsetting the holes to one side so when they were screwed in the screws didn't foul on each other.
Step 6: Fix Ribs Together - Part 2


I started fixing the ribs together in pairs first to make the whole process easier. I started by fixing the large cross piece first, using a square and reference piece to position the wood before screwing it down on the first rib. I then removed the cross section piece and did the same to the second rib. I then ended up with one rib fully fixed and reference screw holes on the other. As space was tight I needed to use either a screwdriver with right angle head on it or as space got even tighter I used the pocket hole driver with a small spanner to tighten the screws.
Step 7: Legs


The next challenge was to add the legs, these would be attached to the ribs so would also be angled in two directions.
I started by clamping some left over rib parts in between two parts of oak, this would make a natural recess for me to fit the legs on to the ribs. Again this step was a lot of trial and error, fitting, adjusting and refitting until the legs were correct. Once I had all four legs I clamped them in to place and drilled a 10mm hole all the way through the leg and rib.
I made some dowels on the lathe, cut them to length followed by gluing and doweling the holes. Once it was all dried I trimmed the dowels and sanded the area to 180 grit.
Step 8: Seat Pieces - Part 1


Ideally I wanted the seat pieces to be fixed to the ribs so you couldn't see any fixings but I couldn't think of a way to do it easily.
I did think of dowelling each part to the ribs but the overlap of rib and seat parts was too small, even for small dowels. Even if the ribs were wider, dowels would be very difficult to locate in the exact location, as the seat pieces and ribs aren't at right angles to each other so some kind of angled drilling would be required too.
In the end I used small angle brackets to fix the seat pieces to the ribs, although at some angles you can see them so weren't ideal in the end.
To look a bit better and to give the timber room to expand I decided to leave a small (1mm) gap between each seat section, so that had to be taken in to account when cutting the seat wood.
I started by ripping lengths of the oak with a 10 degree angle to each side (the same angle as the individual rib sections). Once I had these I could measure the the required top and bottom widths and determined the angle of these cuts before cutting then with a mitre saw. This step had to be repeated for each row as they are different angles and widths all the way up.
Once cut I the clamped a piece to the ribs and secured with a bracket I had bent to the follow the angle between the rib and the seat piece. I then used a spacer between the previously fixed parts to locate the next seat section. A small amount of adjustment also needed to be done so all the gaps were uniform(ish) and all sides were parallel to each other.
This was a very lengthy process as even a fraction of a millimetre to one side was noticeable.
Step 9: Seat Pieces - Part 2


After I had fixed two rows I decided to sand and oil each part before attaching them to the ribs as taking them all off again and re-fixing in to the exact same place, I imagined, would take a long time.
As with the ribs I sanded with 80, 120 ad 180 grit and oiled with a layer of Danish oil.
The further I got up the chair the smaller the gap became and was more and more difficult to fix the brackets. On the top sections I used a tiny 90 degree ratchet screwdriver to fix the screws, although that was a very difficult thing to do.
For the bottom row I cut a 45 degree cut to the top edge which I then sanded to a curve to make it more comfortable on the legs.
Step 10: Paint Front Brackets


The only thing I didn't really like was the obviousness of the fixings from certain viewing directions, to make the front ones (the ones that will mainly be seen) less obvious I added a coat of primer and then painted the brackets a brown colour similar to the wood. It isn't ideal but better than what it was!
Step 11: Finished


Once it was all put together I added another couple of coats of oil on and a final layer of wax.
In the end I think it turned out really good.
If you enjoyed this project it would be great if you could vote for me in the woodwork contest. Thanks!!!!
Step 12: Update


So following publishing this Instructable I still wasn't happy with the visibility of the brackets and one of the comments gave me an idea to make a cover for the brackets.
I started by cutting a couple of lengths of wood to a width of just wider than the bracket. I then made a groove with multiple cuts on the table saw before cutting to size. I then made some end caps for each of the pieces and glued them on to the ends. After sanding to 240 grit I stuck them over the brackets using superglue (CA glue) with a spray accelerator and finished with a layer of oil.
It does make the back much better......not as good as a method with no visible fixing but the best I could do with what I had!

Judges Prize in the
Woodworking Contest


