
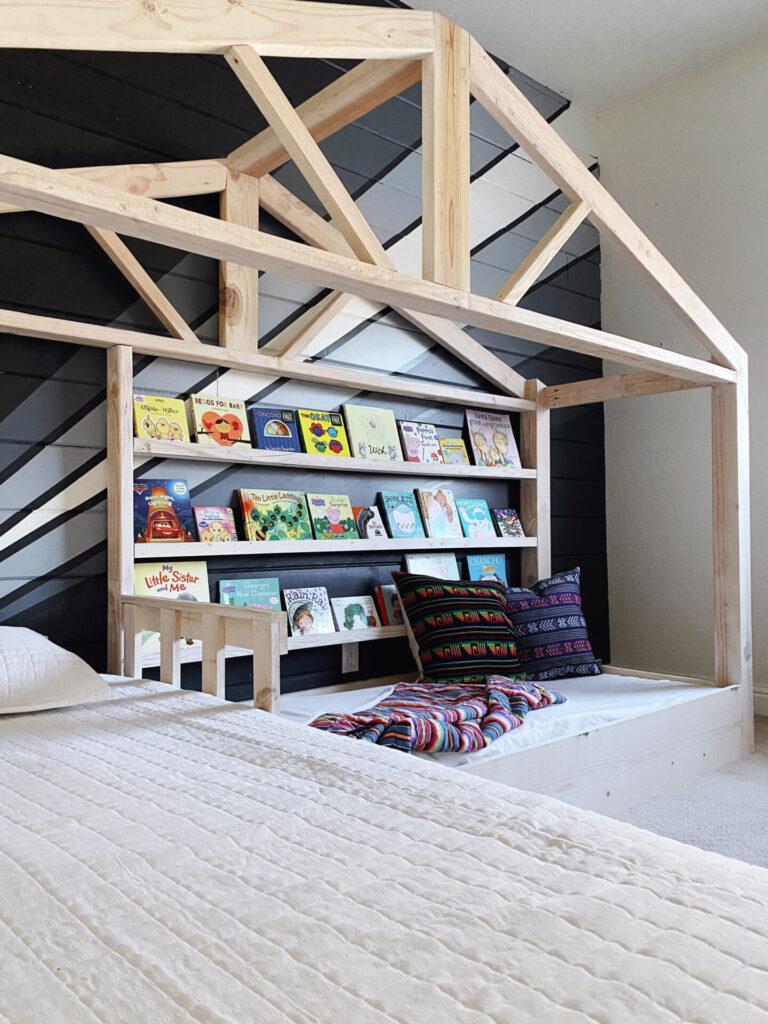
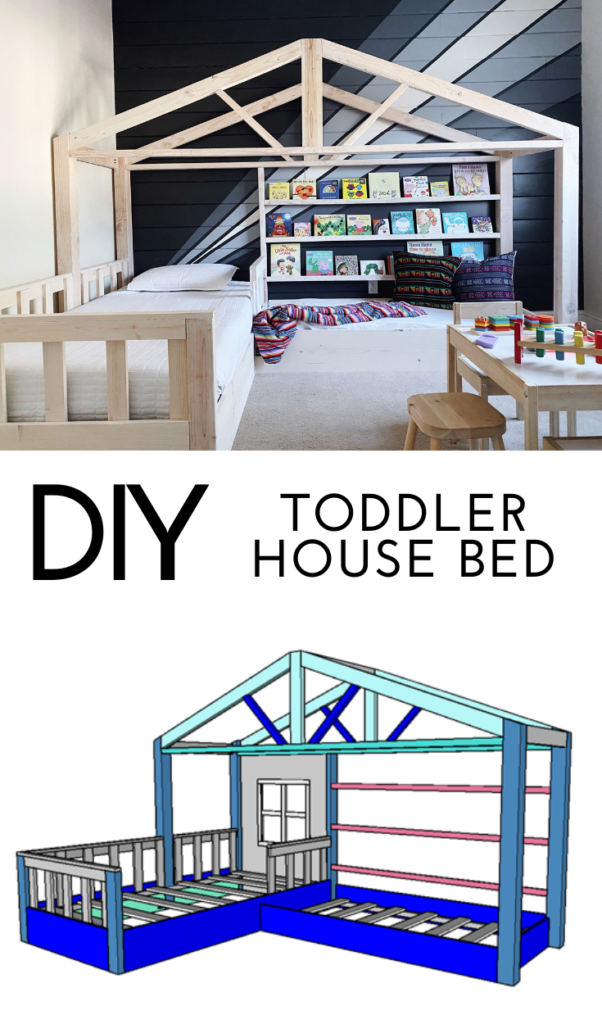
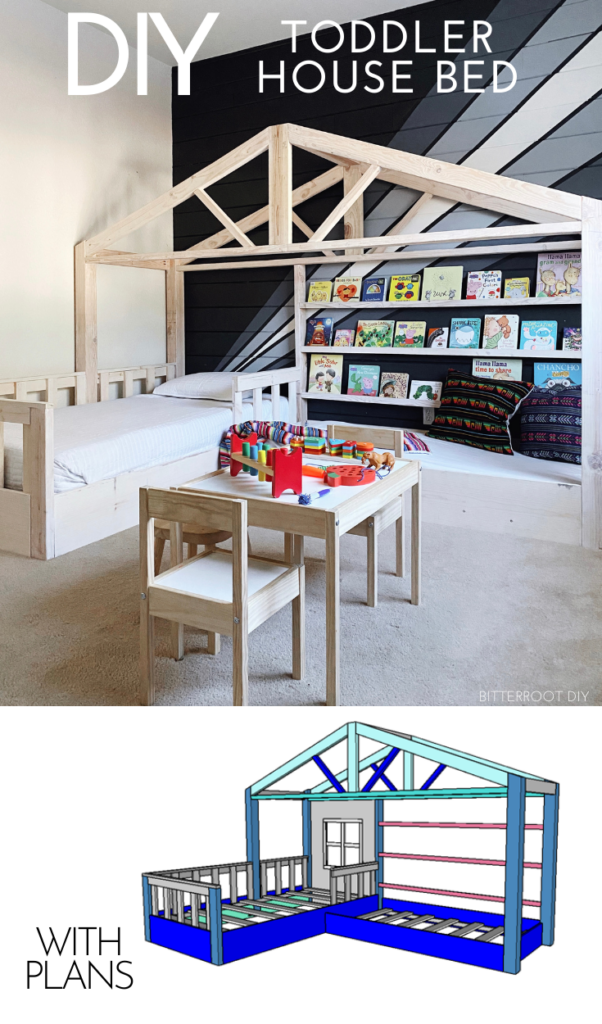
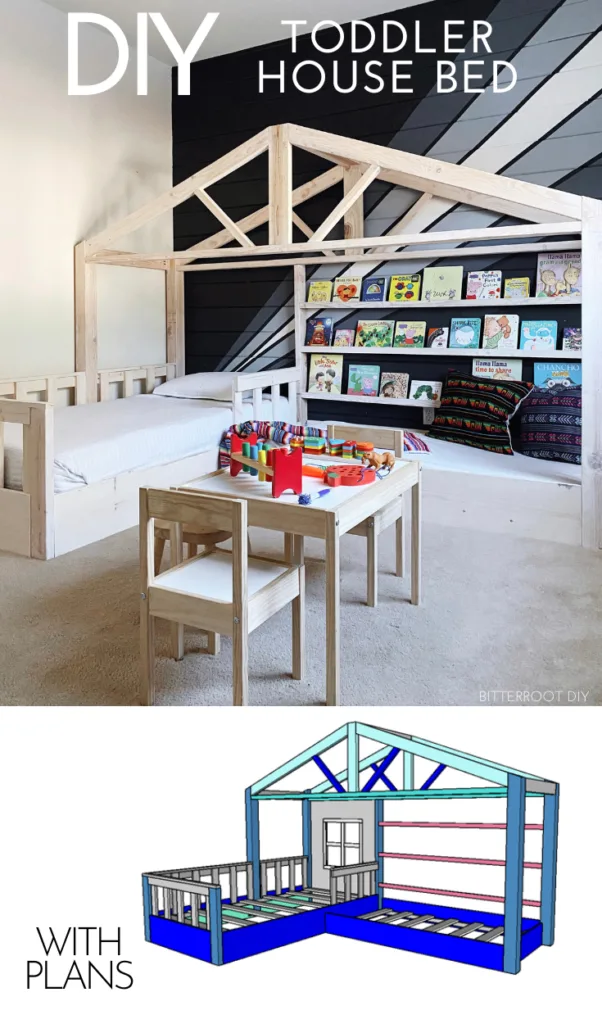
Build a DIY toddler house bed with these full plans and step-by-step instructions.

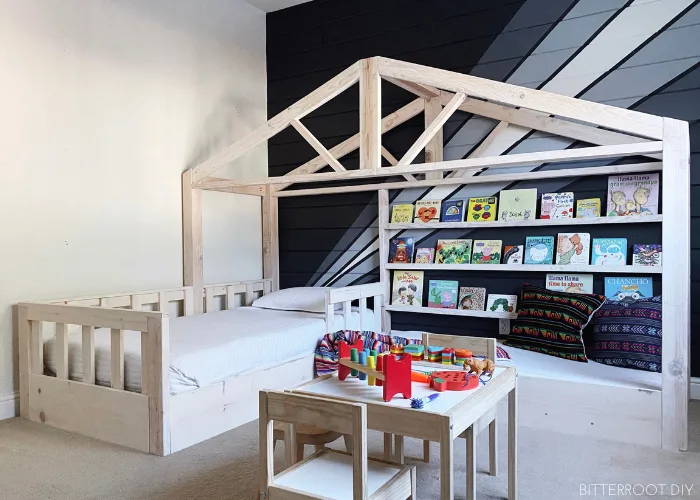
This is definitely one of the largest plan sets I’ve put together so far and I’m SO EXCITED to share it with you guys today!
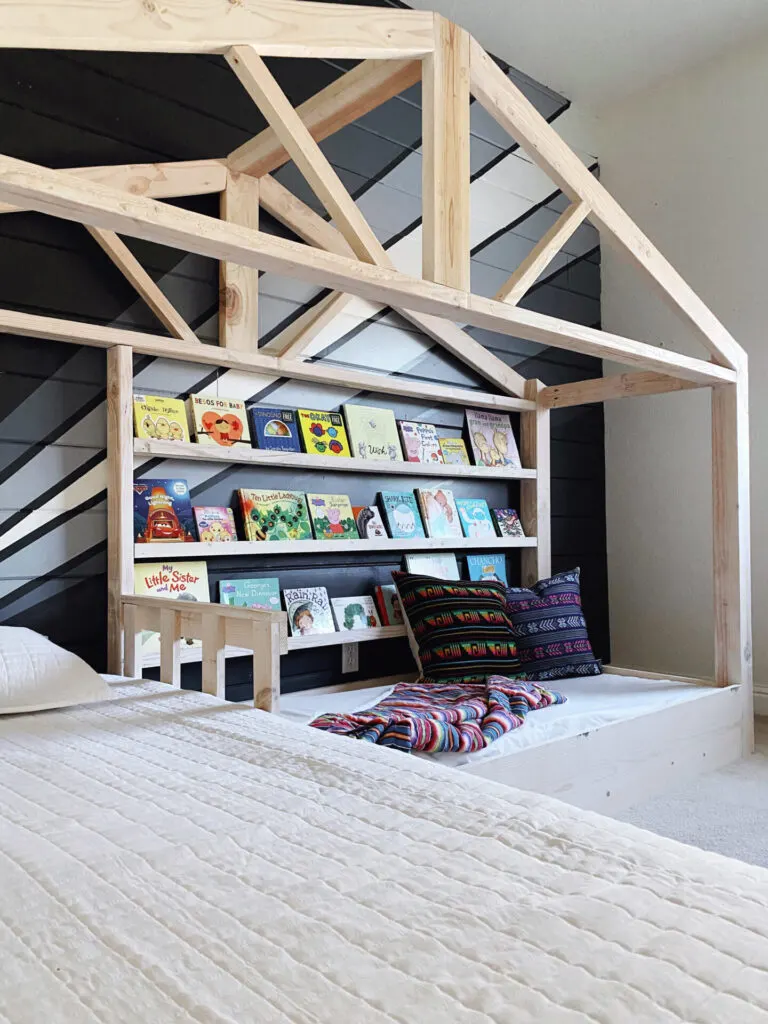
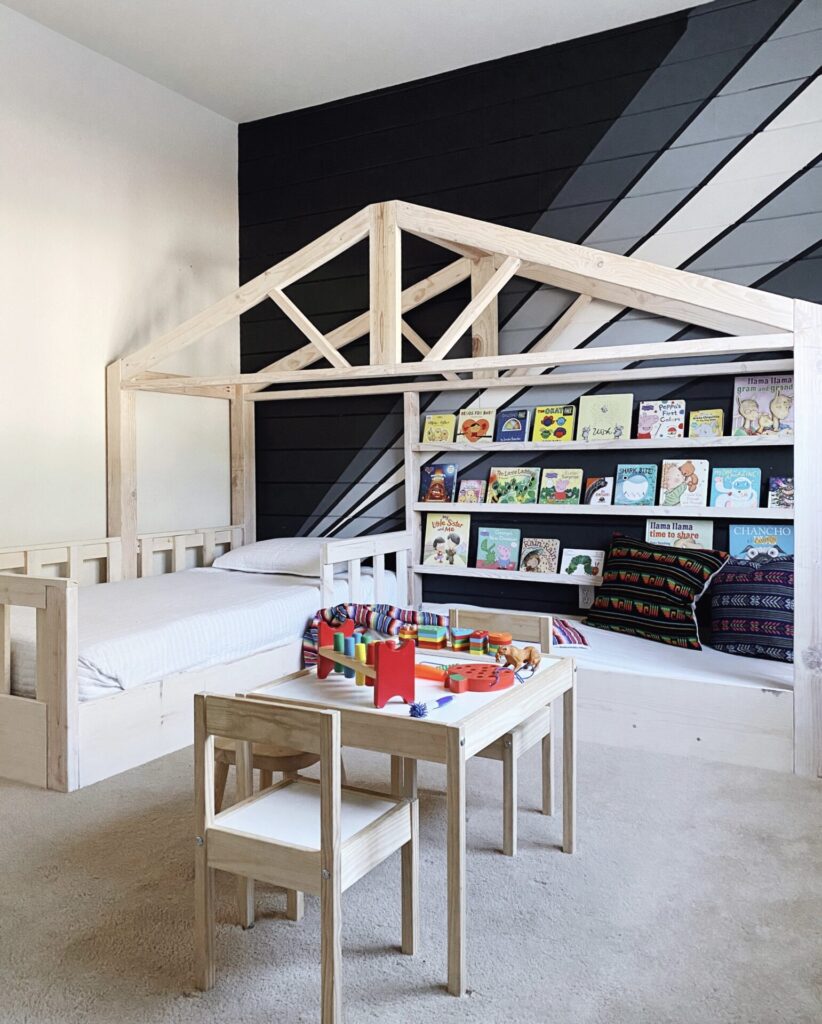
Earlier this year at Workbench Con (pre-COVID), I met Monica and Ruben – the couple behind House of Esperanza. We got to talking and they mentioned that they wanted to build a toddler house bed for their little boy but couldn’t quite figure out the design. They showed me a few inspiration photos from around the web and I was HOOKED. I offered to draw up the design and plans for them and HERE IT IS.


I’ve been waiting ALL YEAR to see this thing come to life! It’s even better than I imagined.
All credit goes to Monica and Ruben for the build and adorable toddler boy room. Check out their Instagram highlights to see the whole process.
Enjoy the plans!
** Please let me know if there are any errors in the plans and I will fix it. I’ve double and triple checked my work, but sometimes I still miss things.
- The Nugget Daybed
- Twin Mattress
- Kreg Pocket Hole Jig (that’s the one I use – there are simpler ones as well)
- Bed Rail Brackets
- Miter Saw
- Circular Saw (or Table Saw to cut plywood)
- Jigsaw
- Brad Nailer
- Orbital Sander
- Drill
- 2 1/2″ Pocket Hole Screws
- 1 1/4″ Pocket Hole Screws
- 1 1/4″ Brad Nails
- Tape Measure
- Pencil
- Safety Glasses
- Ear Protection
The lumber and cut lists for this DIY toddler house bed are available for purchase. Your purchase also includes a downloadable PDF of the plans. If you prefer, the plans are available for free in the post below – you simply have to calculate the lumber and cut lists yourself.

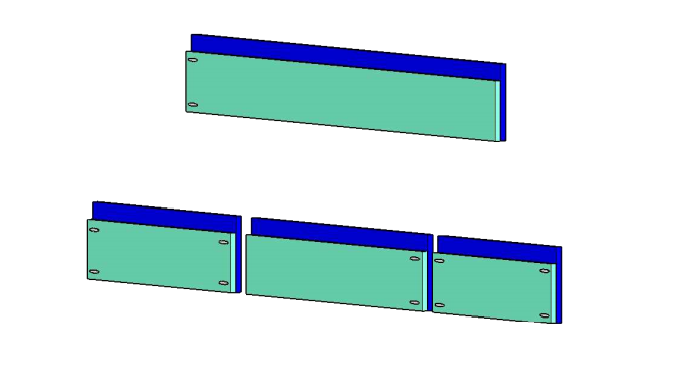
Step 1.
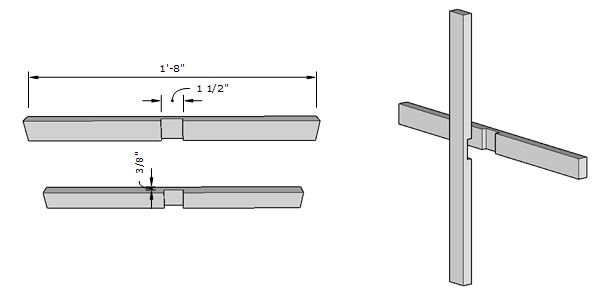
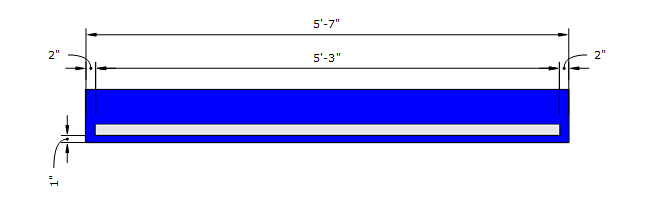
Glue the 1×10 and 1×8 rail boards together with wood glue to form the rails for the twin bed frame. Position the bottoms of the boards flush with each other and fasten the boards together. This will create a small “shelf” to set all the railing slats on later. Clamp the boards together and let the glue dry.
I recommend waiting for the glue to dry, but if you don’t want to wait, you can throw a few screws through the 1x8s into the 1x10s to hold them together.


View from the side:

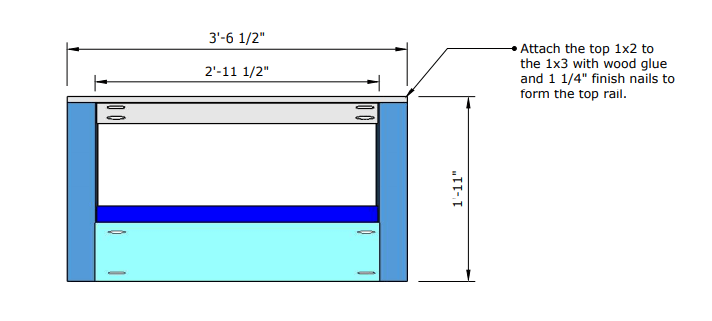
Step 2.
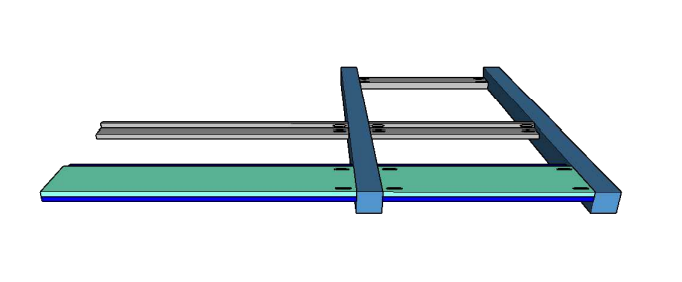
Assemble the outside leg frame for the twin bed as shown. Line the top 2×4 up with the outside top of the legs. Position the middle rail so the 1×2 is flush with the inside edge of the legs. Position the bottom rail flush with the inside of the legs. Use one pocket hole screw on the inside of the 1×3 and one on the bottom of the 1×2 to attach the rail to the legs.


View from the bottom:
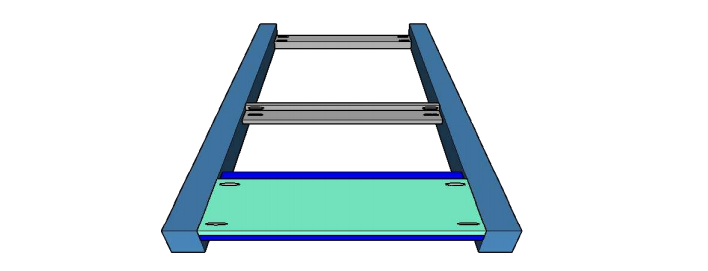

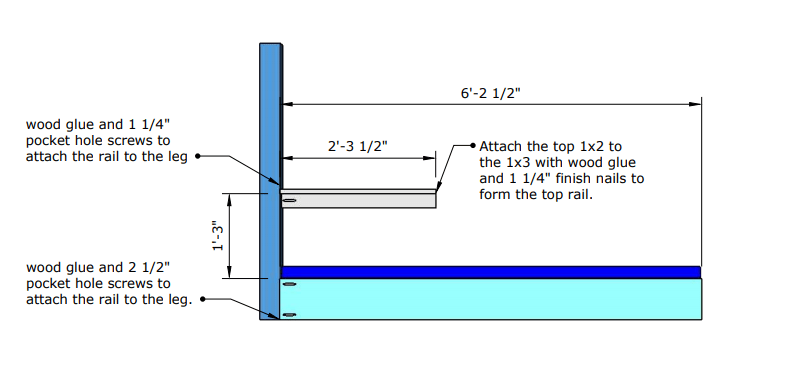
Step 3.
Attach the long top and bottom rails to the legs with wood glue and pocket hole screws. Again, use one pocket hole on the bottom of the 1×2 and one on the 1×3 to attach the top rail.


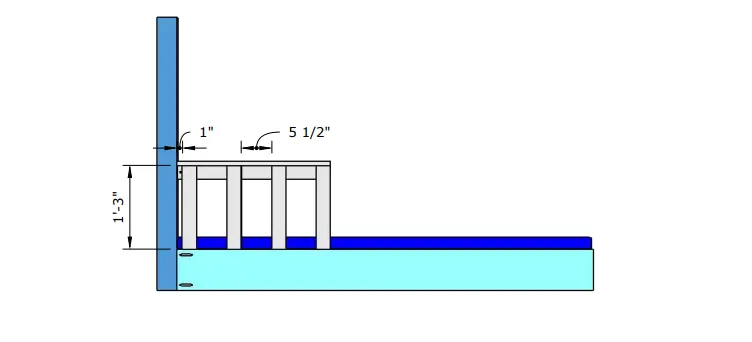
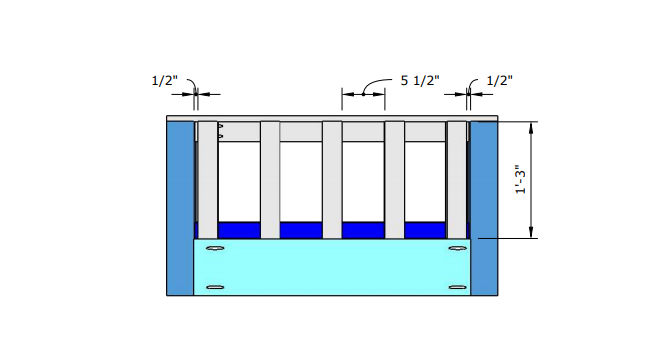
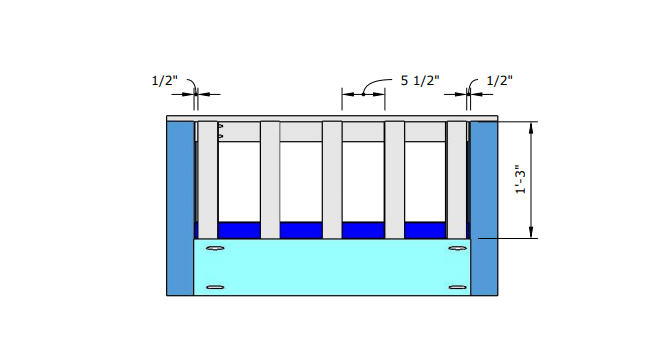
Step 4.
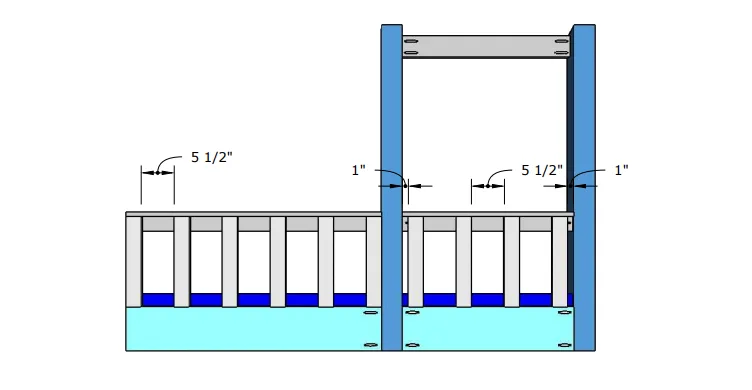
Attach the balusters to the rails with wood glue and 1 1/4″ finish nails. Use two nails on the top of each baluster and two on the bottom to secure them to the rails. Start the balusters 1″ in from the legs on the short rail and then space them 5 1/2″ apart. Start the balusters flush with the end of the longer rail and then space them 5 1/2″ apart.

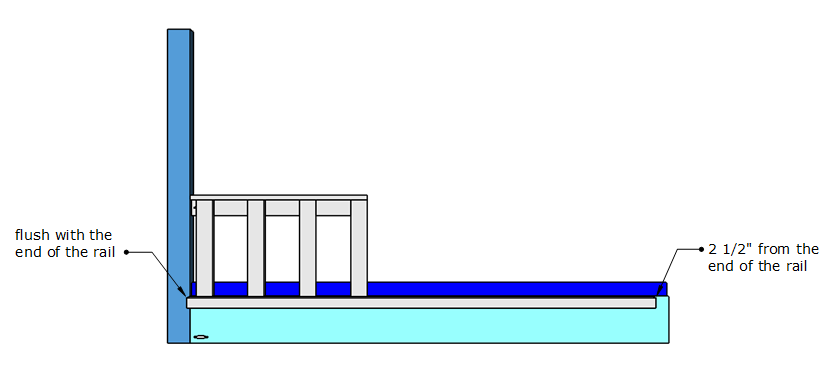
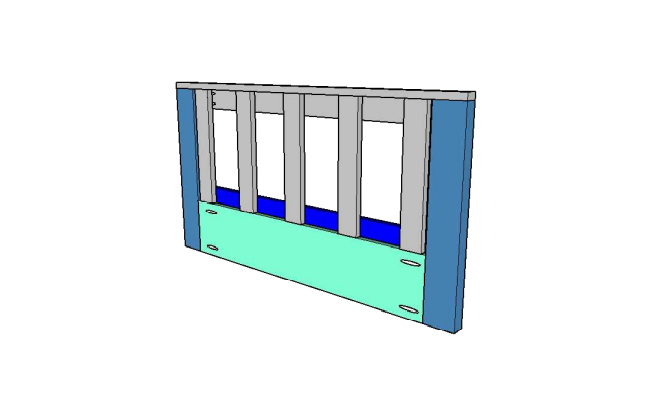
Step 5.
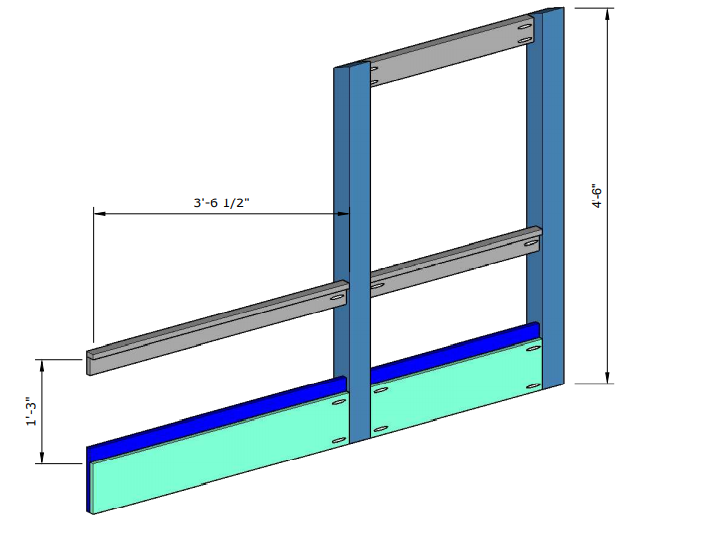
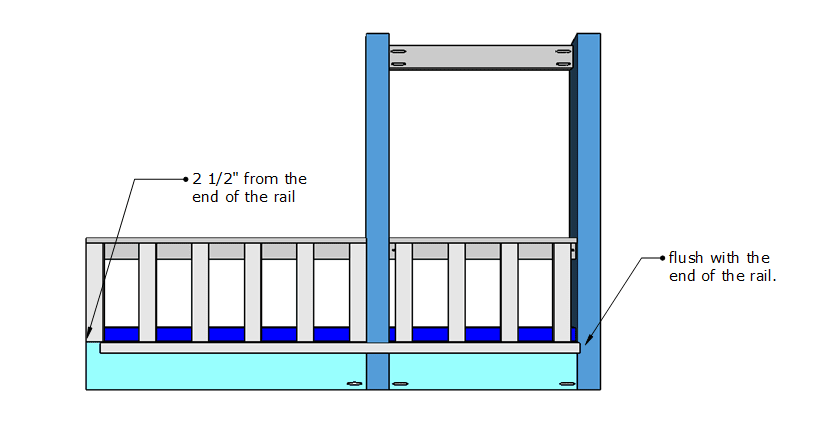
Attach the bottom 2×2 bed slat support to the rail with wood glue and 2″ screws. Line the 2×2 up so it is even with the top of the 1×8 on the rail, 2 1/2″ from the end of the rail (left side in the diagram), flush with the leg on the other side (right). This will leave room to attach the bed rail hardware.

Step 6.
Assemble the inside rail for the twin bed as shown. Line the top rail up so the top 1×2 is flush with the edges of the 2×4. Line the bottom rail up so it is flush with both sides of the 2×4.

Step 7.
Attach the 1×3 balusters to the top and bottom rail with wood glue and 1 1/4″ finish nails. Use two finish nails on the top of each board and two on the bottom.

Step 8.
Attach the bottom 2×2 bed slat support to the rail with wood glue and 2″ screws. Line the 2×2 up so it is even with the top of the 1×8 on the rail, 2 1/2″ from the end of the rail (right side in the diagram), flush with the leg on the other side (left). This will leave room to attach the bed rail hardware.
Step 9.
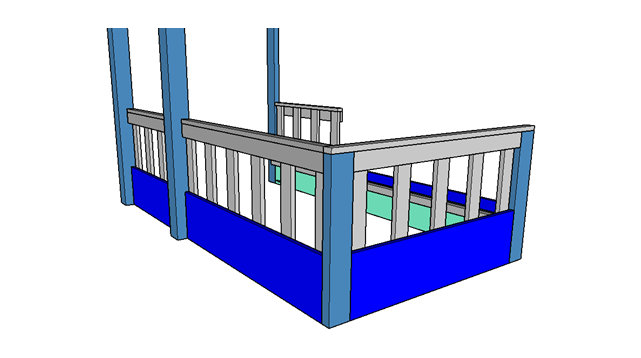
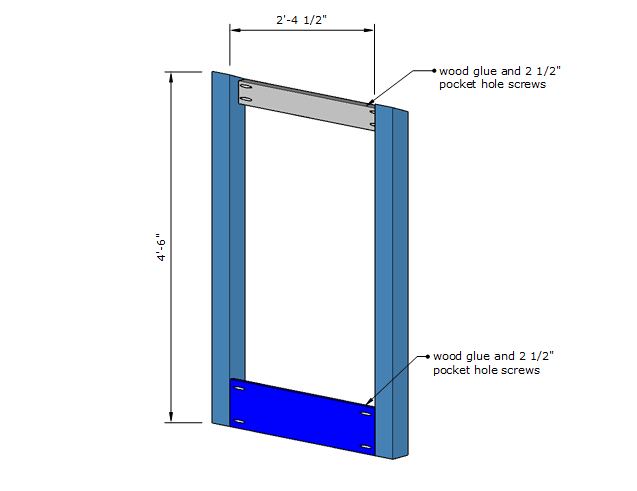
Build the footboard for the twin bed as shown above. Position the top 1×3 flush with the outside surface of the legs so the balusters will be flush with the inside of the legs in the next step. Use wood glue and pocket hole screws to attach the top and bottom rails to the legs.

Step 10.
Attach the 1×3 balusters to the top and bottom rail with wood glue and 1 1/4″ finish nails. Use two finish nails on the top of each board and two on the bottom.
Side view of the footboard:

Step 11.
Cut the 1x2s to length for the headboard window frame and then cut half laps in the center of each. Once you’ve cut the half laps join the boards together with wood glue to form the window panes.

NOTE: If you prefer NOT to add the back window section, you can use a 1×10 instead. Simply cut it to the correct width (3′ 3 1/2″) and attach it along the back with bed rail brackets or pocket holes.
Step 12.
Center the window panes in the opening you cut out of the plywood and use wood glue and pocket hole screws to attach them to the plywood. Put pocket holes on the back of the window panes to hide them. Finish the window off with 1/4″ lattice trim around the frame. Use wood glue and 3/4″ finish nails to attach it to the plywood.


Step 13.
Assemble the footboard and side rails of twin bed frame. Use bed rail brackets to make it easier to disassemble and reassemble the bed. If you prefer not to use brackets, just use two 2 1/2″ pocket hole screws on the end of the side rails to screw them to the footboard. DO NOT USE WOOD GLUE just in case you need to disassemble the bed.

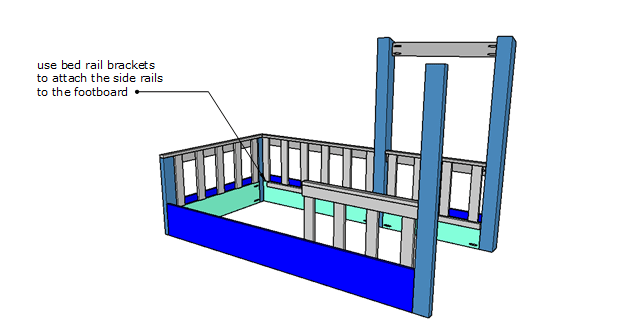
The outside of the rails should line up with the outside edge of the footboard legs, as shown below.

Step 14.
Complete the twin bed frame by attaching the plywood window to the side rails of twin bed frame. Use bed rail brackets to make it easier to disassemble and reassemble the bed. If you prefer not to use brackets, just use 1 1/4″ pocket hole screws on the sides of the plywood to attach it to the legs. DO NOT USE WOOD GLUE just in case you need to disassemble the bed.

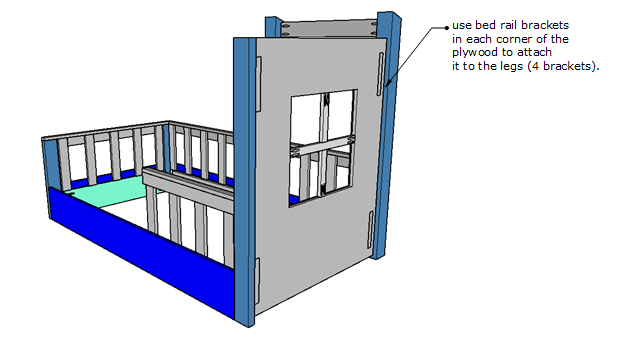
Position the plywood so it is even with the top of that center 2×4 leg. The bottom should sit 3/4″ above the ground. This is so you can get the whole piece out of just a 1/2 sheet of plywood.
Front Iso view:


Step 15.
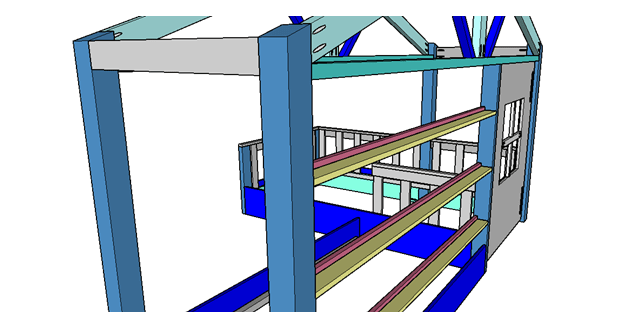
Assemble the outside leg frame for the day bed as shown. Line the top 2×4 up with the outside top of the legs. Position the bottom rail flush with the inside of the legs.

Step 16.
Attach the bottom 2×2 bed slat support to the rail for the day bed with wood glue and 2″ screws.

Repeat for both day bed rails.
Step 17.
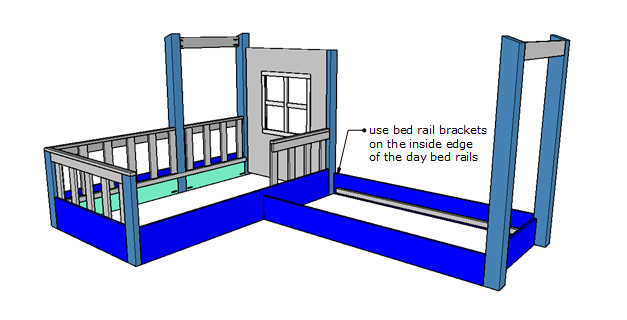
Assemble the day bed frame. Line the front and back rails up so they are flush with the outside edge of the legs. Use bed rail brackets to make it easier to disassemble and reassemble the bed. If you prefer not to use brackets, just use two 2 1/2″ pocket hole screws on the sides of the rails to attach it to the legs. DO NOT USE WOOD GLUE just in case you need to disassemble the bed.


Step 18.
Join the day bed frame to the twin bed frame. Again, use bed rail brackets to make it easy to disassemble and reassemble. If you prefer not to use brackets, use two 1 1/4″ pocket hole screws on the ends of the rails and screw it to the twin bed frame. DO NOT USE WOOD GLUE just in case you need to disassemble the bed.

Side view:

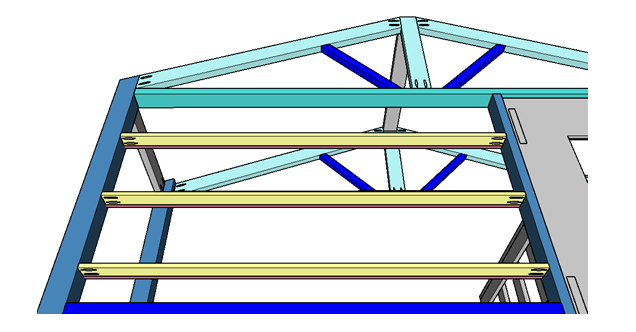
Step 19.
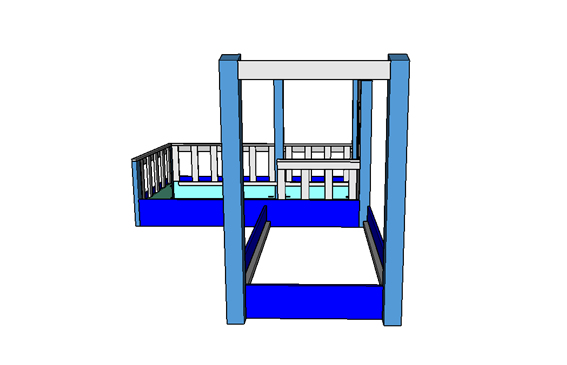
Attach the front and back bottom truss cords to the legs with wood glue and 2 1/2″ pocket hole screws.


Step 20.
Now you’re going to build the truss. Start with the back. Center the 2×2 king post along the bottom truss chord. Line it up flush with the back of the bottom chord and attach it with wood glue and 2 1/2″ finish nails. Place pocket holes along the back of the 2×2 to hide them.
Next, attach the 2×4 top chord to the king post. Use wood glue and 2 1/2″ pocket hole screws to attach it to both the leg and the king post. Again, place pocket holes along the back of the 2×4 to hide them.


Repeat for the other side of the truss.
View from the back:

Step 21.
Follow the same process to build the front truss. Again, place pocket holes along the back of the boards to hide them.

Step 22.
Join the front and back trusses together with the 2×2 ridge board. Use wood glue and 2 1/2″ pocket hole screws to attach the ridge board to the king posts.


Step 23.
Attach the 2×2 webs to the truss with wood glue and 2 1/2″ pocket hole screws. Place pocket holes along the back of the 2x2s to hide them (pocket holes are not drawn on the diagram).


Repeat for all four webs.
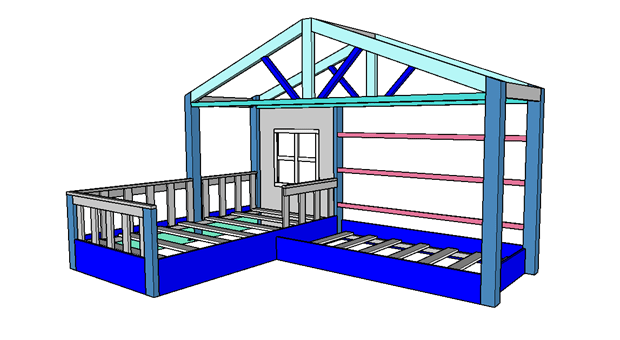
Step 24.
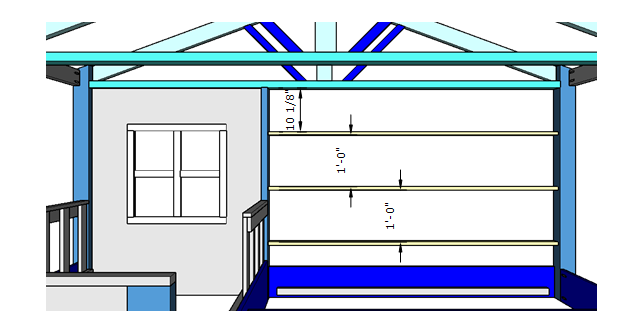
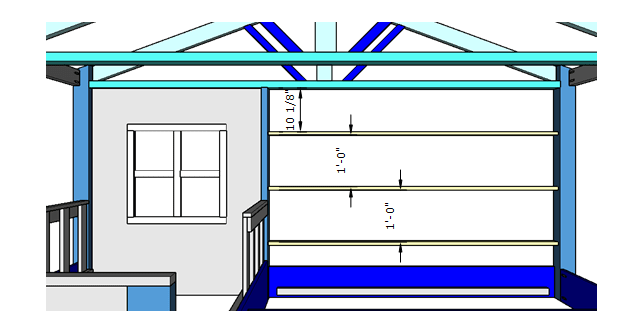
Attach the 1×3 shelves to the back legs with wood glue and 1 1/4″ pocket hole screws. Space the top shelf 10″ from the bottom truss cord. Space the next two shelves 1′ apart. Use two pocket hole screws on each end of the 1x3s and put them on the bottom of the boards to hide them.
Step 25.
Use wood glue and 2″ finish nails to attach 1x2s to the front of the shelves. Line the 1x2s up flush with the bottom of the 1x3s to finish off the front of the shelves.
Back view:

This is the view from the bottom of the shelves.

Step 26.
Use 1x4s as slats for both the twin bed and day bed. You can attach the 1x4s to the bed rails or just set them on top. Use as many as feel secure to you.

notes
Adjust the side daybed section as necessary to fit a second mattress or daybed of your choice. This design fits the nugget daybed from Nugget. They have great furniture for kiddos!
Since this is a large build, I recommend cutting the pieces to fit as you go. Small discrepancies in
cuts can add up over the whole project.
It’s best to build this bed in sections and move it into the room for final assembly. If you’re placing
this in a finished room, you may want to paint or stain it as you go as well.
Most of the pocket holes are hidden so you can disassemble the bed easily if necessary. However, if you don’t want to see the joints at all, feel free to fill them with wood plugs.
I’d love to see your take on this DIY toddler house bed, so definitely tag me and House of Esperanza in your builds over on Instagram @bitterrootdiy and @house.of.esperanza or shoot me an email at bitterroot.diy {at} gmail.com!
Please let me know if you have any questions and I’ll get back to you as soon as possible.


elyce
Saturday 12th of December 2020
is there anything she can't do? amazing.
Eva R
Friday 11th of December 2020
This is such an amazing build!
tylynn_sattler
Sunday 13th of December 2020
Didn't they do AMAZING! It turned out so cool!
Devyn
Friday 11th of December 2020
This is so awesome! What a great collaboration!!!!
tylynn_sattler
Sunday 13th of December 2020
Thanks! It was so much fun!
Monica Rockstroh
Friday 11th of December 2020
This looks SO amazing. I've loved watching Monica build this on her Instagram account and how incredible to have the step by step plans here, thank you!!
tylynn_sattler
Sunday 13th of December 2020
They did such an amazing job! It was a fun collaboration 🙂