

Introduction: How to Build an Entryway Bench


This is a simple step by step tutorial on how to build an entryway bench with cabinet storage below. If you have trouble at all throughout the process, check out my easy to follow video!
Supplies
2x4" 8 ft 1pc
1x3" 8 ft 3pcs
1/2"plywood 4x8 ft 1pc
1x12" 12 ft 1pc
Lattice strips 8 ft 2pcs
cabinet knobs 2pcs
door catches 2pcs
hinges 4pcs
pocket screws 100pcs
1/2 inch foam
1.5 yards of fabric
Step 1: Cut Four 2x4"s to 22 Inches Long


Step 2: Cut Out a Fancy Leg Design


Take one 2x4" and make a line 3 inches across from one of the short sides.
Draw another line perpendicular to that 1.5 inches from one of the long edges.
Use a circular object to trace a curved line between the two.
Use a jigsaw to cut out your design.
Use your first leg as a template for the other three, then cut those out as well.
Sand the legs smooth as necessary.
Need help? Check out the video:
Step 3: Cut the 1x3"s to Make the Basic Frame


Cut four 1x3"s to 34 inches
Cut four 1x3"s to 14 inches
Drill two pocket holes on each short side on all 8 of these boards.
Step 4: Attach the 1x3"s to the Legs


Attach the 1x3"s to the legs using wood glue and pocket screws.
I attach all of these boards 1/4 inch in from the outside edge of the legs.
Two of the 34" boards are joined flush with the top of of the legs.
Two of the 34" boards are joined 19" from the top of the legs.
(the bottom of the 1x3s are flush with the 19" line)
Two of the 14" boards are joined on the sides flush with the top of the legs.
Two of the 14" boards are joined on the sides 19" from the top of the legs.
(the bottom of the 1x3s are flush with the 19" line)
Need help? Watch the video:
Step 5: Cut a 1/2" Piece of Plywood for the Base


Measure between the bottom 1x3s and cut out a piece of 1/2 inch plywood to fit.
My plywood needed to be 15" x 39," but you should measure yours to get a perfect fit.
Step 6: Trim Notches Out of the Plywood Base


Measure the area where your legs sit. My measurement was 2.5" x 5/8"
Cut a notch this size out of each corner. I recommend sanding this piece before installing it.
Step 7: Attach the Plywood to the Base


Use wood glue and finish nails to attach the plywood flush with the top of the lower 1x3s.
You may need to trim this if you have trouble fitting the board.
If you have minor gaps, you can use wood putty to fill those and sand before moving on
Step 8: Cut a Plywood Piece for the Back


Cut a piece of 1/2 inch plywood to 34" x 16.5" tall.
drill 3 pocket holes on each of the short sides and 2 on the top.
The 3 on the sides will connect the board to the legs, and the other 2 will be used to connect the seat top later.
Step 9: Attach the Plywood to the Back


Use wood glue and 6 pocket screws to attach the plywood to the back of the bench.
Use finish nails to attach it to the top and bottom.
Make sure your pocket holes are on the inside of your bench.
Make sure two of them are on the top side to attach the seat top later.
If you have any gaps, use wood putty to fill them and sand as needed.
Step 10: Cut Two 1x12s to 14 Inches Long

These will be the cabinet doors on the bench.
Step 11: Cut Four Pieces of Lattice 14 Inches Long


These will make the stiles of your cabinet doors.
Attach these to the front of your cabinet doors with wood glue and finish nails.
They should be flush with the sides.
Step 12: Cut 4 More Pieces to Fit


Measure between the side pieces and cut four pieces of lattice to fit on the top and bottom edges of the cabinet doors.
My pieces needed to be 8 3/8" long.
Attach these to the top and bottom with wood glue and finish nails.
Need help? Watch the video!
Step 13: Cut Five 1x12s to 16.5 Inches


Cut one of these into four 2.75" strips (16" long).
Join the four 1x12s to the four strips with pocket screws and wood glue.
You can use pocket hole plugs to cover these holes, but they will be inside the bench so you don't have to if you don't want.
Next, drill two pocket holes on the sides and one on the top of ONLY TWO of your new 16.5"x14" boards.
Now is a great time to sand these with some 80 grit sandpaper.
Need help? Watch the video!
Step 14: Attach the Sides of the Bench


Attach the two 16.5"x14"boards you made to the sides of the bench. (with extra pocket holes)
I used wood glue and pocket screws on the sides and finish nails on the top and bottom.
Step 15: Hang the Doors


Attach the hinges to the doors, then hang the doors on the sides of the bench.
Step 16: Cut Another 1x3 to 34 Inches


Drill two pocket holes on one of the long sides.
Attach it to the back of the top 1x3 on the face of the bench.
I used finish nails and wood glue.
Make sure the pocket holes are facing up.
Step 17: Attach the Cabinet Dividers


Attach the last two 16.5" x 14" boards to the inside of the bench with wood glue and finish nails.
Make sure they are flush with the outside of cabinet doors.
Need help? Watch the video.
Step 18: Cut a Piece of Plywood for the Seat Top


Cut your 1/2 inch ply wood to 17" x 41"
Trim the corners and sand the sharp edges off the board.
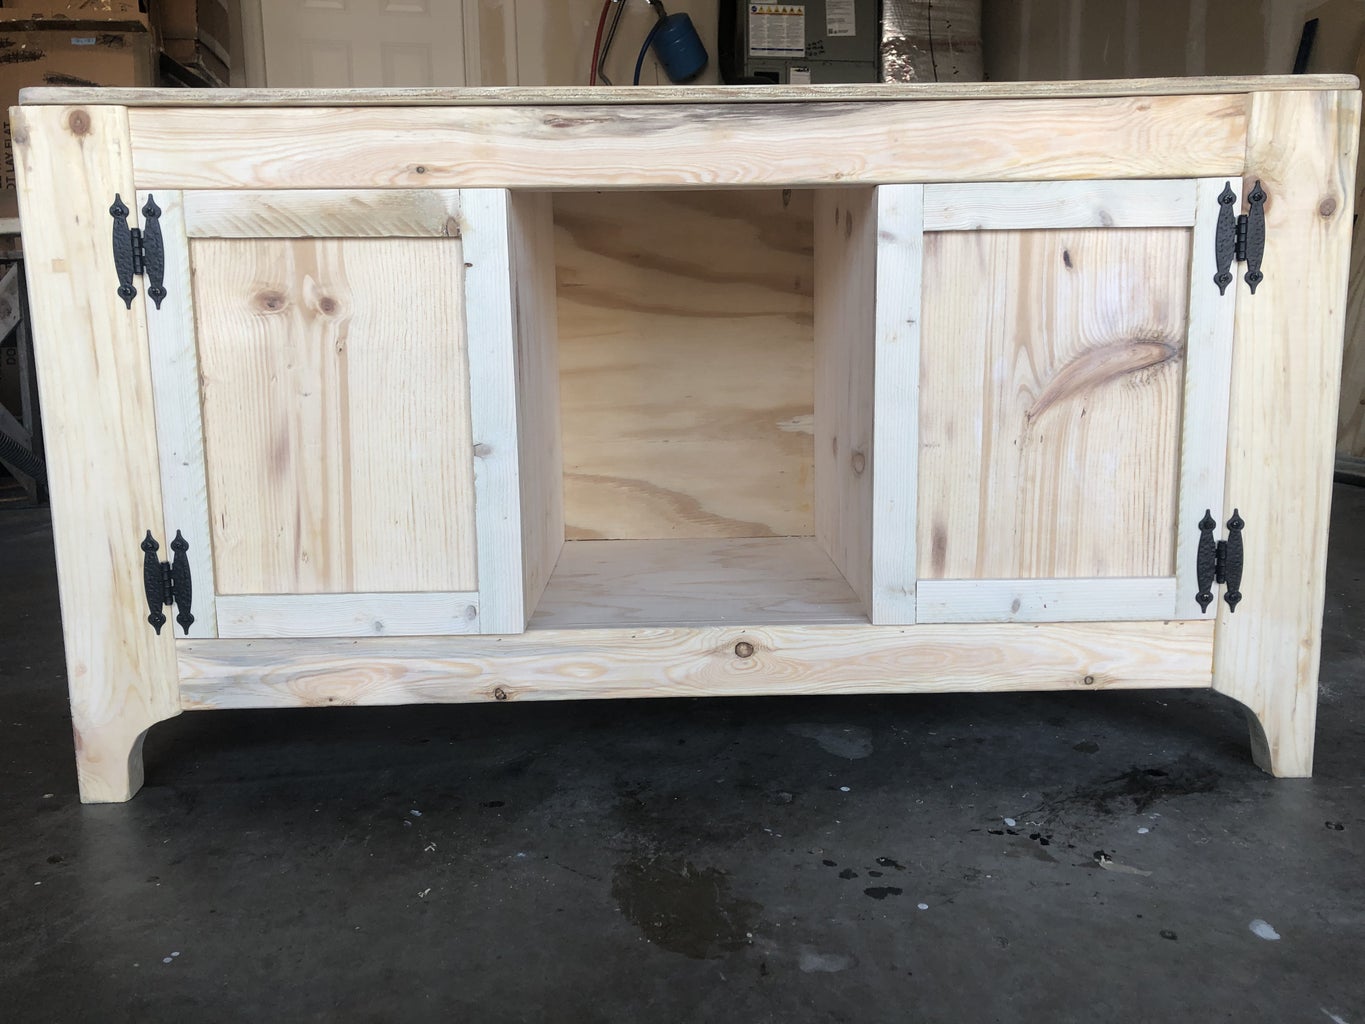
Step 19: Here's a Look Before You Add a Finish

Step 20: Make the Seat


Cut a piece of foam that extends about 1 inch past each side of the 17" x 41" plywood cut out earlier.
Cut a piece of fabric that extends 3-4 inches past each side of the same board.
If you have foam thicker than 1/2 inch, you may need to cut the fabric a little larger.
Place the foam on top of the seat, and the fabric on top of the foam.
Lay these items together on their back carefully.
Stretch the fabric tight and staple it to the back out the plywood.
Need help? Watch the video:
Step 21: Finish As Desired


I used a dark walnut stain and a gloss laquer spray-on clear coat.
Step 22: Reinstall the Doors


Now is also a good time to install the cabinet knobs and door catches.
Step 23: Attach the Seat Top


Use the 6 pocket holes made throughout the project to connect the seat top to the bench.
Be careful not to use screws that are too long.
Step 24: Enjoy Your New Entryway Bench!


If you need help on this project, check out my video to watch the build!


