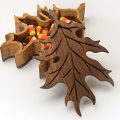
Pay big bucks for wooden sunglasses? No way! Make your own for under $10
By Steve Carmichael
Download the PatternThe first time I saw a pair of wooden sunglasses, I knew I had to make some. After lots of experimentation, I made several pairs that I can actually wear.
I began my research by examining the wooden sunglasses at stores. They are made from both solid and laminated wood, although laminated wood seems to be the most prevalent for strength. Some companies even cut sunglasses out of laminated skateboards. I tried many methods, but the one that worked best for me is using a simple bent lamination technique to create wayfarer-style sunglasses.
Getting Started
Acquire lenses and hinges prior to beginning this project so you can make the frames suit them. You can repurpose them from old sunglasses or purchase them from sunglasses parts suppliers (see Special Sources on page 27). Measure the thickness of the lenses; mine were 3/32″ (2.5mm) thick.
Cutting the Frames |
|
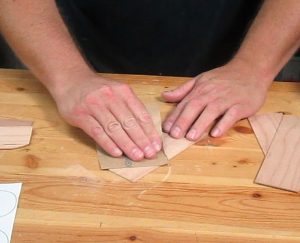 |
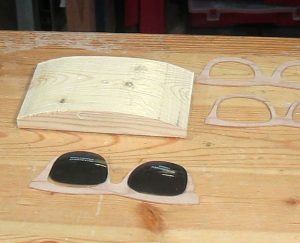
Step 1: Resaw the wood for the frames. Make the pieces the same thickness as the lenses. Cut the pieces to size and sand them smooth. I use three pieces for the frames and two to three pieces for the temples, depending on how thick you want the temples to be. |
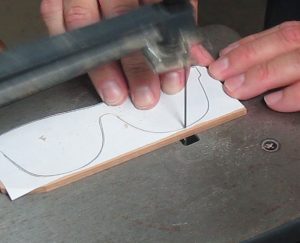 |
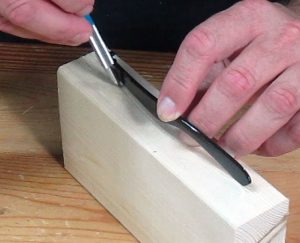
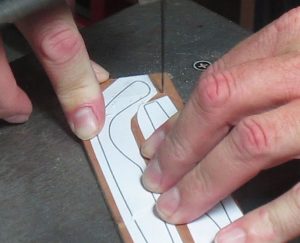
Step 2: Stack the three frame pieces together and secure with tape. (See page 70 for stacking instructions.) Attach the pattern to the top and cut the perimeter of the pattern with a scroll saw. Separate the stack but don’t remove the pattern. |
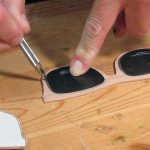 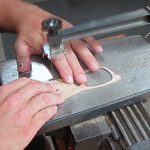 |
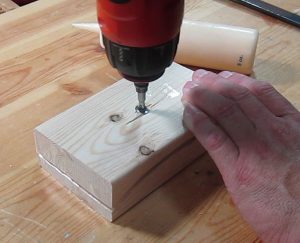
Step 3: Trace the lenses onto the middle layer. Drill blade-entry holes and cut the lens openings. The lenses should fit inside the openings with a little wiggle room around them. |
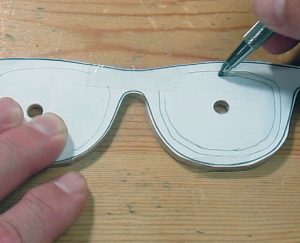 |
Step 4: Secure the two remaining frame blanks together. Trace the lenses onto the pattern, and then draw another line about 1/8″ (3mm) inside that line. The openings in the front and back frame pieces need to be smaller to hold the lenses in place. Cut the openings and sand them smooth. |
Gluing Up the Frames |
|
 |
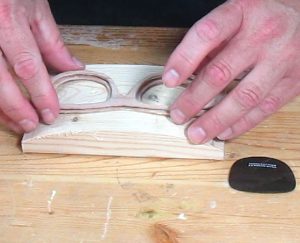
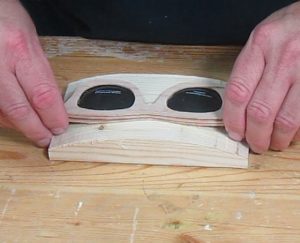
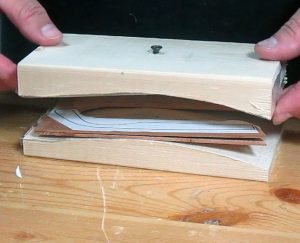
Step 5: Trace the arc from an old pair of sunglasses onto a piece of 2×4. Cut the 2×4 along this line. Drive a long screw through the 2×4 below where you expect the nosepieces to be, and then remove the screw. Cover the inside of the form with packaging tape so the form will not stick to the frames. |
 |
Step 6: Spread a thin layer of wood glue on the bottom frame piece and place it on the form. Avoid using too much glue. Align the middle piece with the bottom piece. Set the lenses in place. |
 |
Step 7: Apply a thin layer of glue to the bottom of the top piece and place it in position. Position the stack on the form so the screw hole is in the middle of the frame below the nosepiece. |
 |
Step 8: Carefully position the top of the form on the stack. Make sure the screw is lined up with the screw hole in the bottom of the form. Screw it down slowly to bend the frames into shape, making sure the frame pieces do not slip out of place. This step requires patience. Secure the form with clamps. |
Making the Temples |
|
 |
Step 9: Make a second form for the left and right temples. Use a 2×4 and the techniques explained in Step 5. |
 |
Step 10: Stack and secure the blanks for the temples. Attach the patterns to the top. Cut around the temple pieces, but leave excess around them at this time. Separate the stacks. |
 |
Step 11: Glue the two pairs of temple pieces together. Clamp them in the form, leaving space between them for the screw. Make sure one pair is flipped over, because the left and right temples bend in opposite directions. Make sure the pieces do not slip out of place as you tighten the screw. Add clamps to secure the form. Allow the glue to dry. |
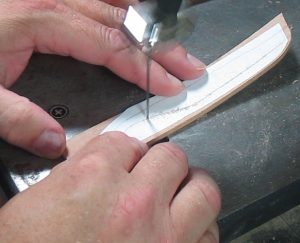 |
Step 12: Remove the pieces from the forms. Peel off any glue from the lenses. Cut the temples to their final shape; I put a reversed version of the pattern on the underside of one of the temples so you can cut them with the ends bending upward. |
Assembling the Glasses |
|
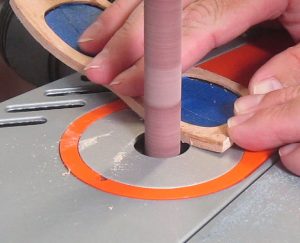 |
Step 13: Cover the lenses with blue painter’s tape. Sand and shape the frames and temples. Use a rotary tool with a sanding drum. |
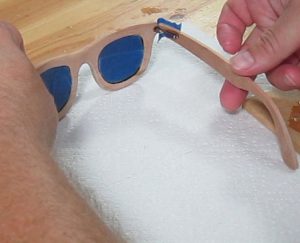 |
Step 14: Use hinges to attach the temples to the front frames. I use epoxy to attach spring hinges cut from metal reading glasses, or you can use any eyeglass hinges. Make sure the temples are in the correct position and the sunglasses lay flat on the table during glue up. Do not glue the hinges shut. Apply mineral oil or a beeswax finish; some other finishes can irritate the skin. |
Materials:
• Hardwood, 3/32″ (2.5mm) thick*: 5 each, 2 1/2″ x 6″ (6.4cm x 15.2cm)
• Construction 2×4: gluing forms, assorted scraps
• Sunglasses hardware: lenses, hinges
• Wood glue
• Tape: packaging, blue painter’s
• Epoxy
• Sandpaper
• Finish, such as mineral oil or beeswax
• Wood screw, long: 2 each
• Sunglasses, old (sample)
Tools:
• Band saw or table saw
• Scroll saw blades: #3 reverse-tooth
• Drill with bits: assorted
• Rotary tool with a sanding drum
• Screwdriver
• Clamps
* Thickness of wood should match thickness of lenses
SPECIAL SOURCES: The author buys sunglasses at “dollar” stores to disassemble for parts. lenses are available from fuselenses.com.
About the Author
Steve Carmichael has been woodworking since childhood and he resides in Atlanta, Ga., with his wife and three children. Look up his YouTube channel “The Carmichael Workshop” and visit his website at www.TheCarmichaelWorkshop.com for this and more fun projects.
 |
Buy the Magazine
• For more articles like this, subscribe to Scroll Saw Woodworking & Crafts magazine. • Plus! Get digital mini magazines in your e-mail between printed issues. Subscribe to our free e-newsletter, Short Cuts.
|