DIY Small Chicken Coop
Well hello there everyone! Are you all going bananas at home as I am? I have tried to put my downtime and energy into some homesteading projects while being quarantined, and this DIY small chicken coop for my rooster is the latest one!
I will have plans for a DIY large chicken coop available at the end of this month…hopefully! It is framed out, with siding and a roof… but not finished yet because I had to whip this up quickly in the middle of building it! 😆 It is 8’x8′ with an attached run that is 6’x16’…a nice size coop for a backyard flock of ladies! Lol! I cannot wait to complete it! Update: I completed it and have the plans for you! DIY Large Chicken Coop Plans
I did as a LOT of people did when the store shelves were void of eggs, I purchased 20 pullets (baby hens) so that I could have my own eggs! I am also very particular and want MY kind of eggs, I buy pasture-raised, soy-free, organic eggs and I do not want to have to lower my standards on the eggs we eat, so I figured it was time to bite the bullet and start raising my own! I have only wanted to do this for the past 13 years! Lol!
In the middle of raising my 20 pullets, I decide that you know what, “I love these ladies so much, I want to have more chicks, not just eggs!” So I contacted the lady that I bought my babies from and sure enough, she had a juvenile rooster for me to buy! Woohoo!
Well you see, as I was loading him into my car, she reminds me that the rooster cannot be near the chicks bc he is old enough he will try to breed them and that will kill them!😲Uh-oh! He was going to forage the backyard until I had the coop ready…shows you what an inexperienced chicken farmer I am!😂😂
So out to Home Depot, we ran with Richard in tow, that’s his name, by the way, so that when he is acting like a dick, and we call him Dick, it’s just part of his name! Lol! So far he is sweet as can be and not a dick at all, but he also isn’t protecting hens yet so that means nothing!😆
Long story short, we had to whip this small chicken coop up as fast as possible so that Richard wasn’t stuck in his dog crate! 😅 I actually had a blast building this with my boys helping! The 3 of us together whipped it up in one and a half days. I spent another half day figuring out a few areas I wasn’t sure of but you won’t have to spend time on that because I have figured it out for you in the DIY Small Chicken Coop Plans! Woot Woot!
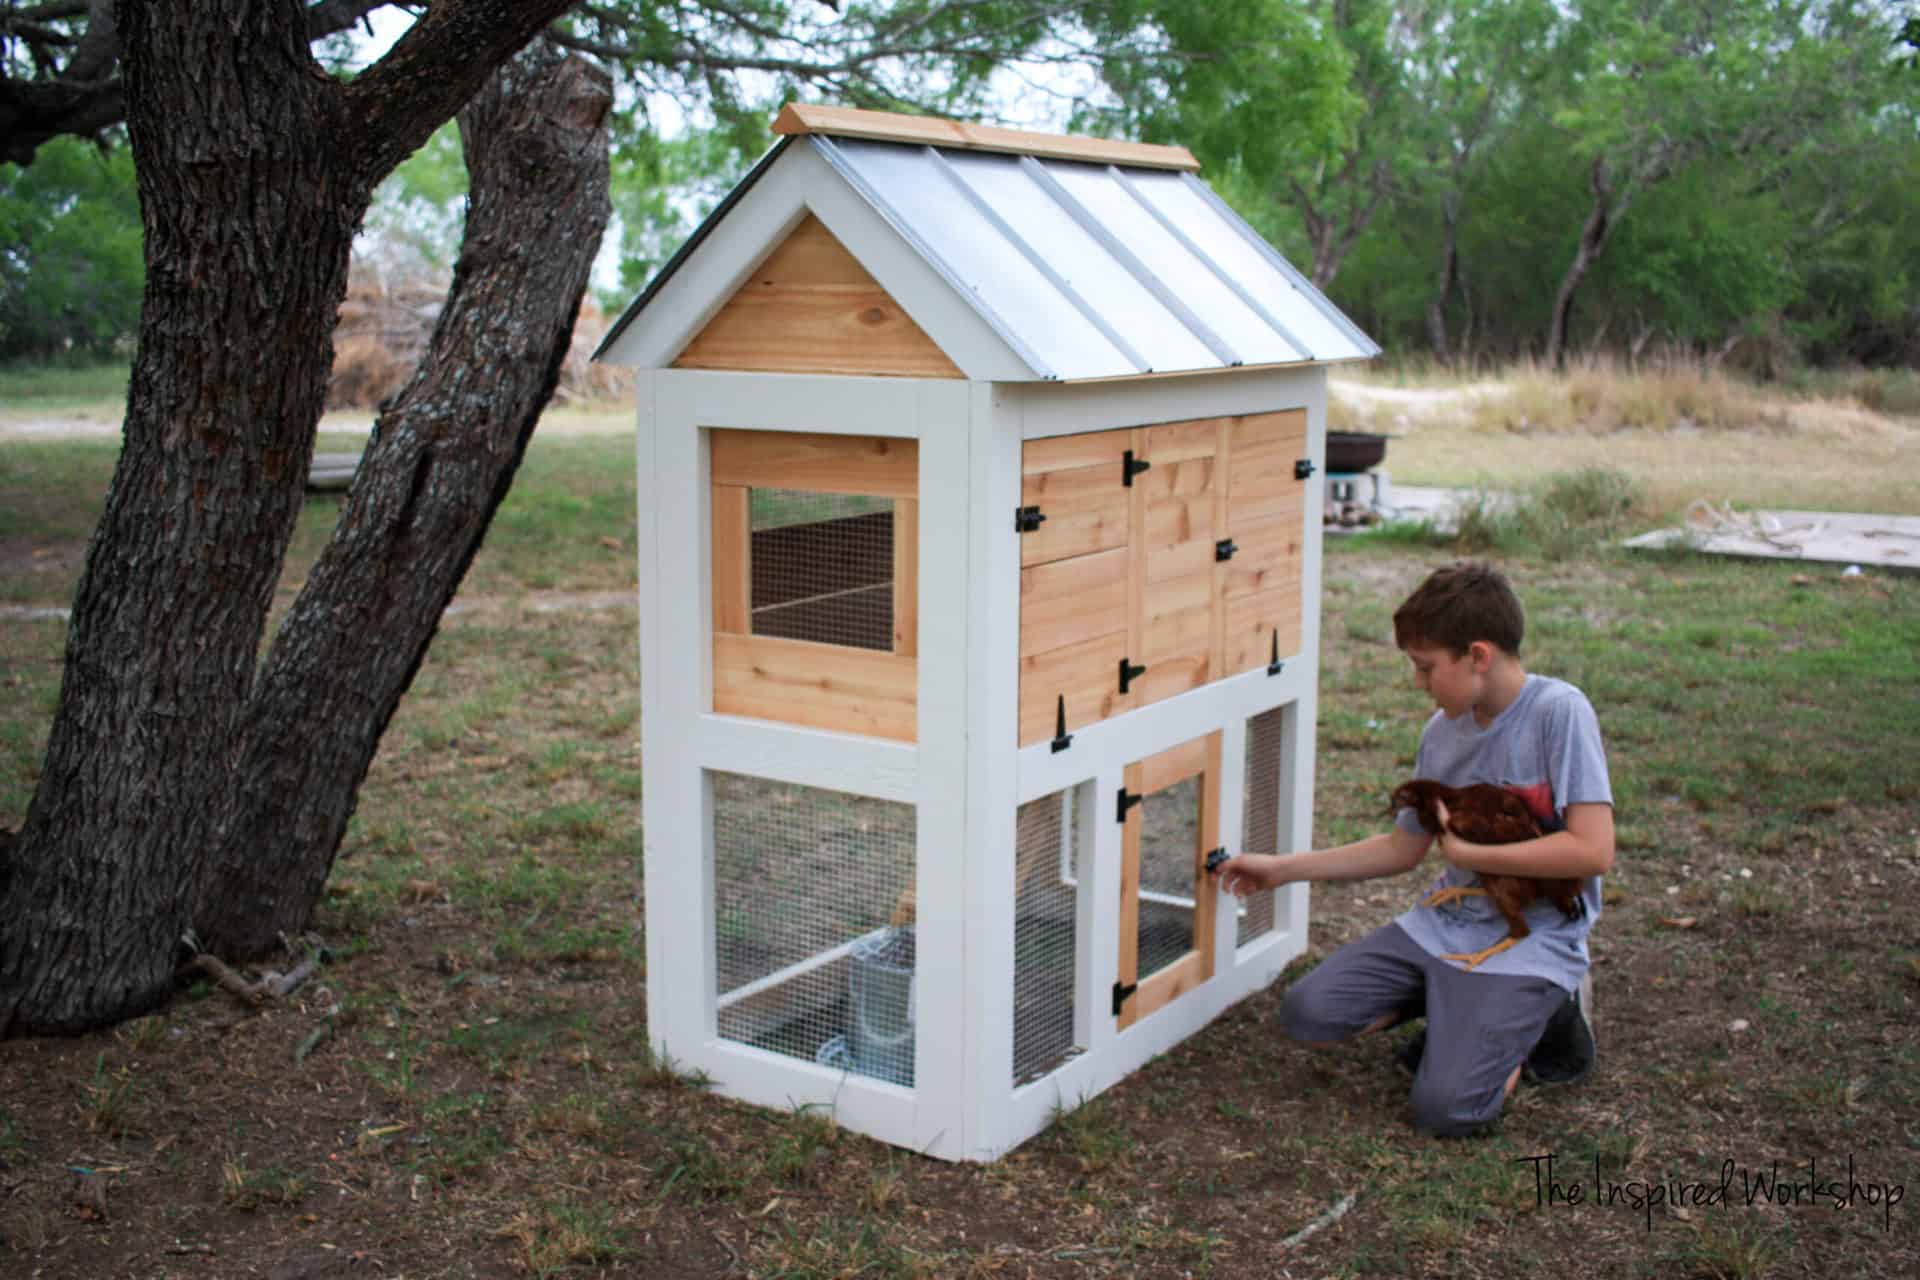
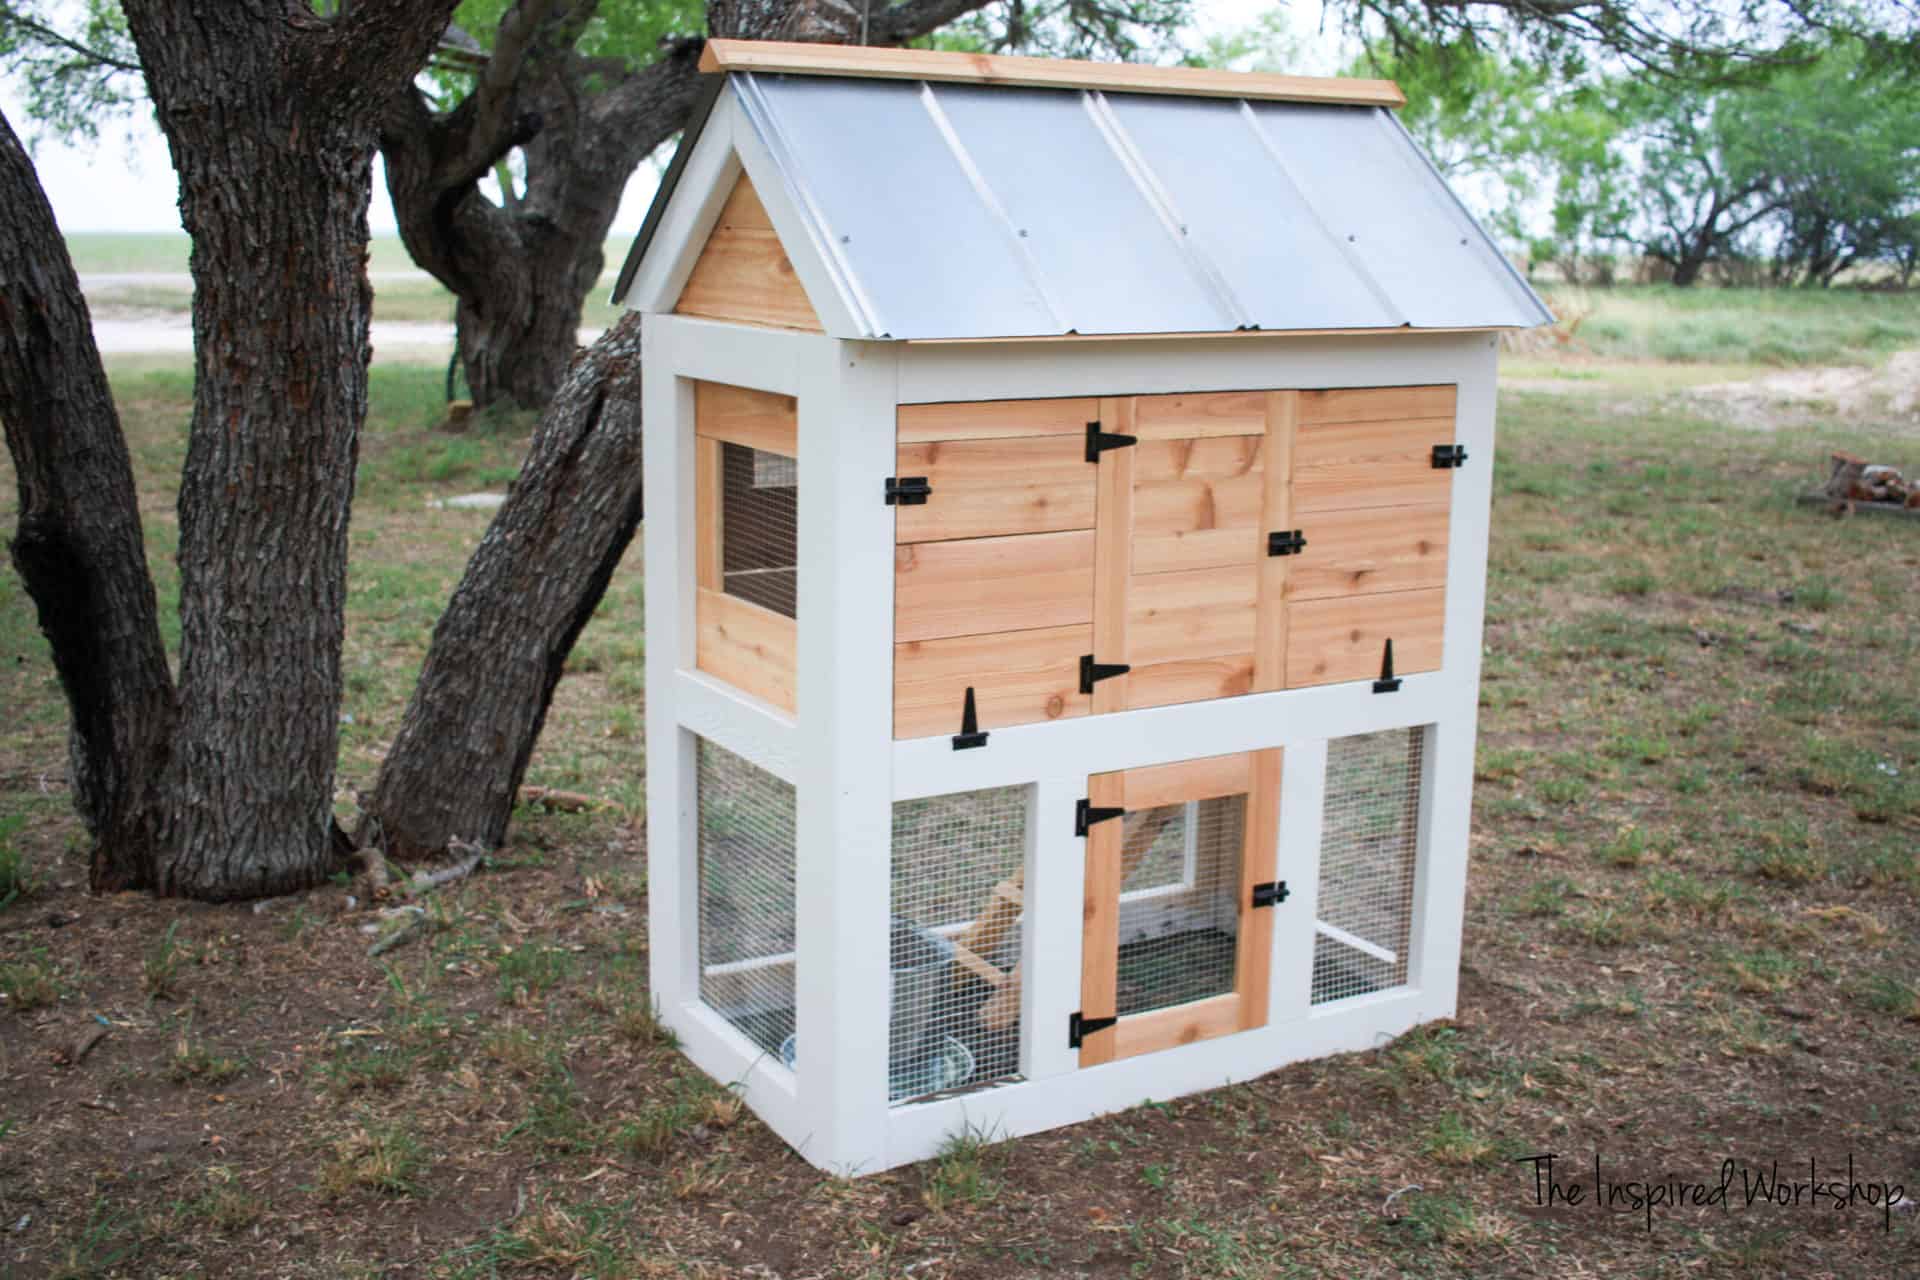
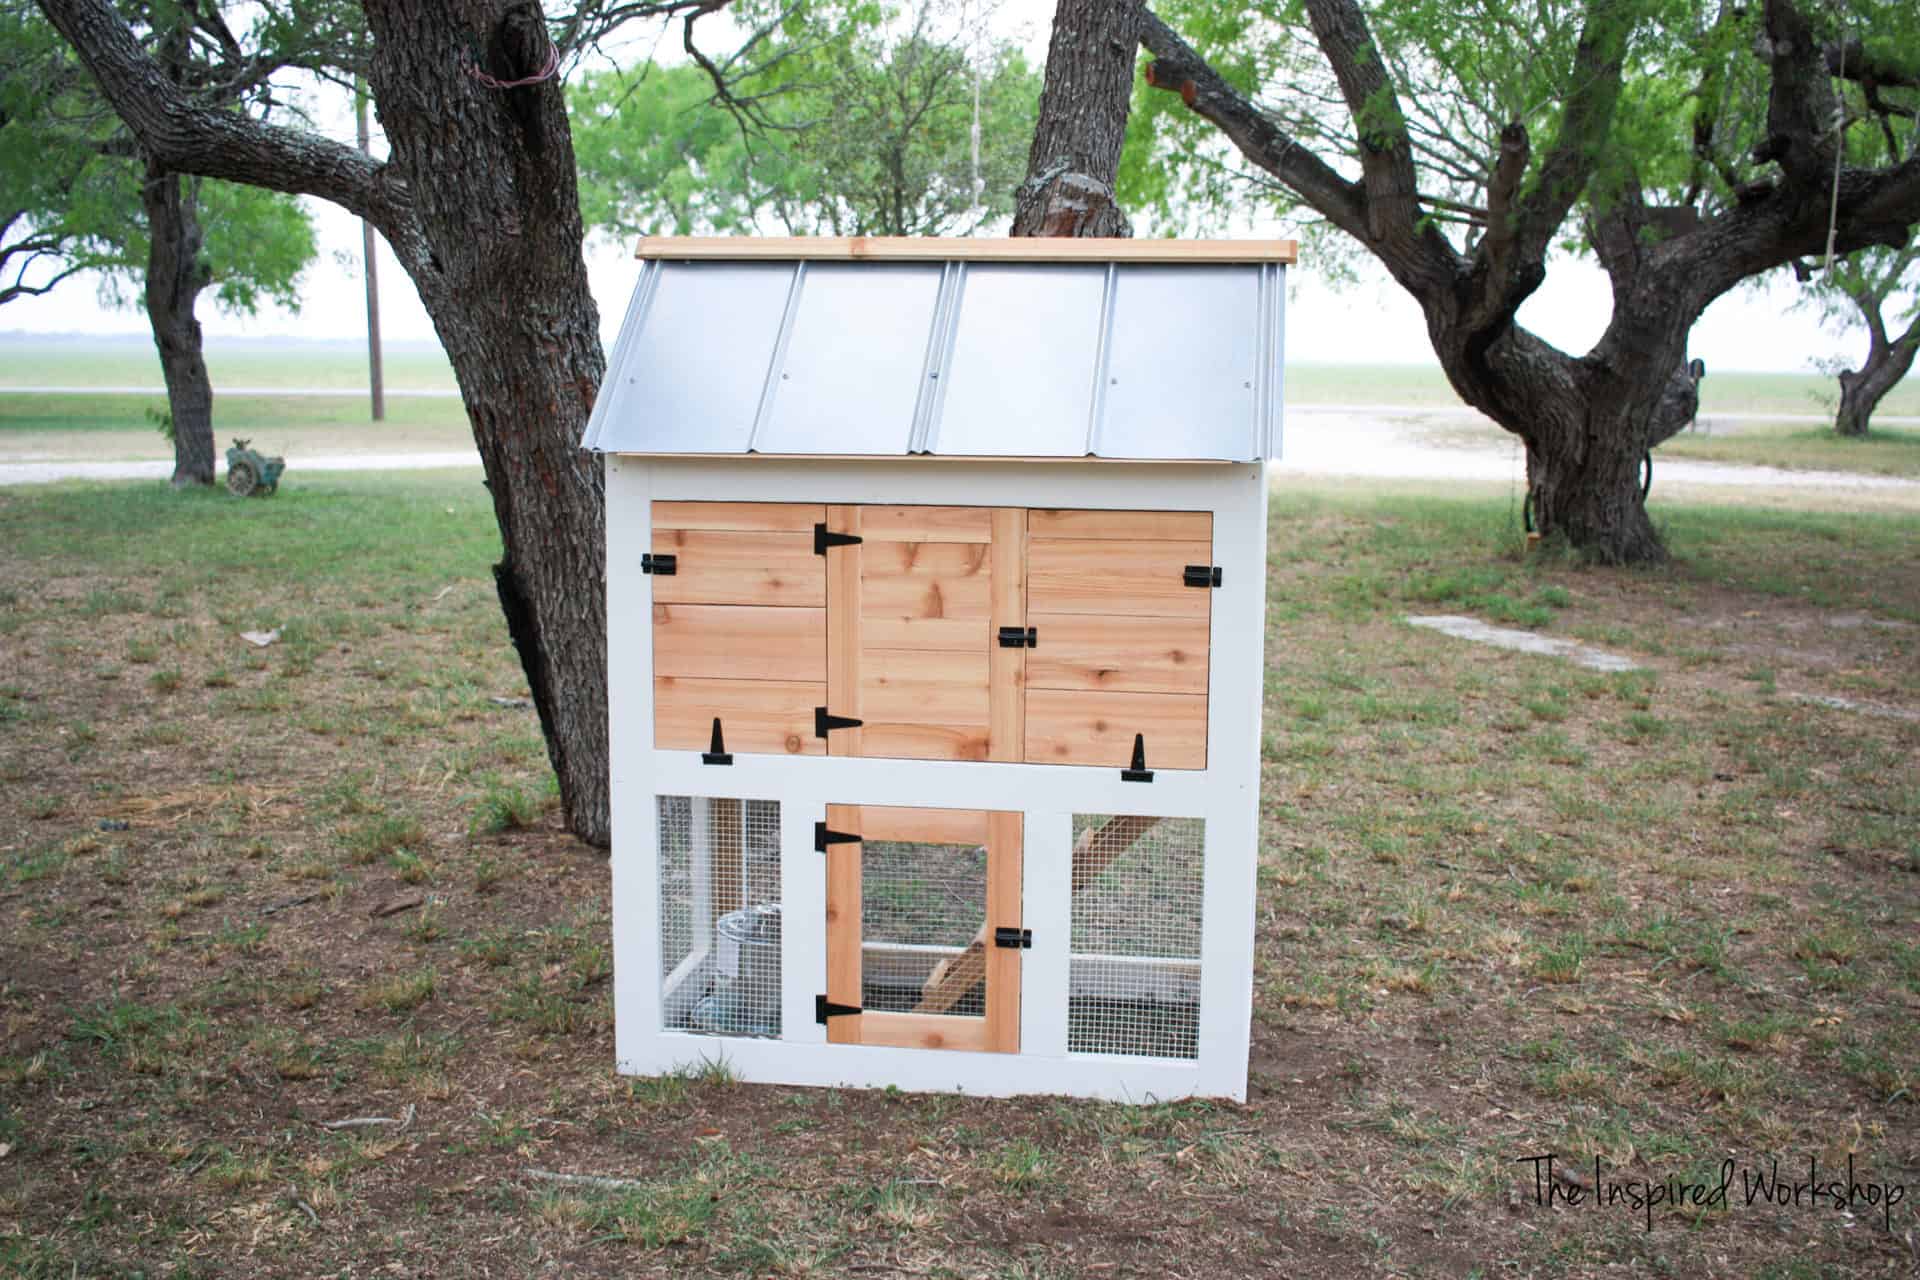
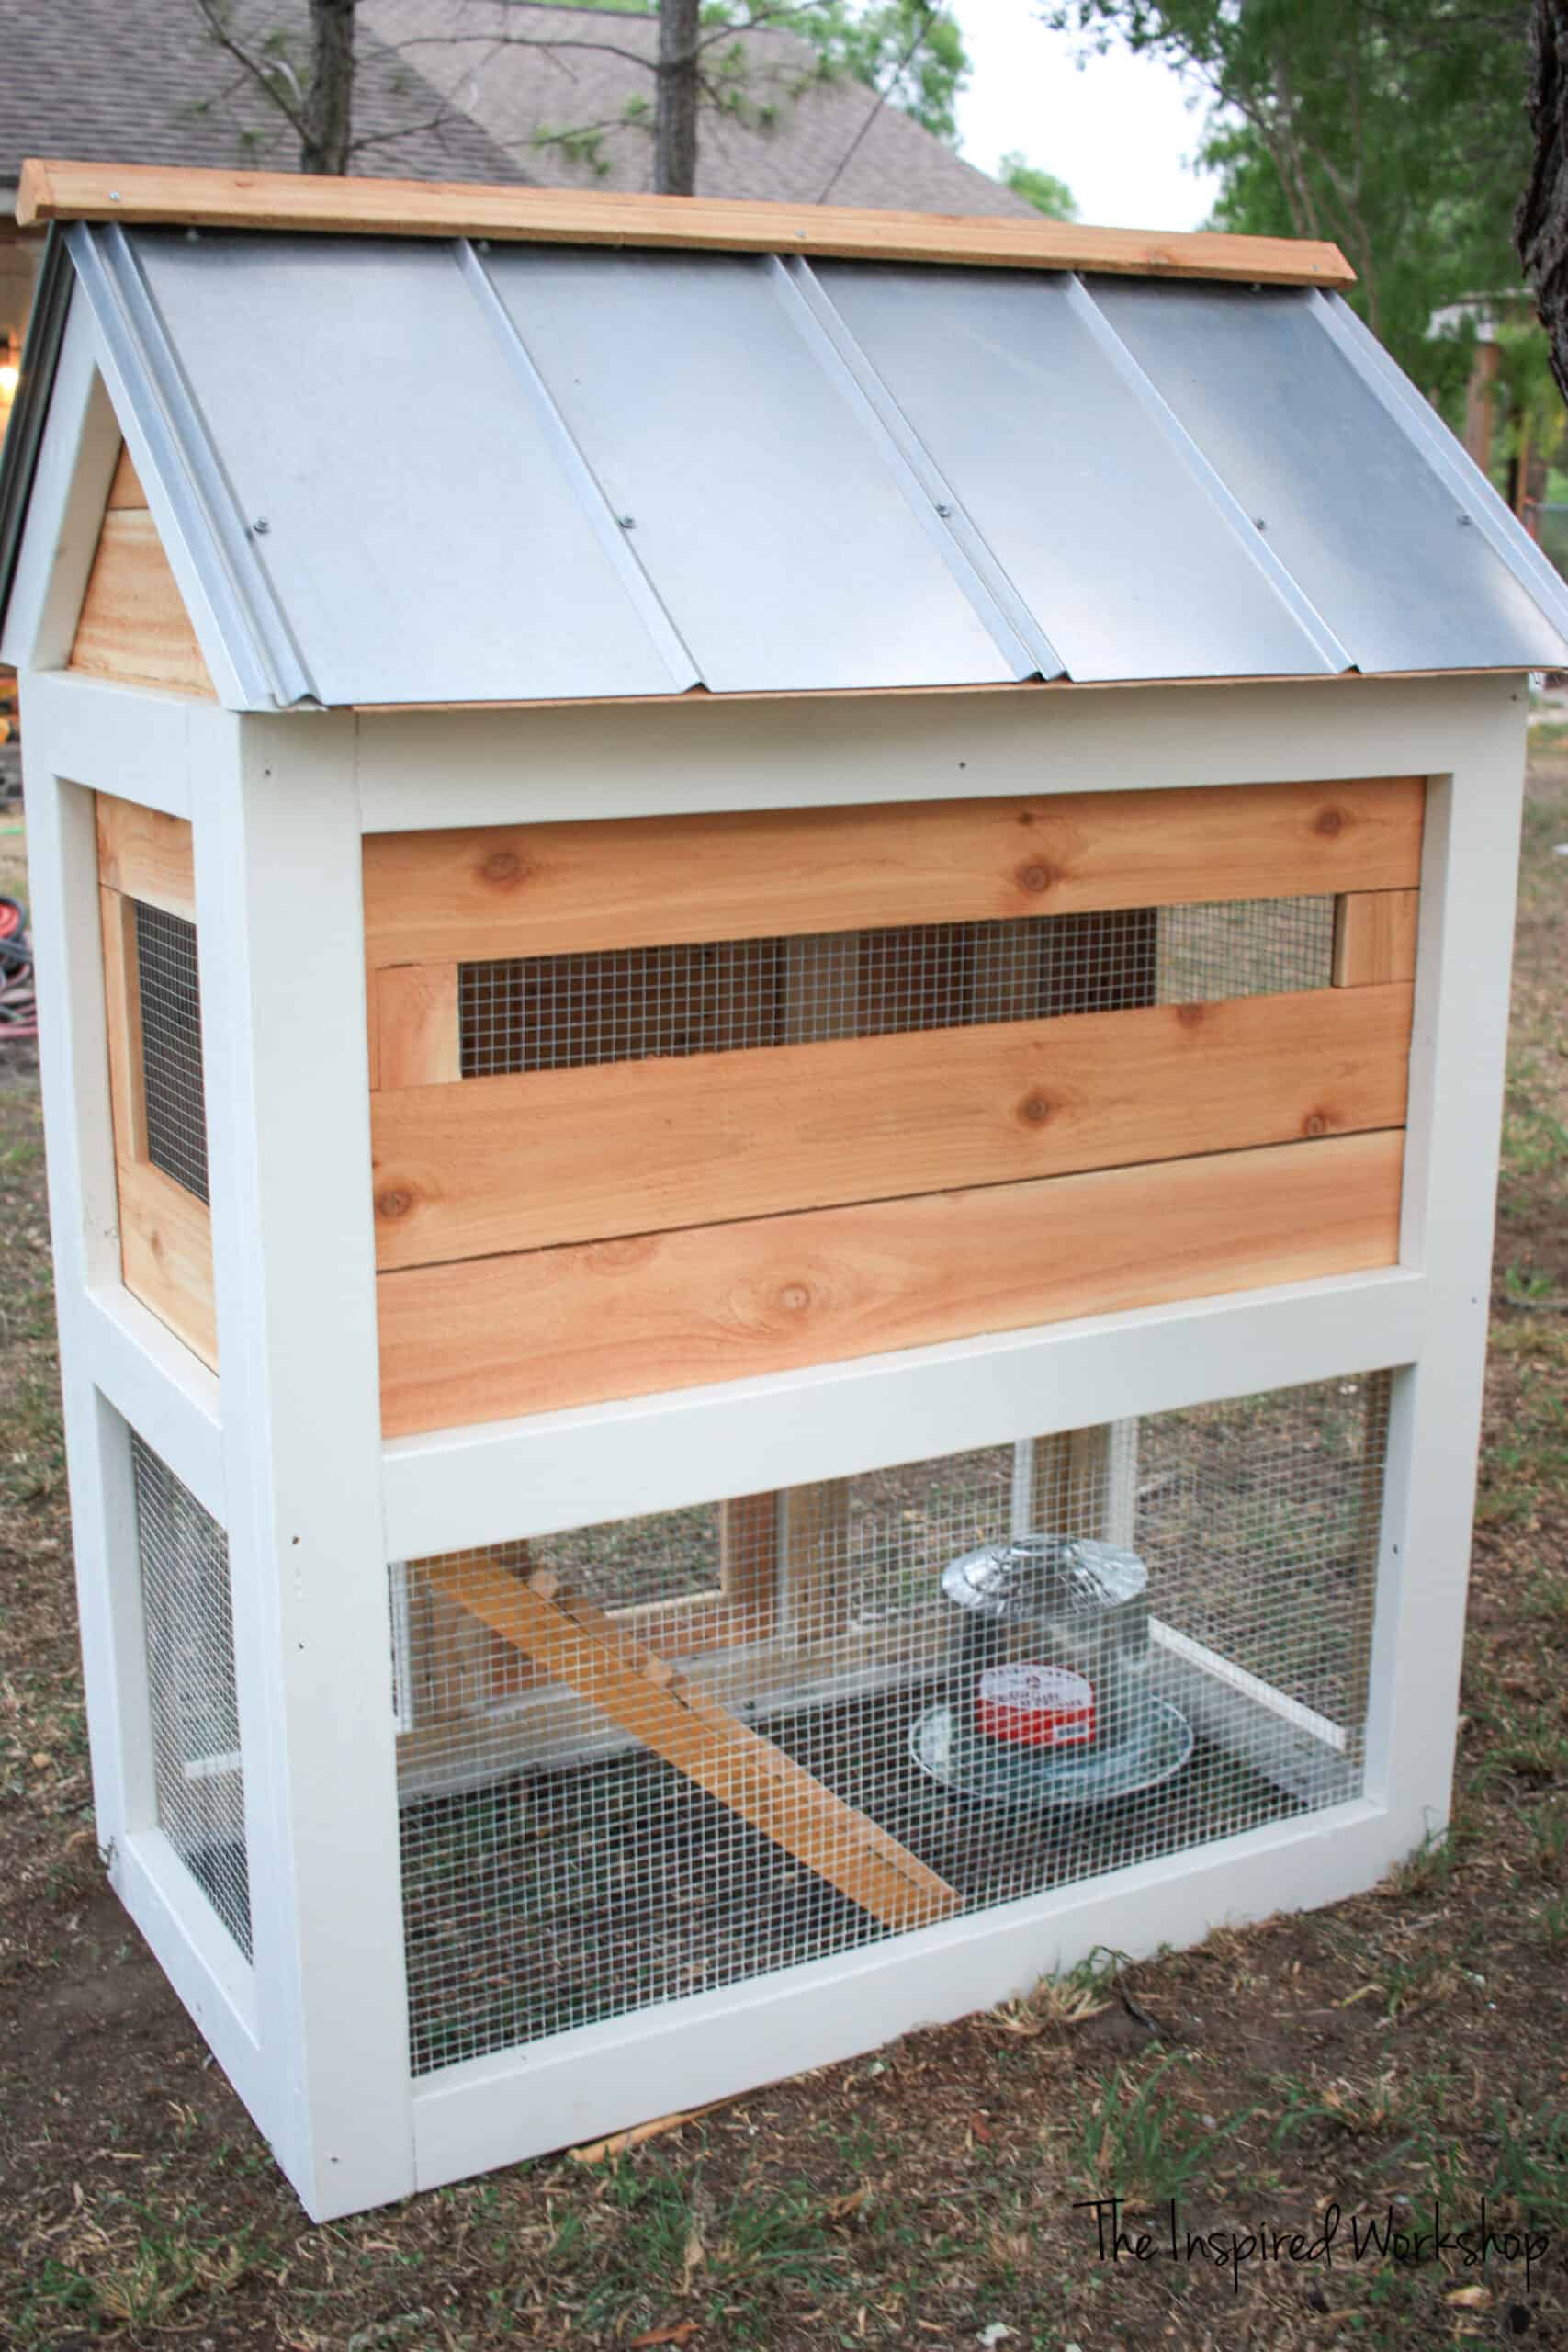
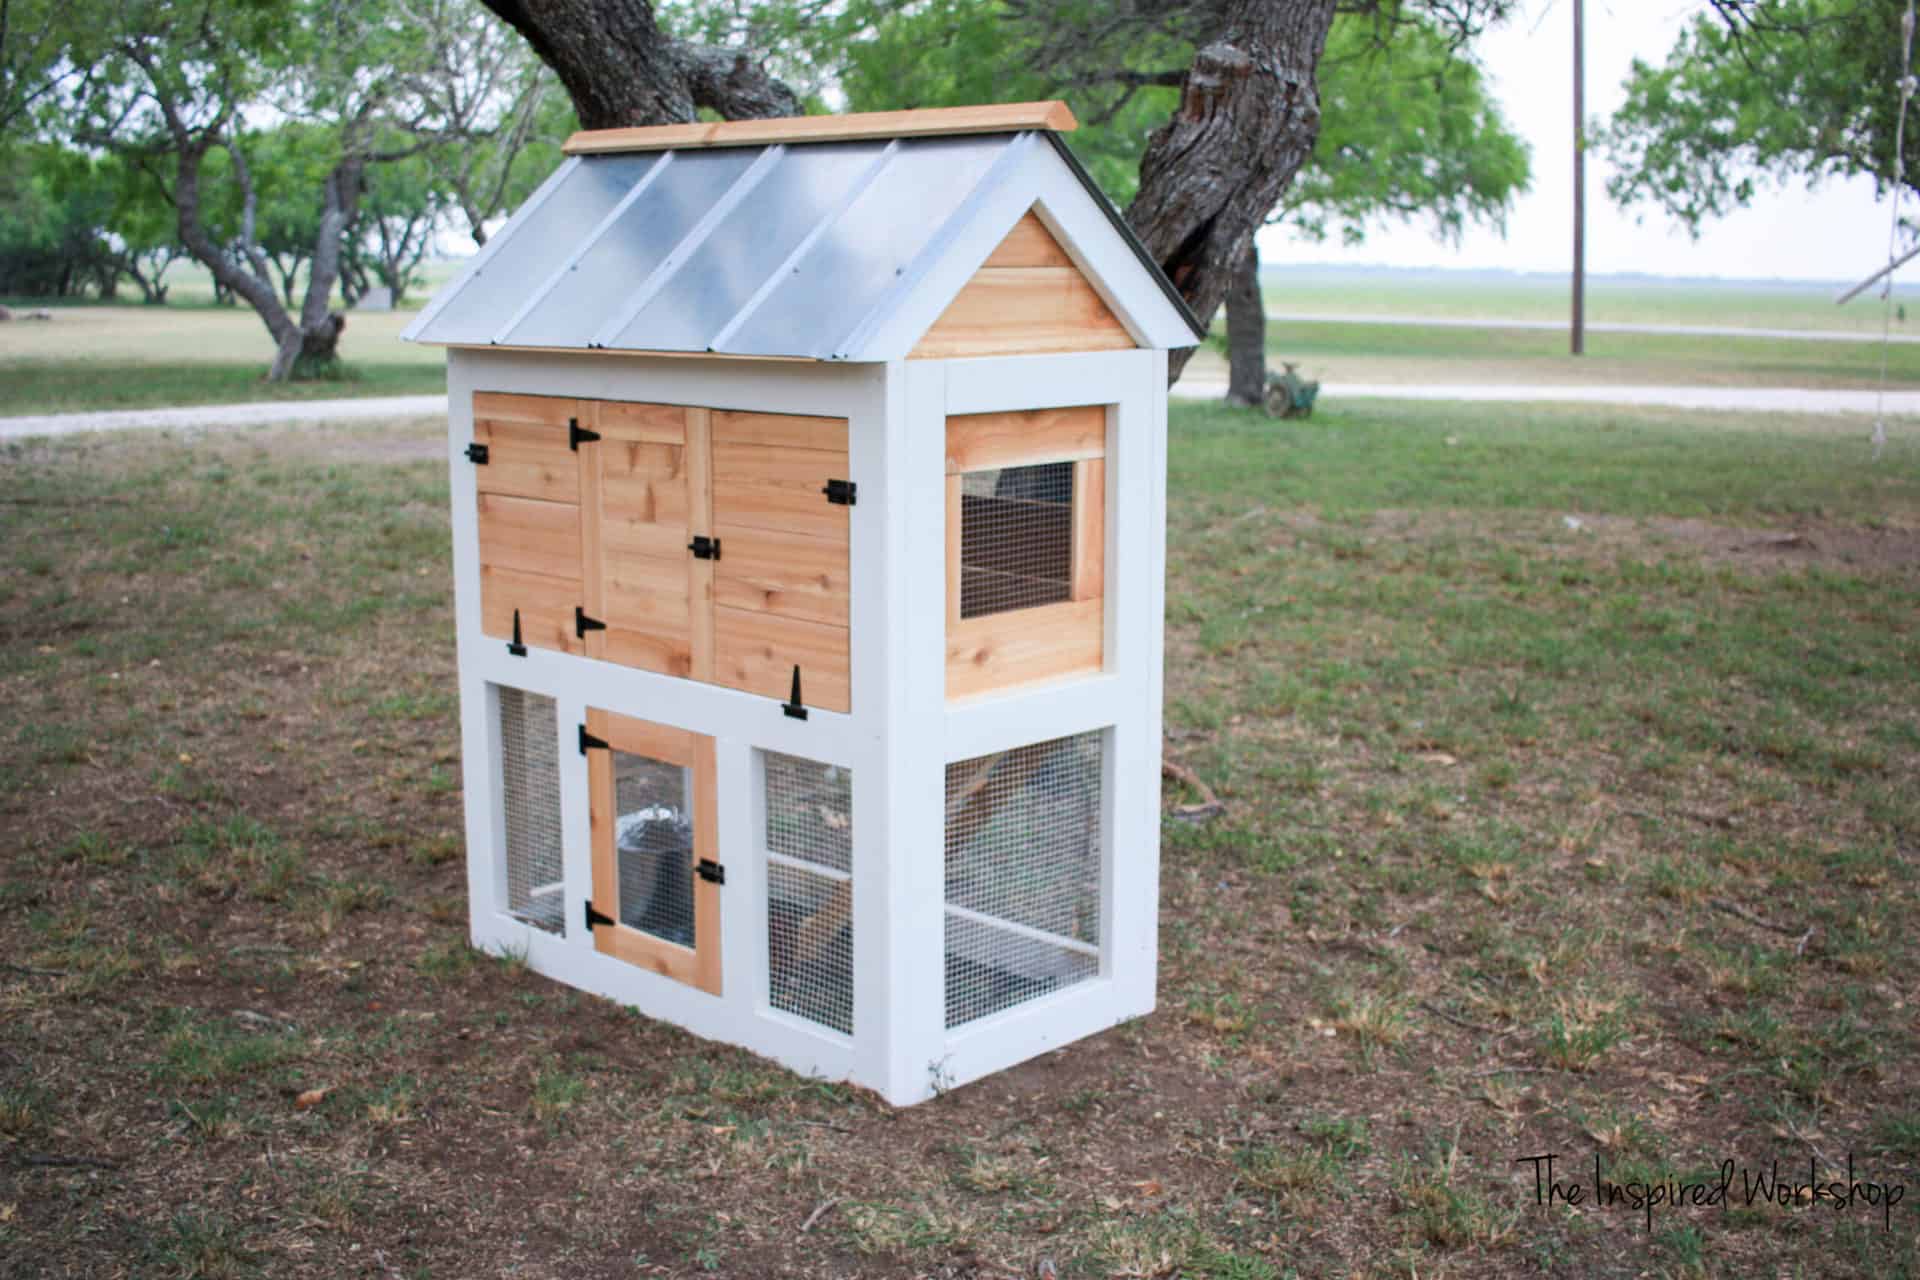
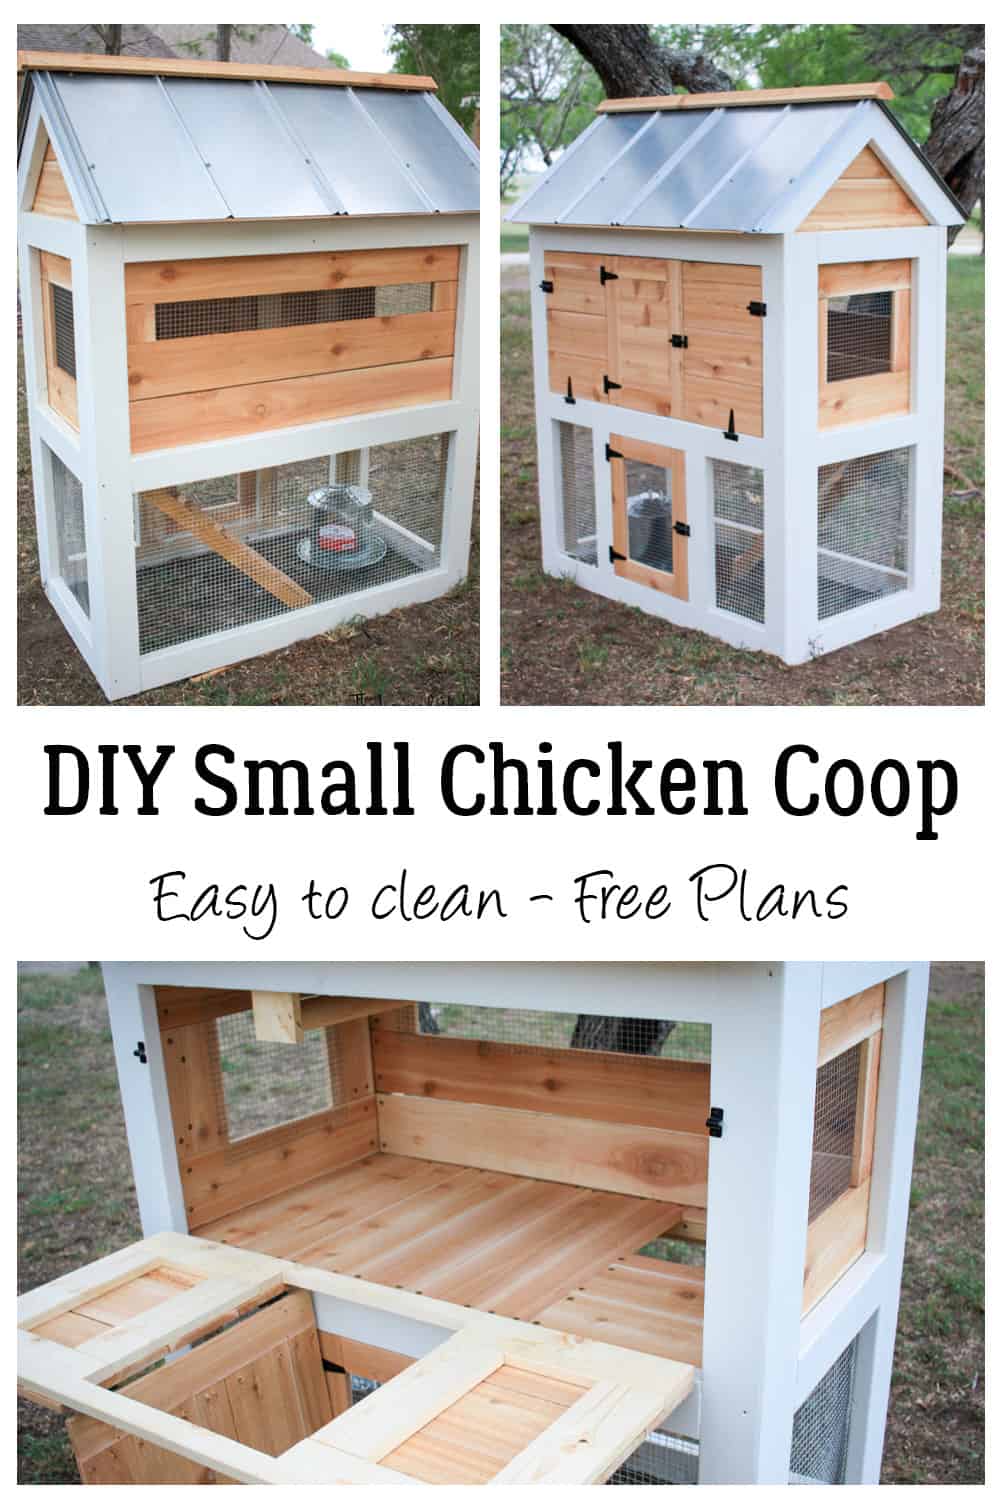
This small chicken coop is just that…small! Lol! It measures 2’x4′ and a little over 5′ tall, so I wouldn’t put more than 2…maybe 3 chickens in it! I didn’t add nesting boxes simply because it is for a rooster, but you can easily slip them inside or add a box on the back! There is a roosting bar that you can’t see that sits right above the big door!
UPDATE: Funny thing is, two years later, the rooster is able to live with all the ladies now but we leave the bottom door open because 2 hens like to sleep in here and they lay their eggs in here…without nesting boxes! LOL! They lay them on the floor of the top part!🤷🏼♀️ Chickens are silly creatures!
I built this small chicken coop with a small door inside a large door that completely folds down on top so that I can also use it as a chicken brooder if I don’t end up with a broody momma hen!
What do you say, are you ready to build yourself a small chicken coop?
Maybe a few more pics because it is just so CUTE! The ladder is my FAVORITE part! Lol!
I know that when I was trying to decide which style of small chicken coop I wanted to build, I looked around Pinterest and almost every chicken coop I found, you had to buy the plans, and I understand why people are charging for plans, a ton of work goes into creating them. But I would have not started building more than likely if it weren’t for the FREE plans by Ana White and Shanty 2 Chic, so, for now, my plans remain free but I do ask for an email address to download them, and that does add you to my email list!
Gathering Supplies for the Small Chicken Coop
Here ya go! Downloadable plans are available here! Step by step tutorial is below!
Printable Plans for Small Chicken Coop
I would love for you to SHARE or PIN this project if you think someone you know might like it!
Materials for DIY Small Chicken Coop
*Amazon links below are affiliate links! What does that mean? If you click a link below and make a purchase, I make a small percentage off of that purchase at no extra cost to you! I sure do appreciate it when you make purchases after clicking my links!😉
- 12-2x4x8
- 3-2x2x8
- 2-1x4x8
- 13-1x6x6 cedar fence pickets
- 2 – 1x4x6 cedar fence pickets
- 1 – 8′ sheet of a steel roof panel
- –3 1/8″ screws
- –1/2″ staples
- –2 1/2″ Kreg screws
- –1 1/4″ Kreg screws
- –1″ Kreg screws
- –2’x25′ roll of 1/2″ hardware cloth
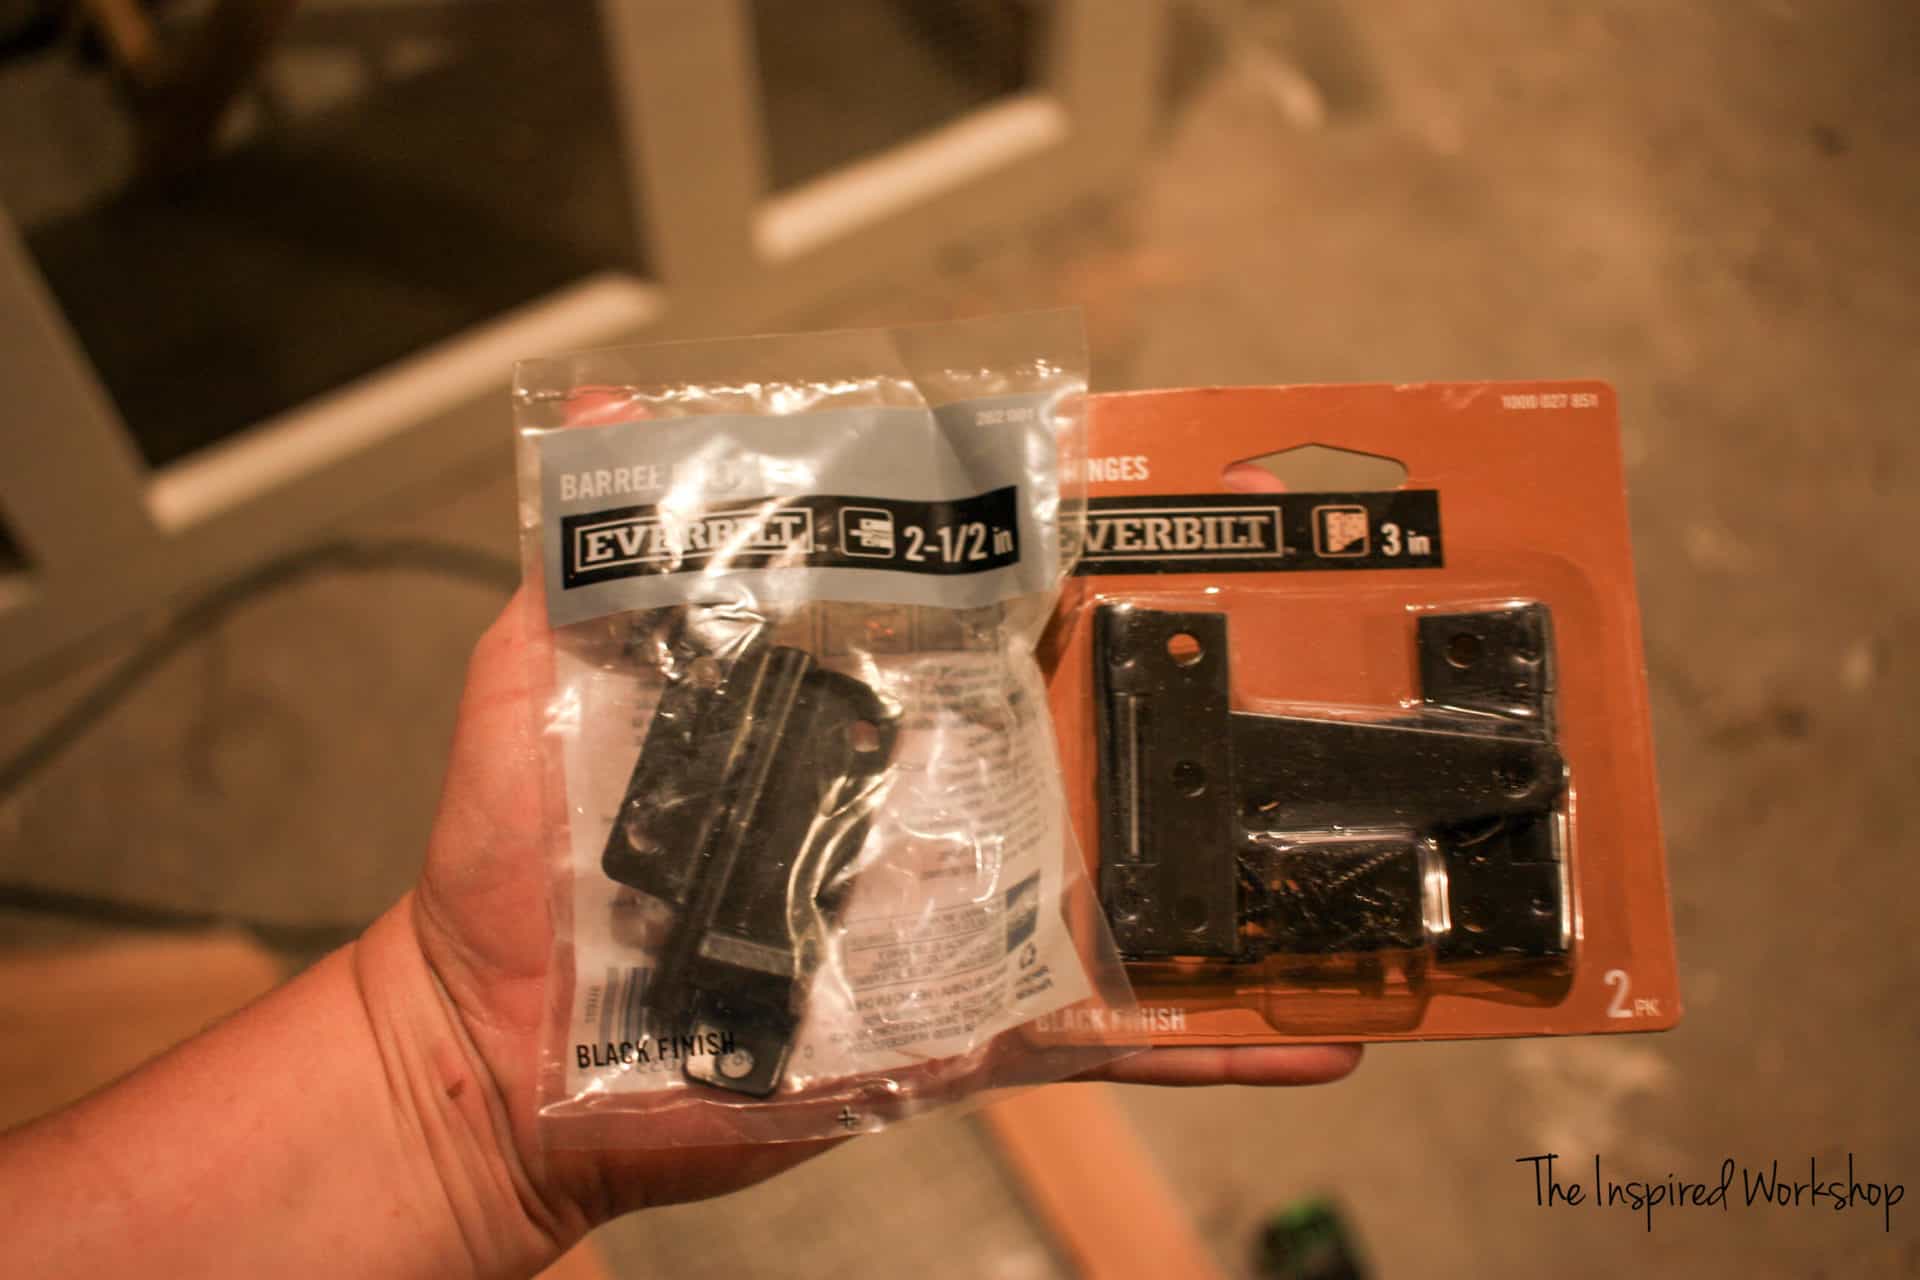
- 3 – sets of hinges
- 4 – latches
- 4 – Simpson Strong-tie Roof Brackets – they are cheaper at Home Depot, I just wanted to show you what they look like and I couldn’t find them on HDs website!
- –staple gun
- –Kreg jig
Cut List for the DIY Small Chicken Coop
- 8 – 2×4 @ 48″ (legs)
- 6 – 2×4 @ 41″ (front and back rails)
- 6 – 2×4 @ 17″ (side rails)
- 4 – 2×4 @ 22 7/8″ mitered on one end at 40 degrees off square and 50 degrees off square, ends not parallel (roof trusses)
- 3 – 2×4 @ 45″ (roof braces)
- 2 – 2×4 @ 18 3/4″ (bottom door braces)
- 2 – 2×2 @ 42″ (floor braces)
- 2 – 2×2 @ 24″ (floor braces)
- 2 – 2×2 @ 34 1/2″ mitered at 45 degrees off square, ends not parallel (ladder)
- 6 – 1×1 @ 7″ (ladder rungs) These are ripped from an actual 1×4 board, not a fence picket.
- 1 – 2×2 @ 2″
**1x6s and 1x4s below are cedar fence pickets, not actual nominal 1x6s unless otherwise noted, any 1x2s or odd 1x 1 1/2 are ripped down from fence pickets and are actually cut to the size stated!
- 5 – 1×6 @ 24″ (floorboards)
- 1 – 1×4 @ 24″ (floorboard)
- 2 – 1×6 @ 14″ (floorboards)
- 1 – 1×2″ @ 14″ (floorboard)
- 1 – 1x 1 1/2″ @ 14″ (floorboard)
- 1 – 1x 1 1/2″ @ 9 1/2″ (floorboard)
- 1 – 1×2 @ 12 1/2″ (actual pine 1×2, not a fence picket) (floor support)
- 4 – 1×6 @ 24″ (side windows)
- 4 – 1×6 @ 9 1/2″ (side windows)
- 3 – 1×6 @ 44″ (back wallboards)
- 2 – 1×6 @ 4″ (back window)
- 2 – 1×4 @ 40 3/4″ (actual 1x4s not fence pickets)(large door frame)
- 4 – 1×4 @ 11 1/2″ (actual 1x4s not fence pickets)(large door frame)
- 6 – 1×6 @ 13″ (large door boards)
- 2 – 1×2″ @ 13″ (large door boards)
- 4 – 1×2 1/2″ @ 18 1/2″ (top and bottom small doors)
- 2 – 1×2 1/2″ @ 9 1/2″ (top door)
- 2 – 1×6 @ 9 1/2″ (top door middle boards)
- 1 – 1×2 1/4″ (top door middle board)
- 2 – 1×2 1/2″ @ 9 3/8″ (bottom door)
- 2 – 1×6 @ 34 3/4″ mitered at 50 degrees off square, ends not parallel, with cutouts (roof rafter boards)
- 2 – 1×6 @ 21 7/8″ mitered at 50 degrees off square, ends not parallel (roof rafter boards)
- 2 – 1×3 29/32″ beveled at 45 degrees off square on one edge (roof soffit)
- 2 – 1×1″ @ 48″ (top of roof boards)
Building the DIY Small Chicken Coop
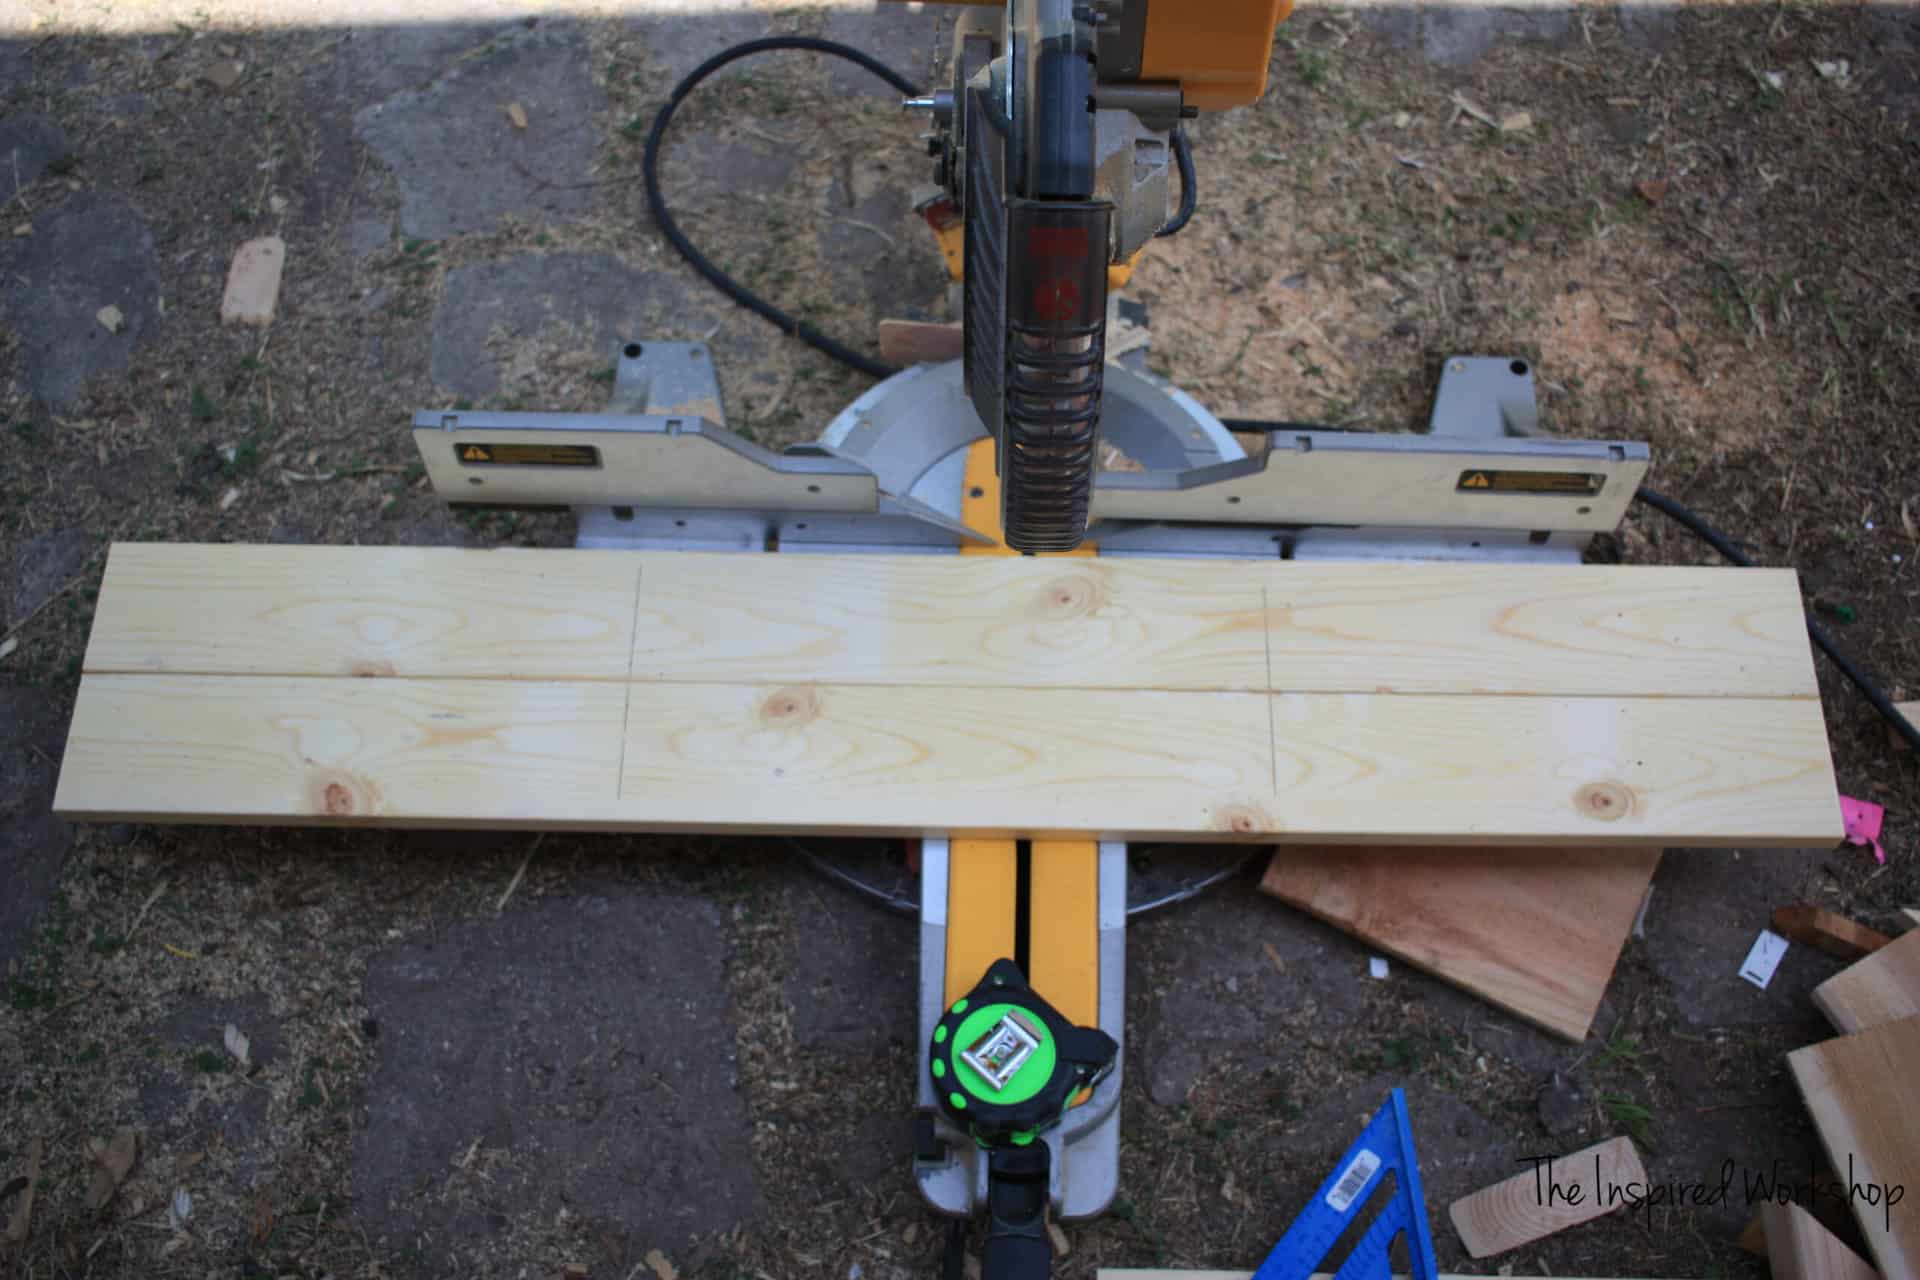
Step 1
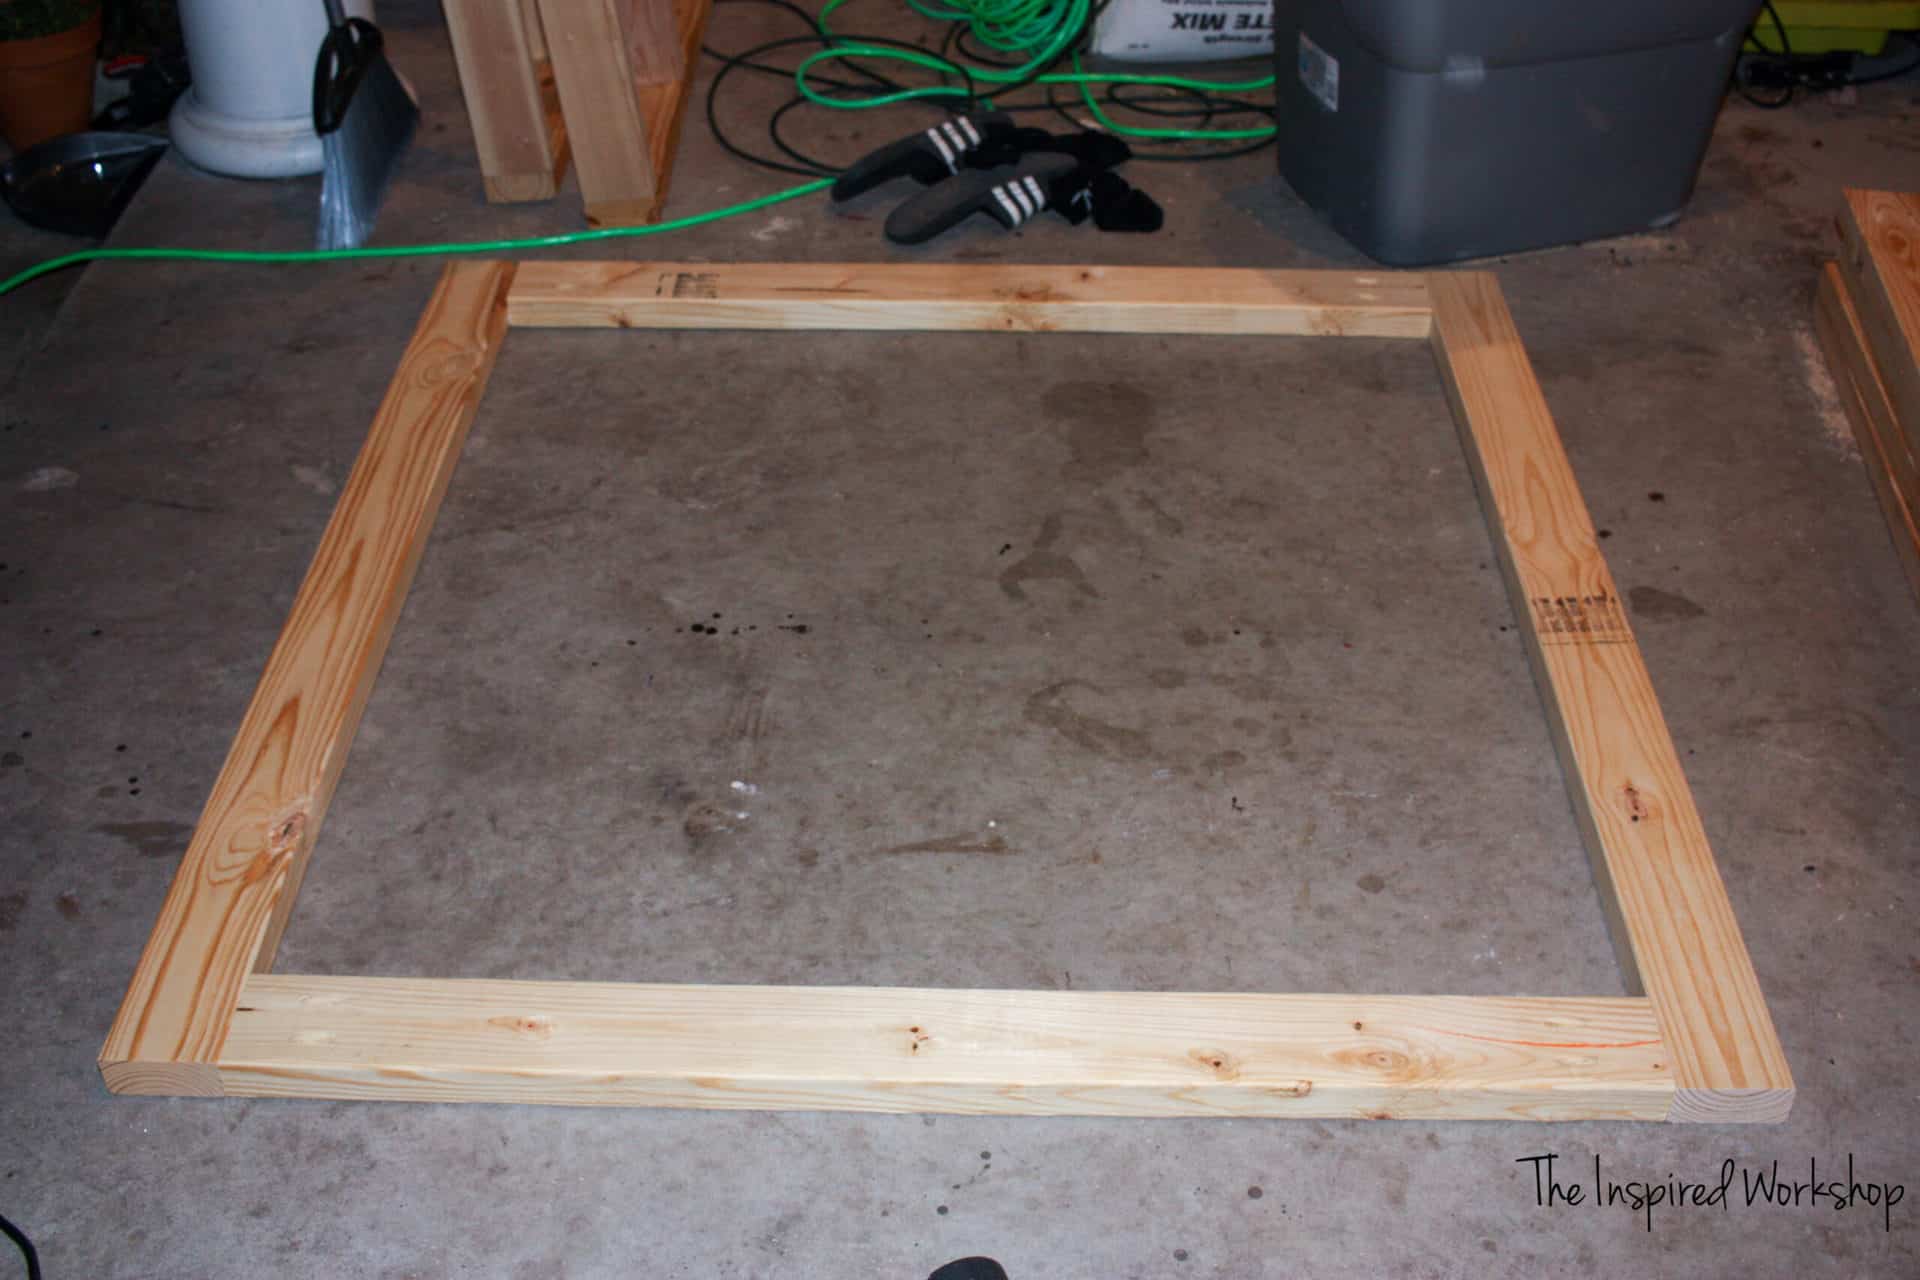
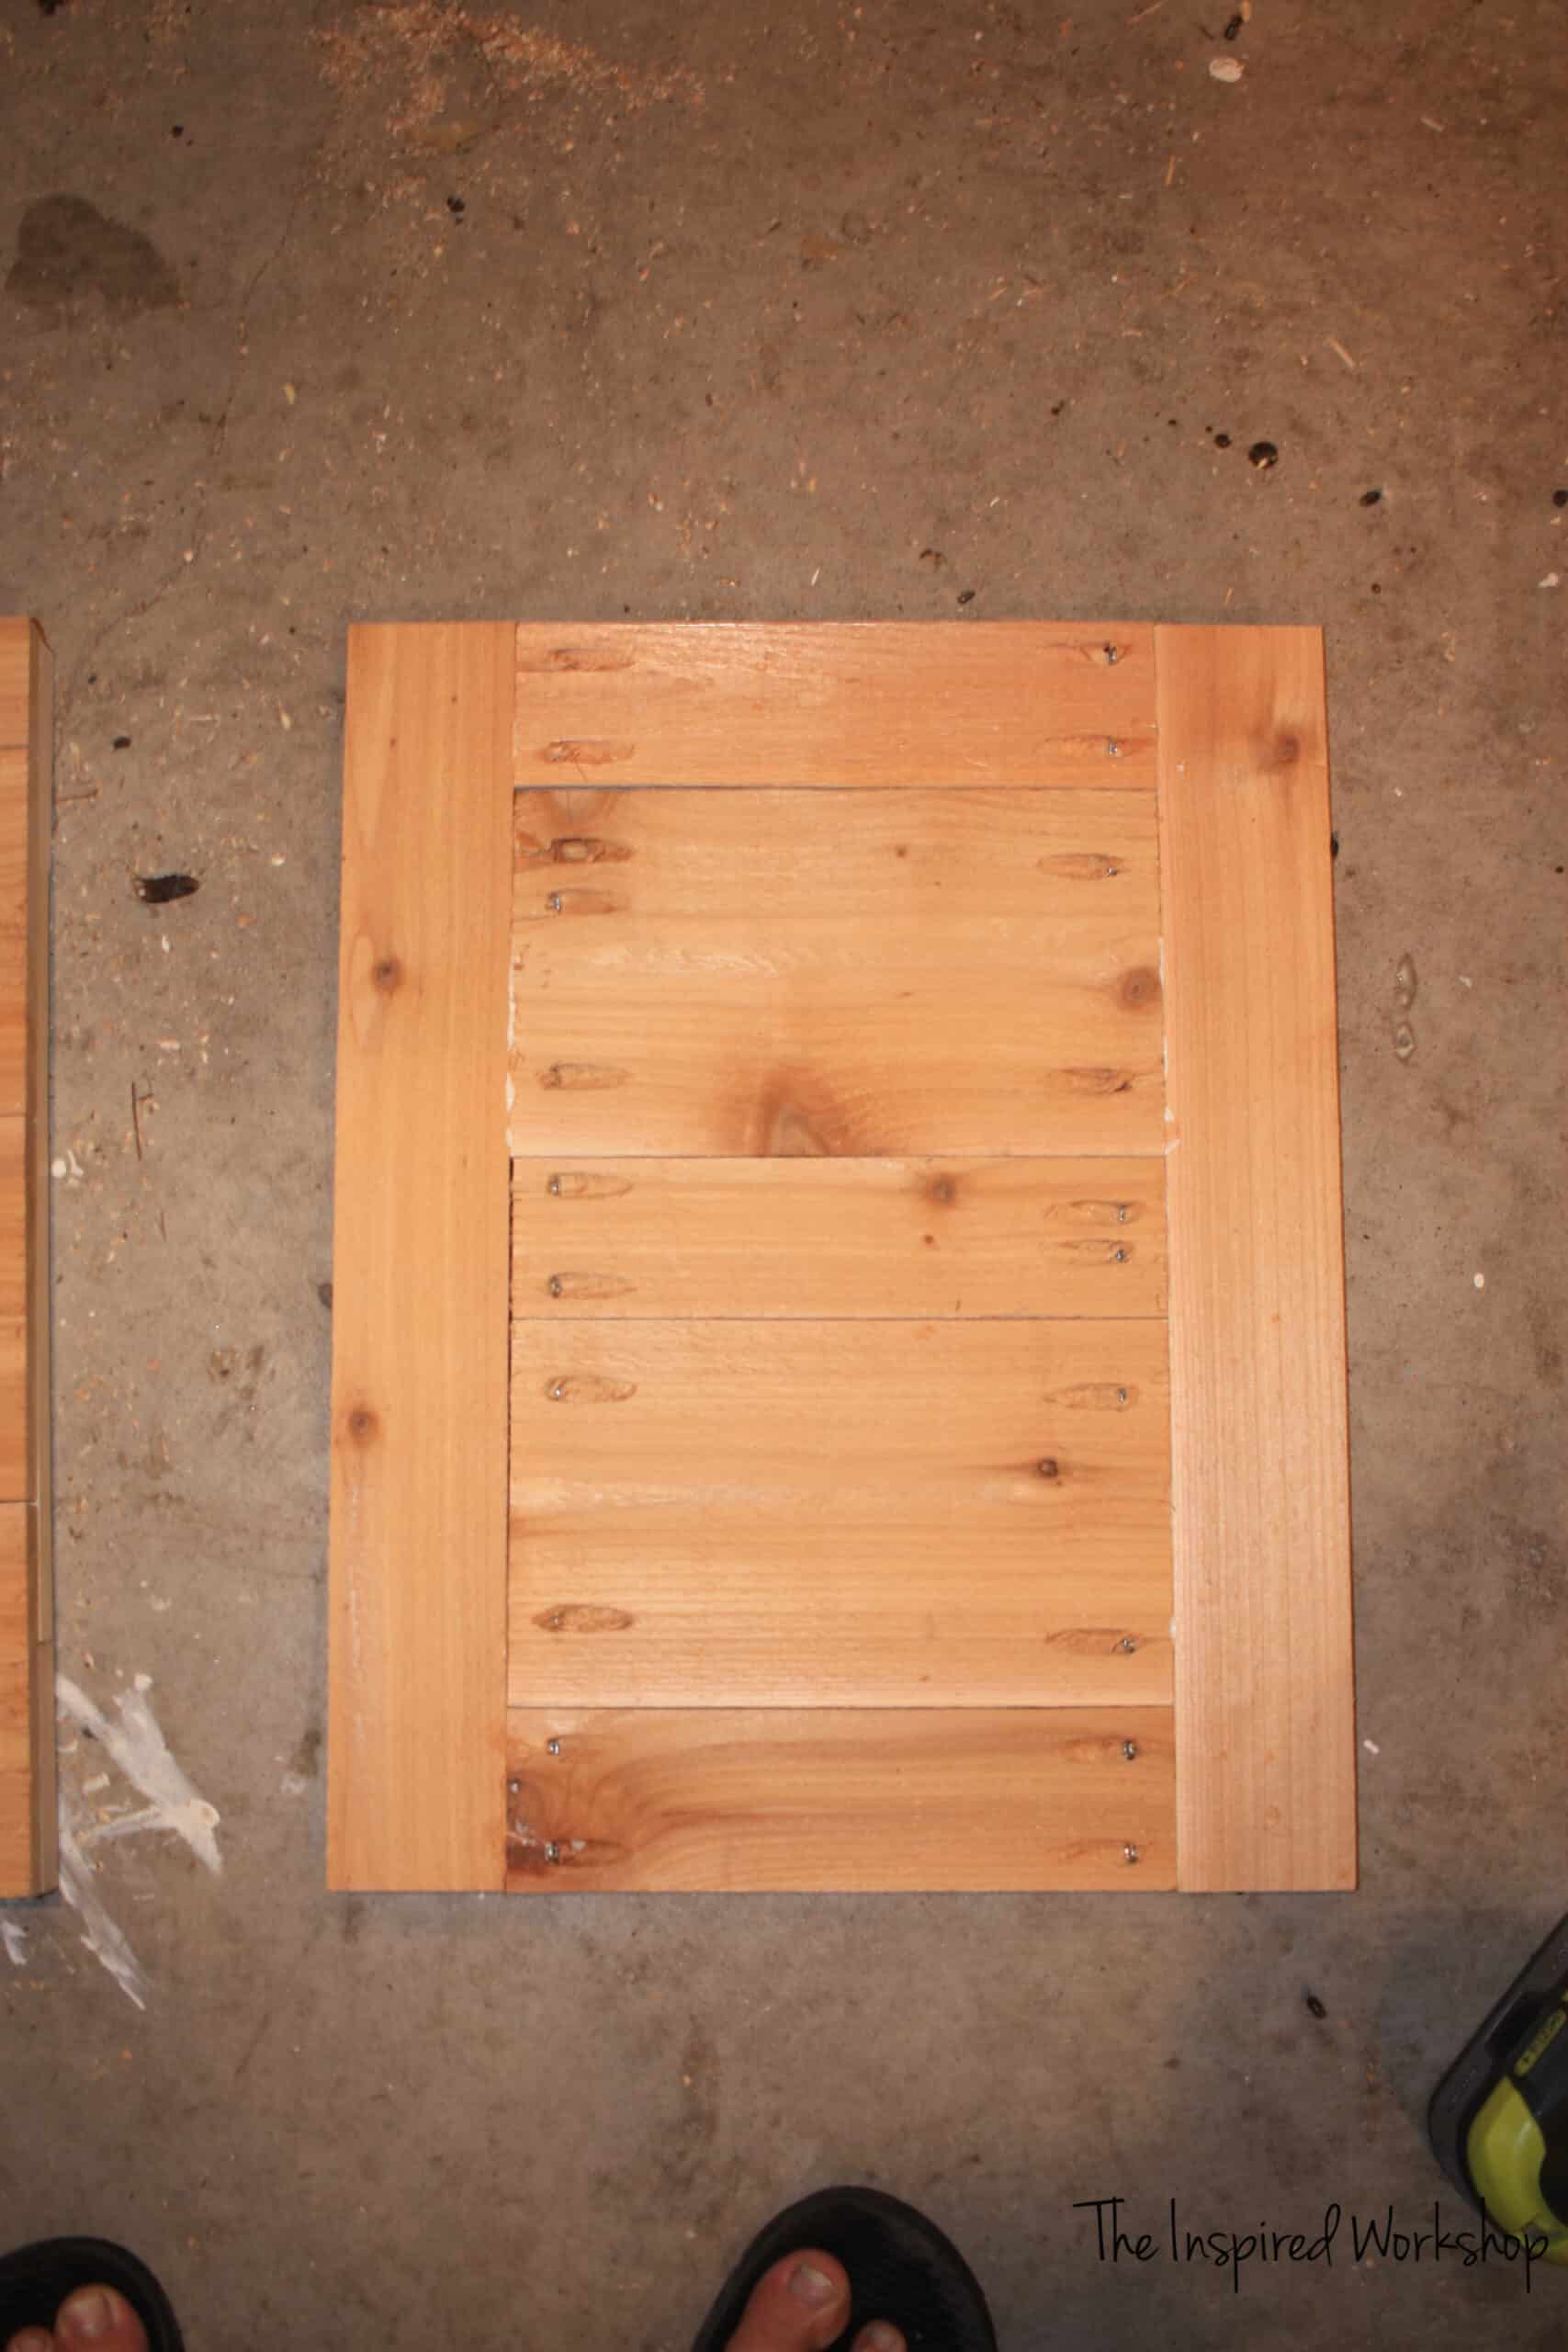
Build the side walls of the small chicken coop. You will build 2 of the walls shown below, on both sides.
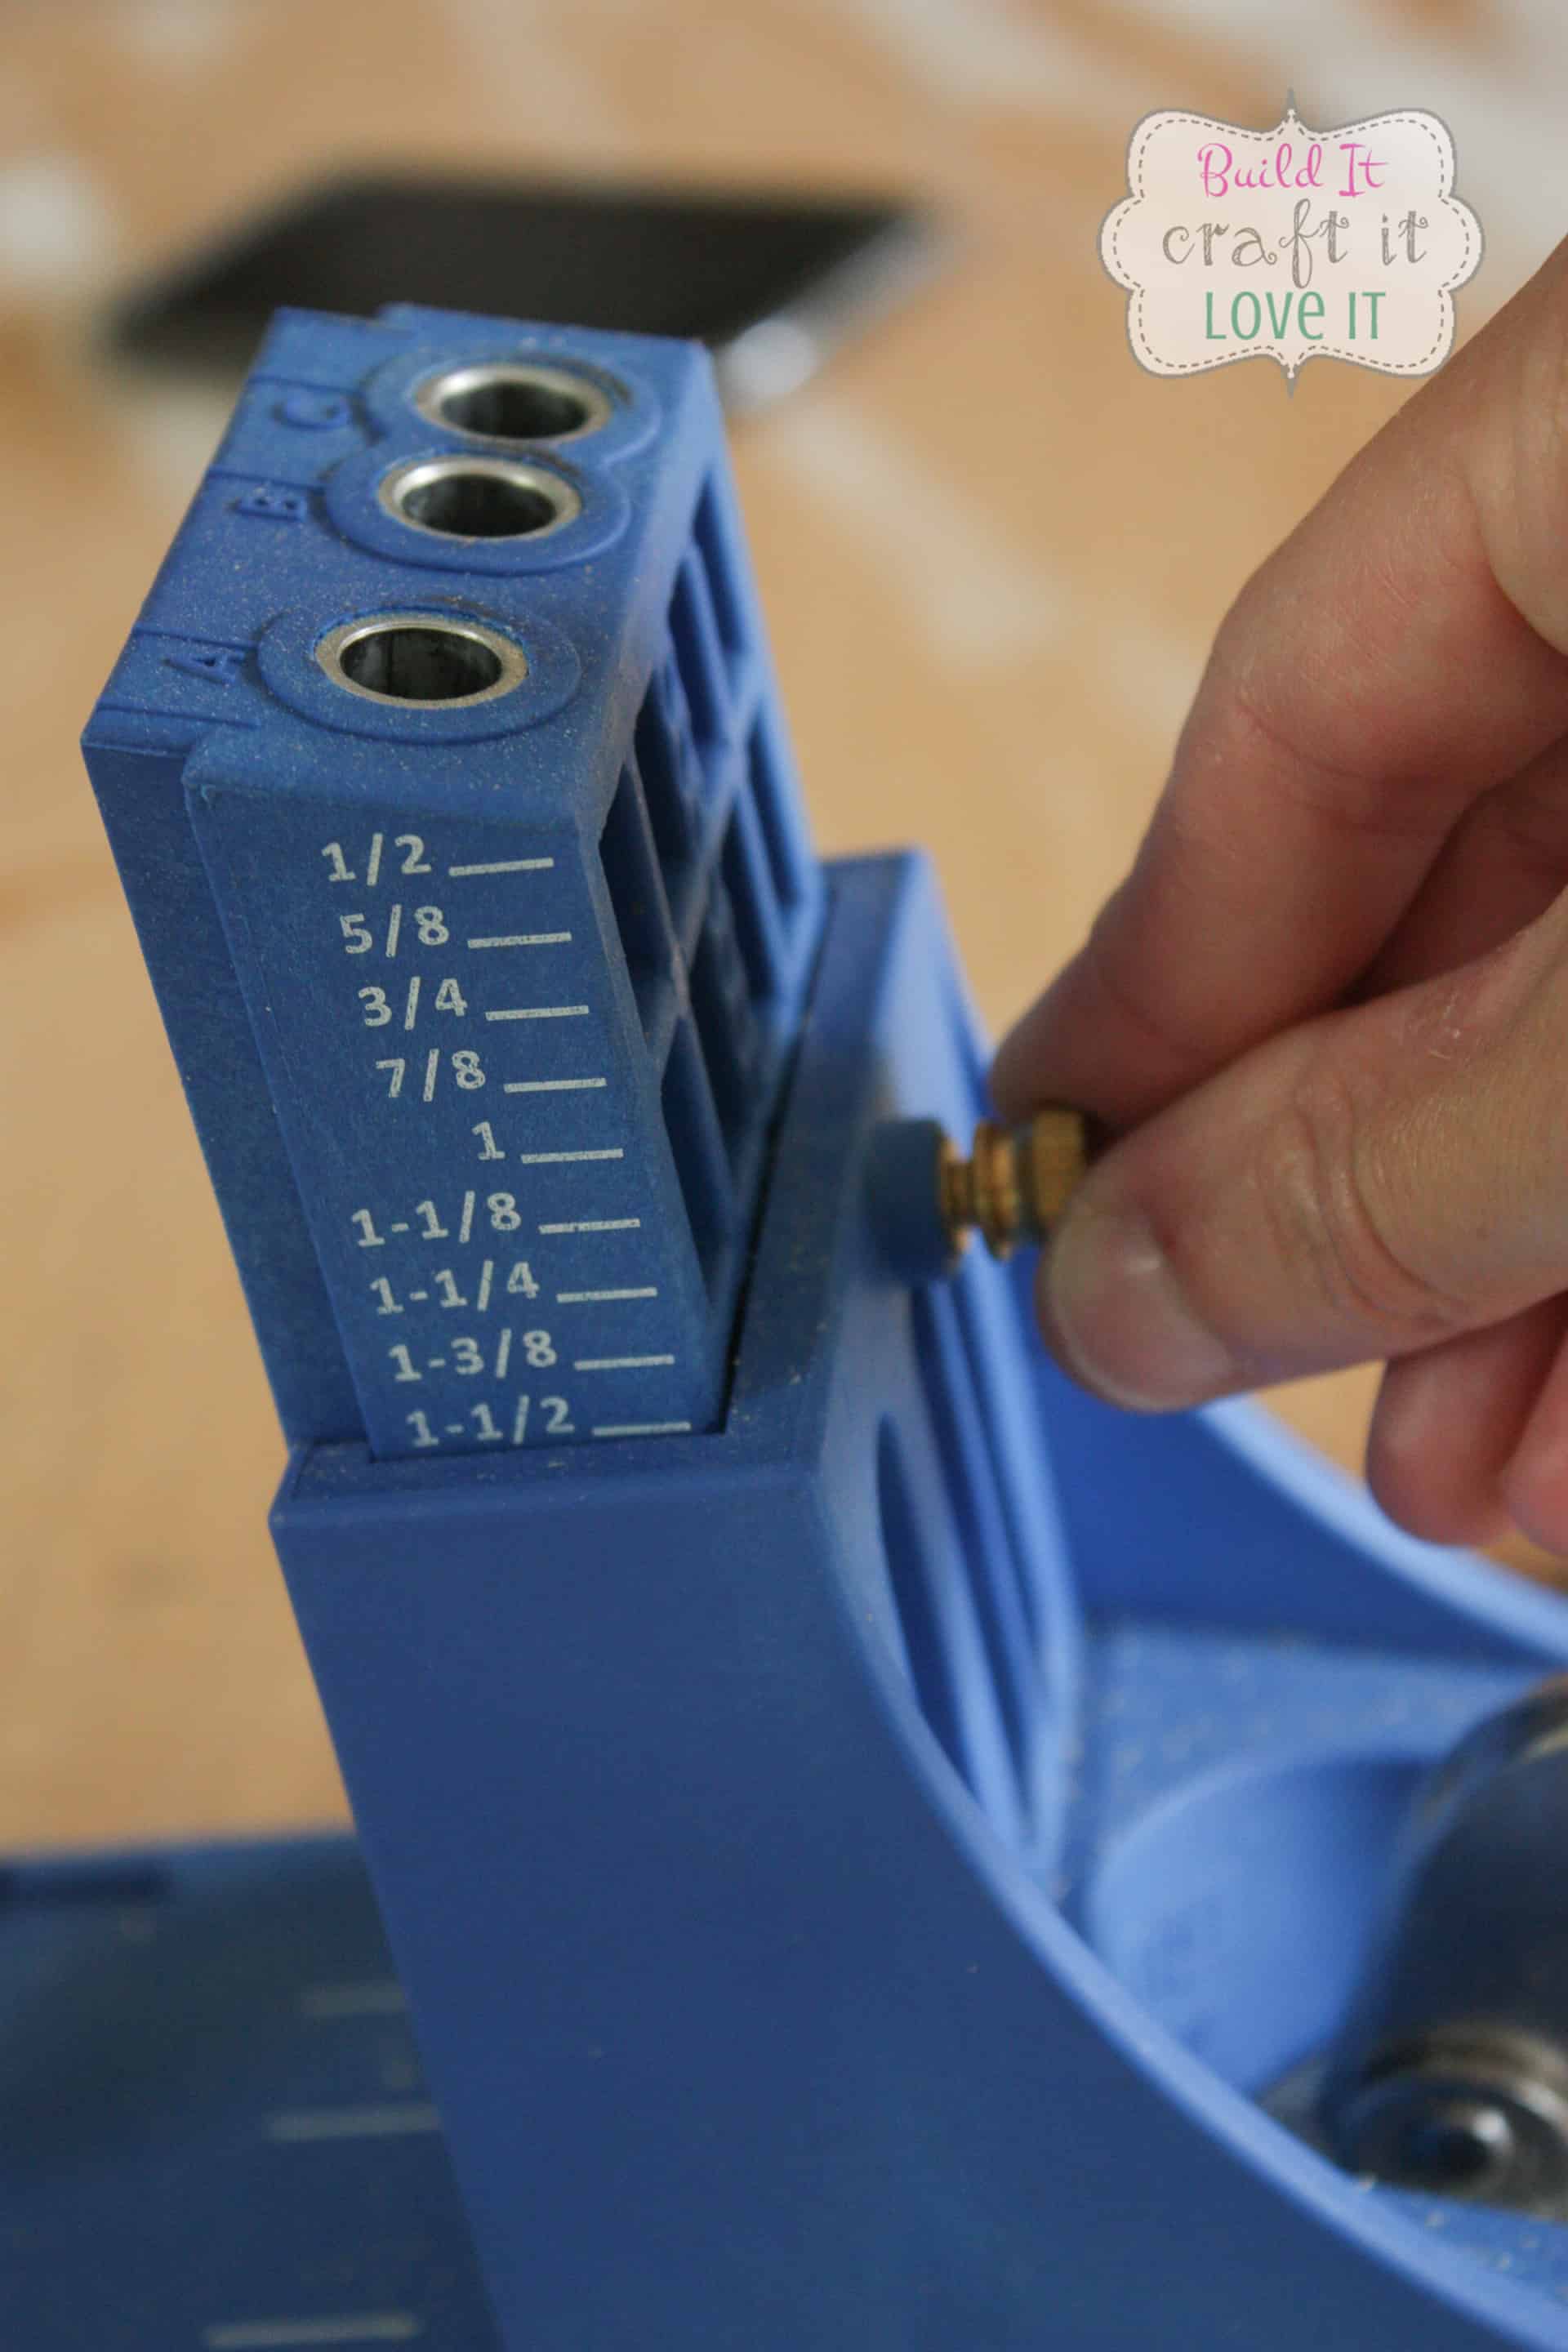
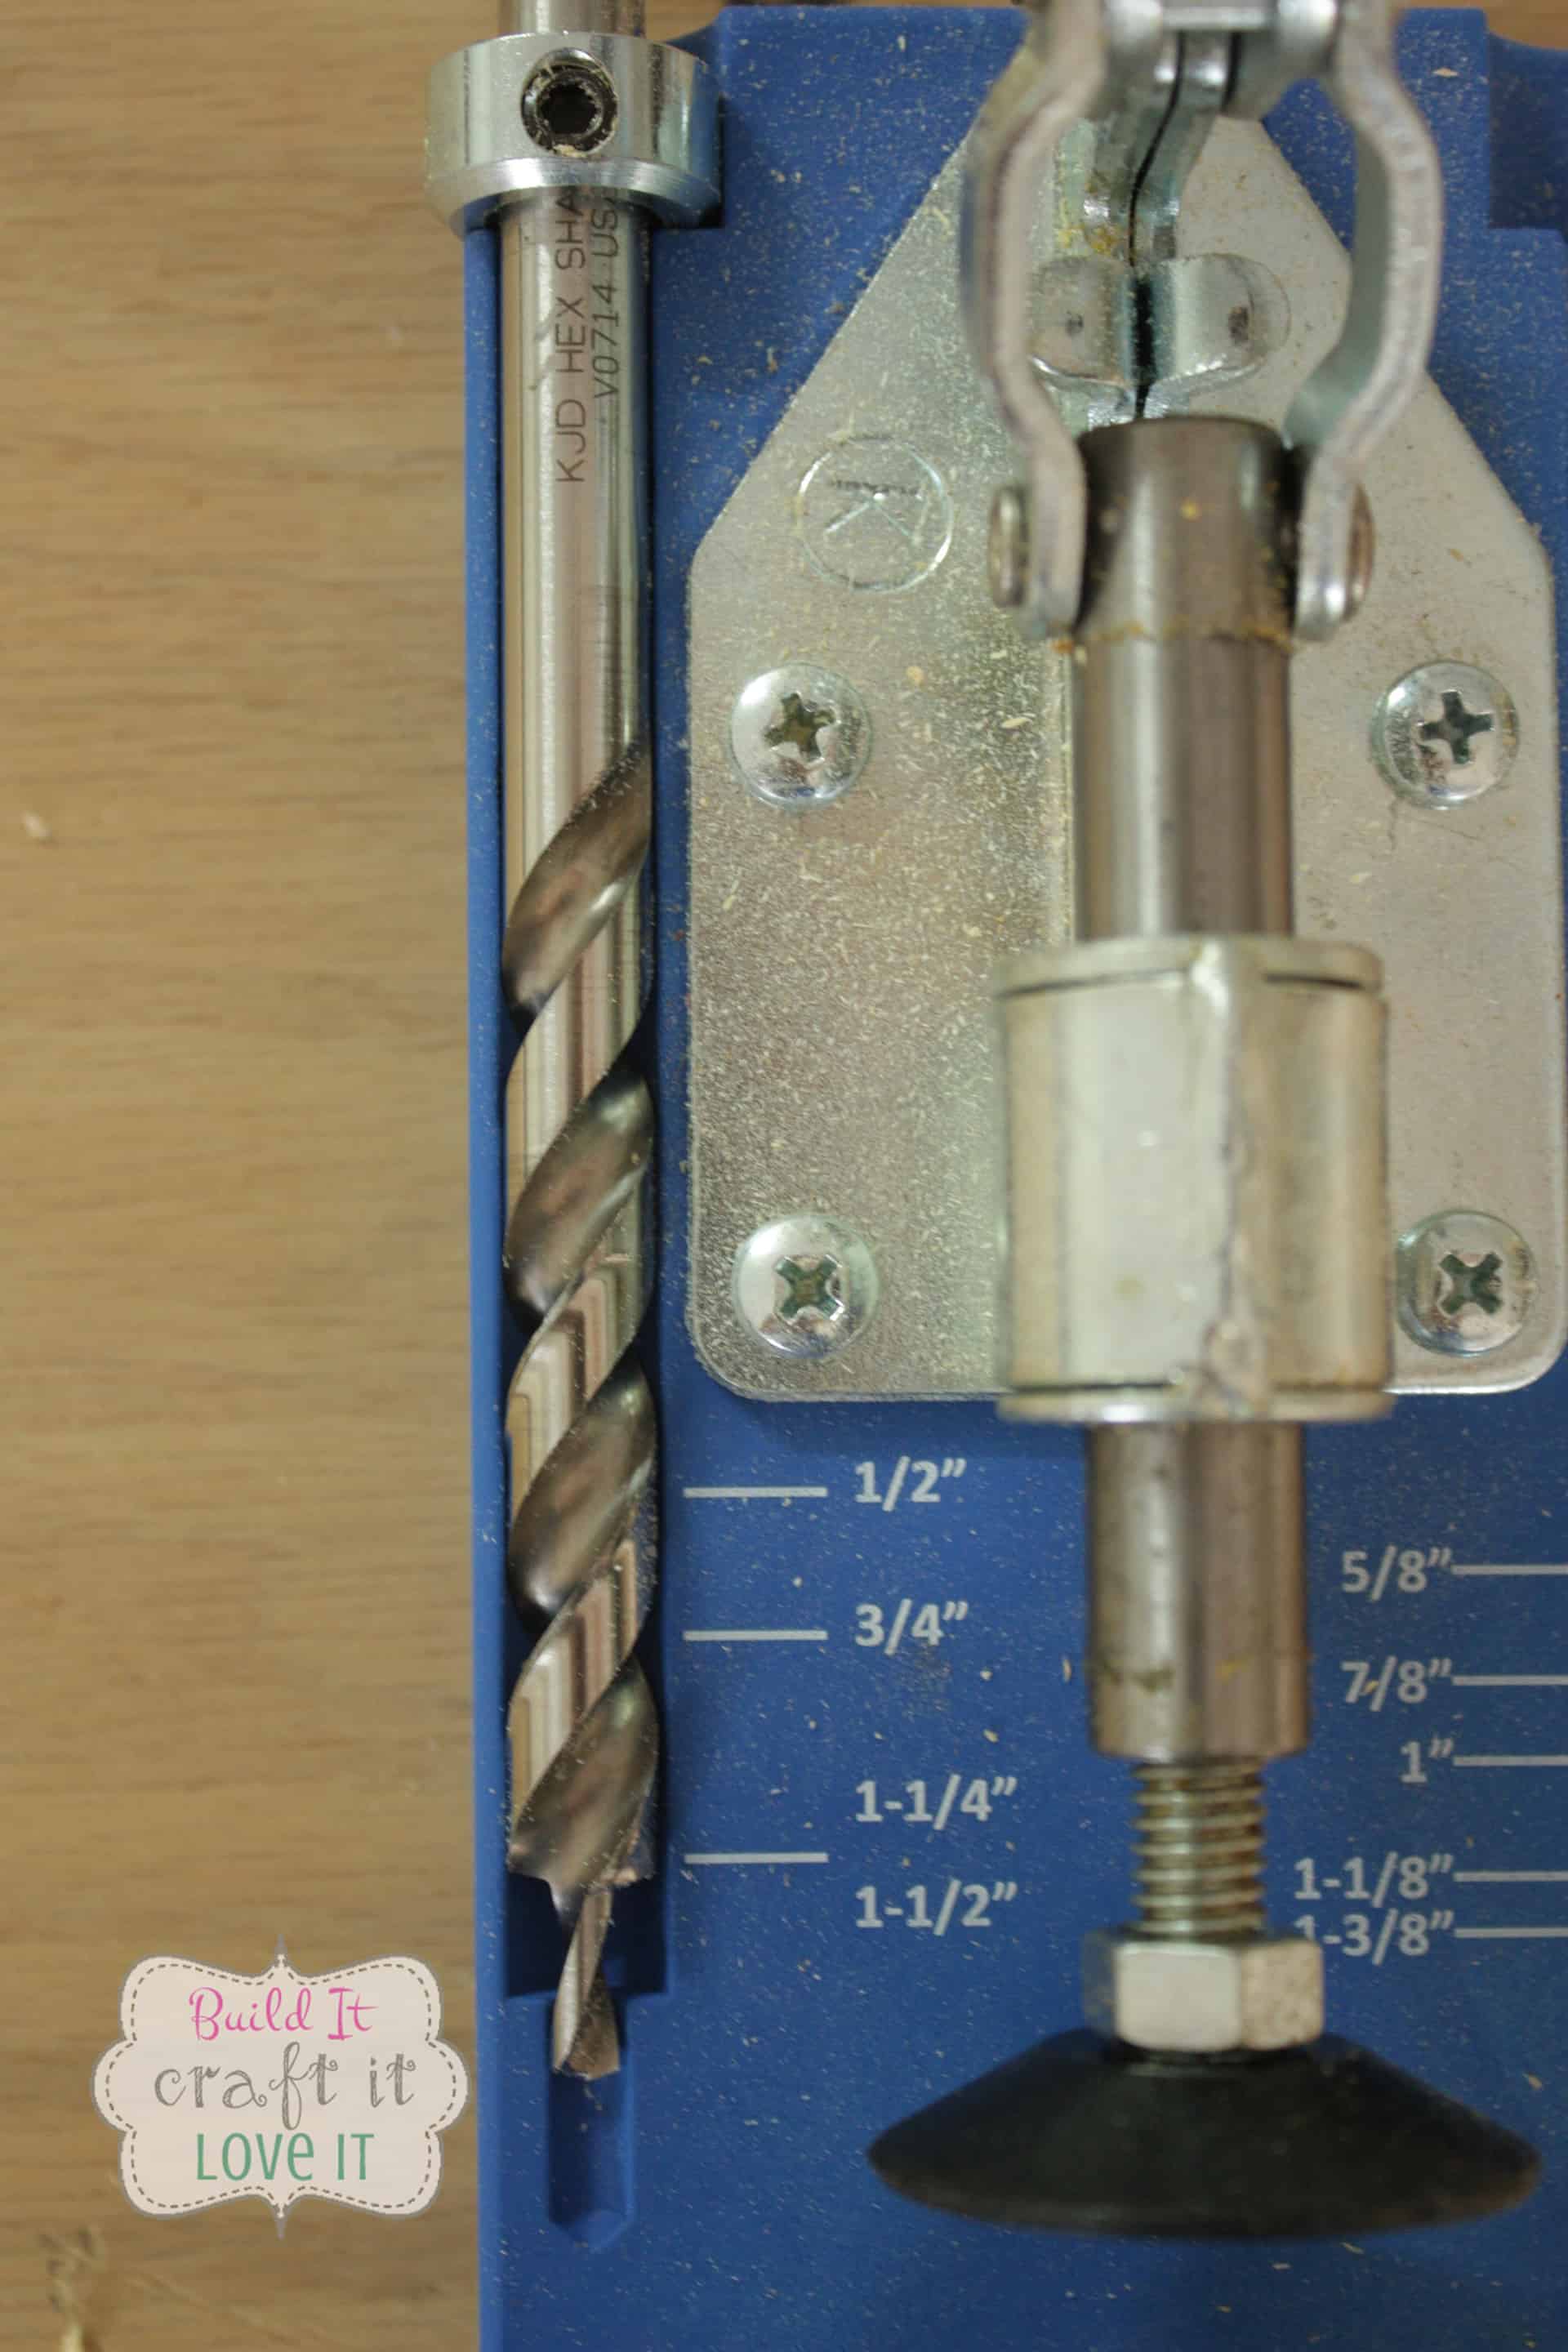
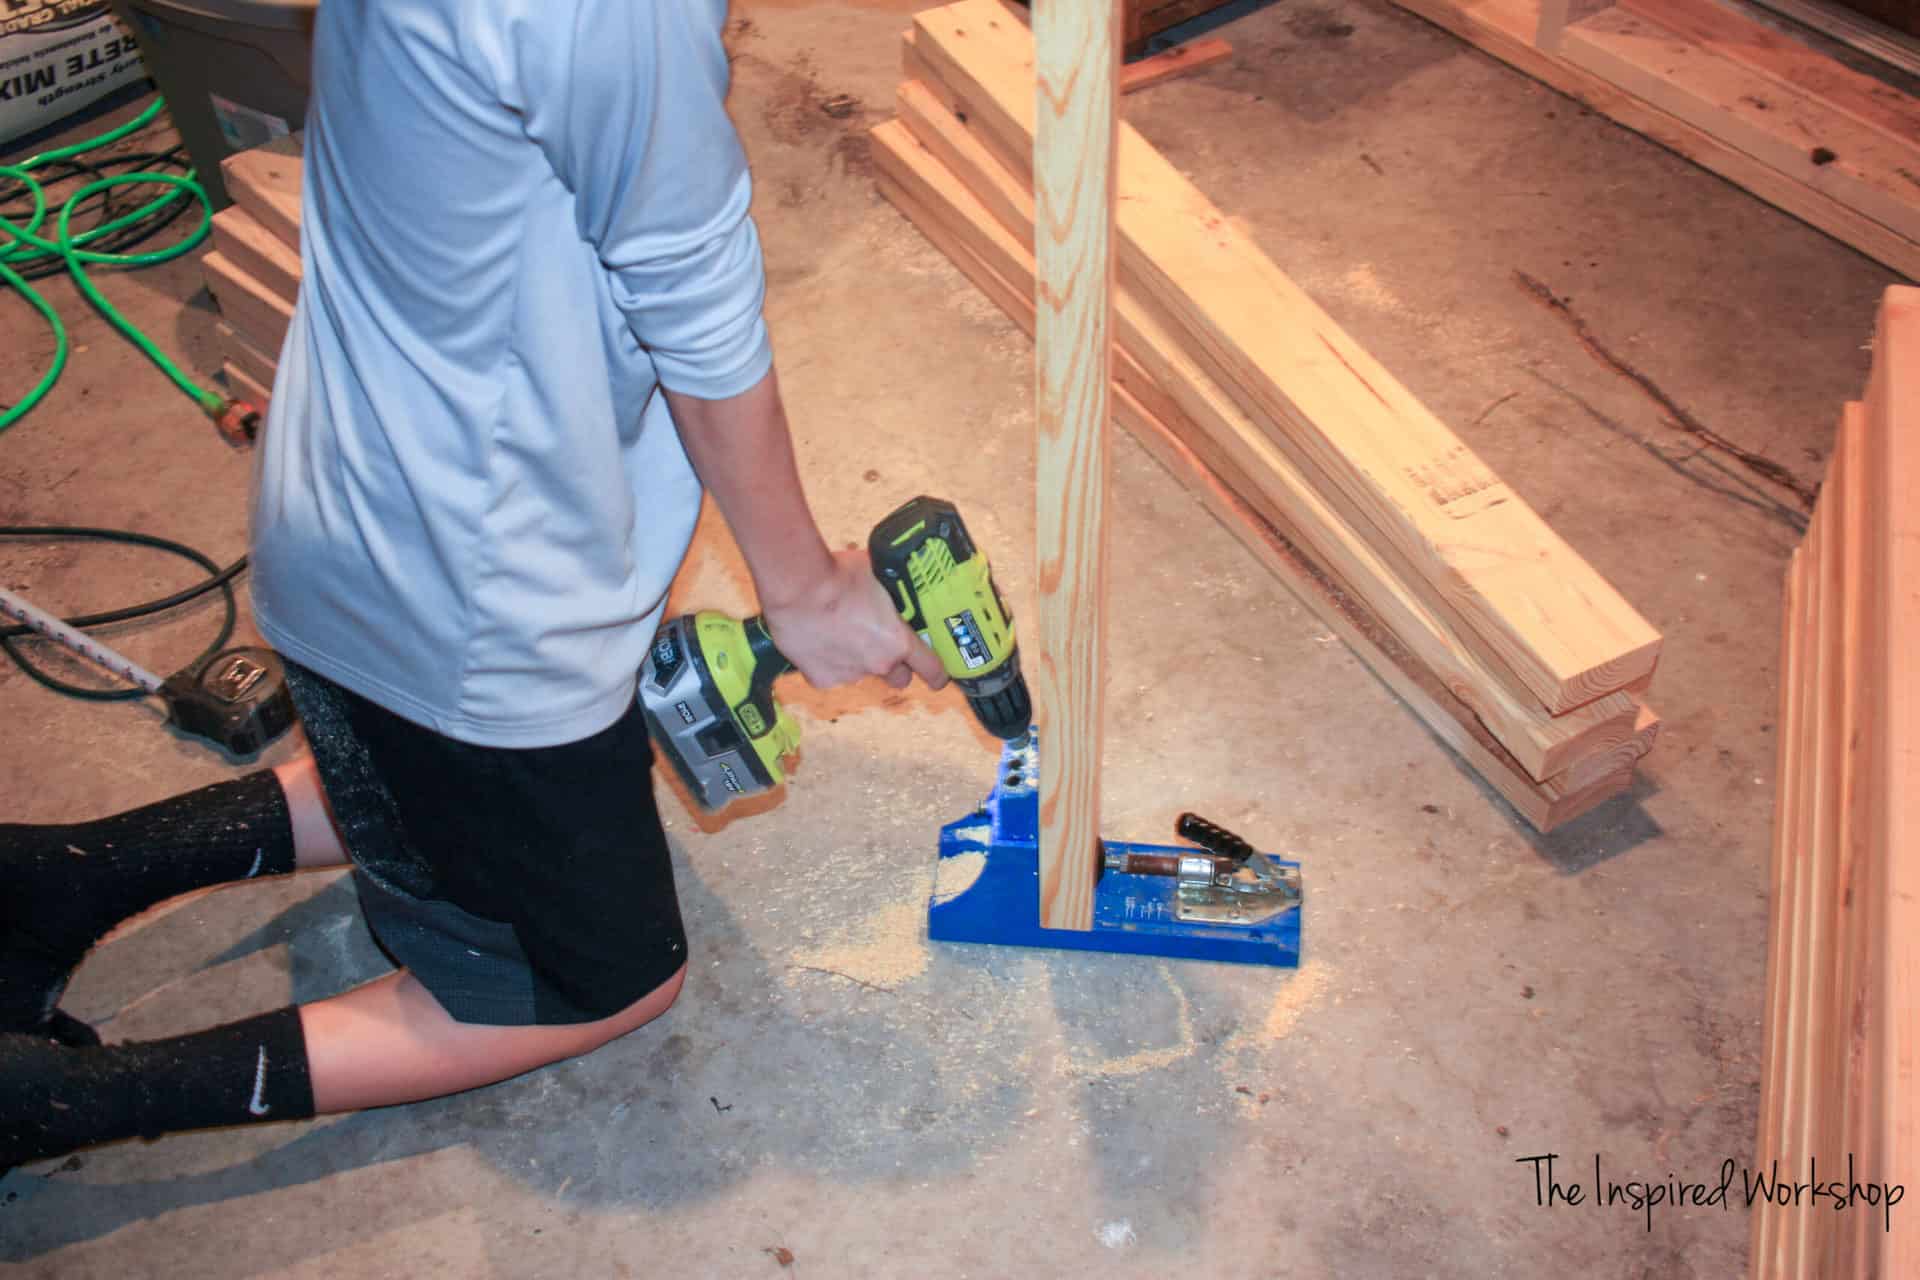
Using 2 – 2×4 @ 48″ and 2 – 2×4 @ 17″ form a rectangle. Add another 2×4 @ 17″ in the center of the rectangle. Drill 1 1/2″ pocket holes on the ends of the 17″ boards and use wood glue, along with 2 1/2″ Kreg screws to attach. Make sure and use wood glue on EVERY joint even if it is not specified!
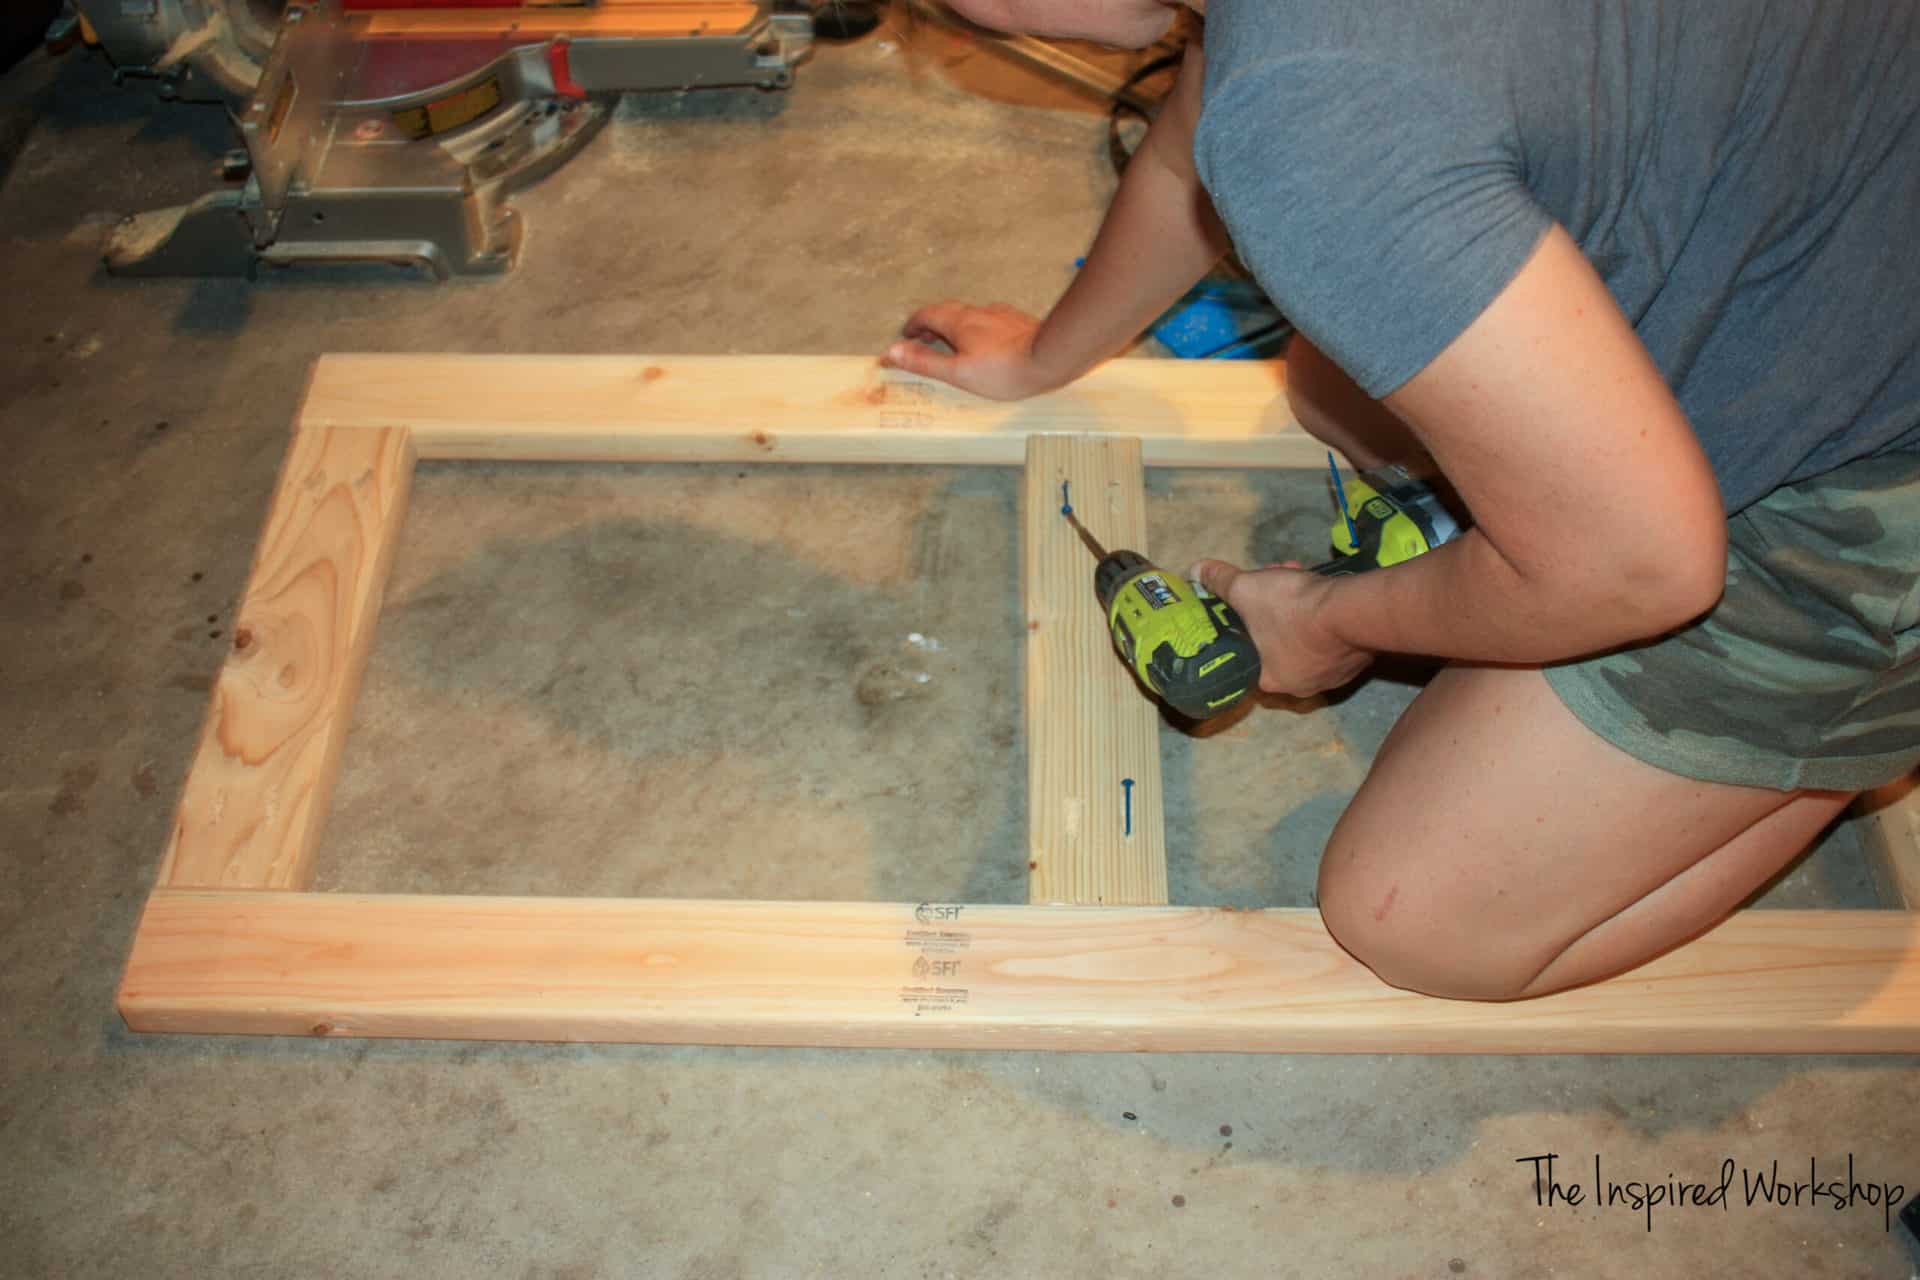
Drilling pocket holes is easy enough my kids do it for me all the time! You just have to set the jig to 1 1/2″ and set your bit to 1 1/2″, then drill the holes! (Ignore the old watermark on my photos! Lol!)
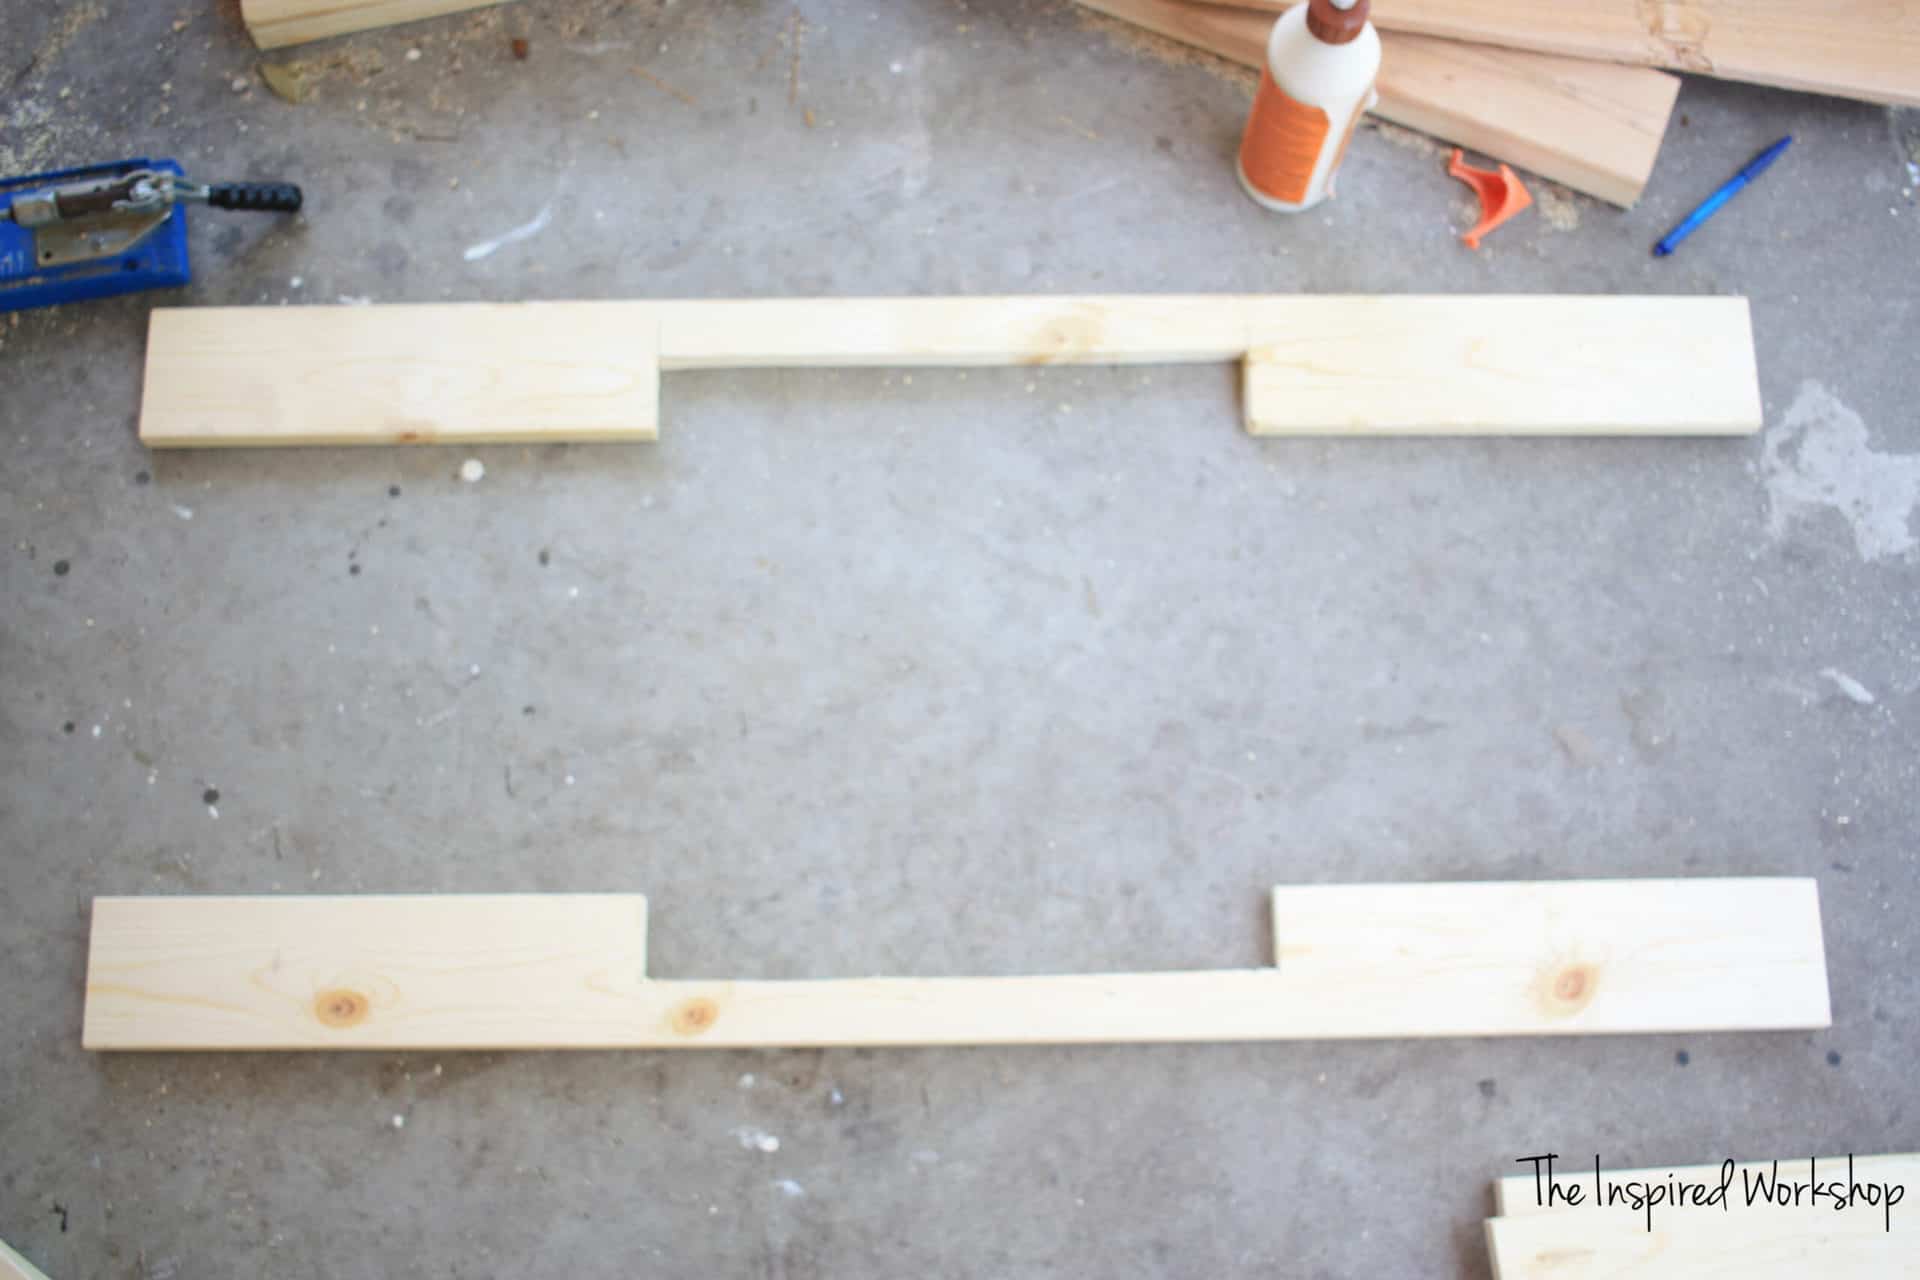
Step 2
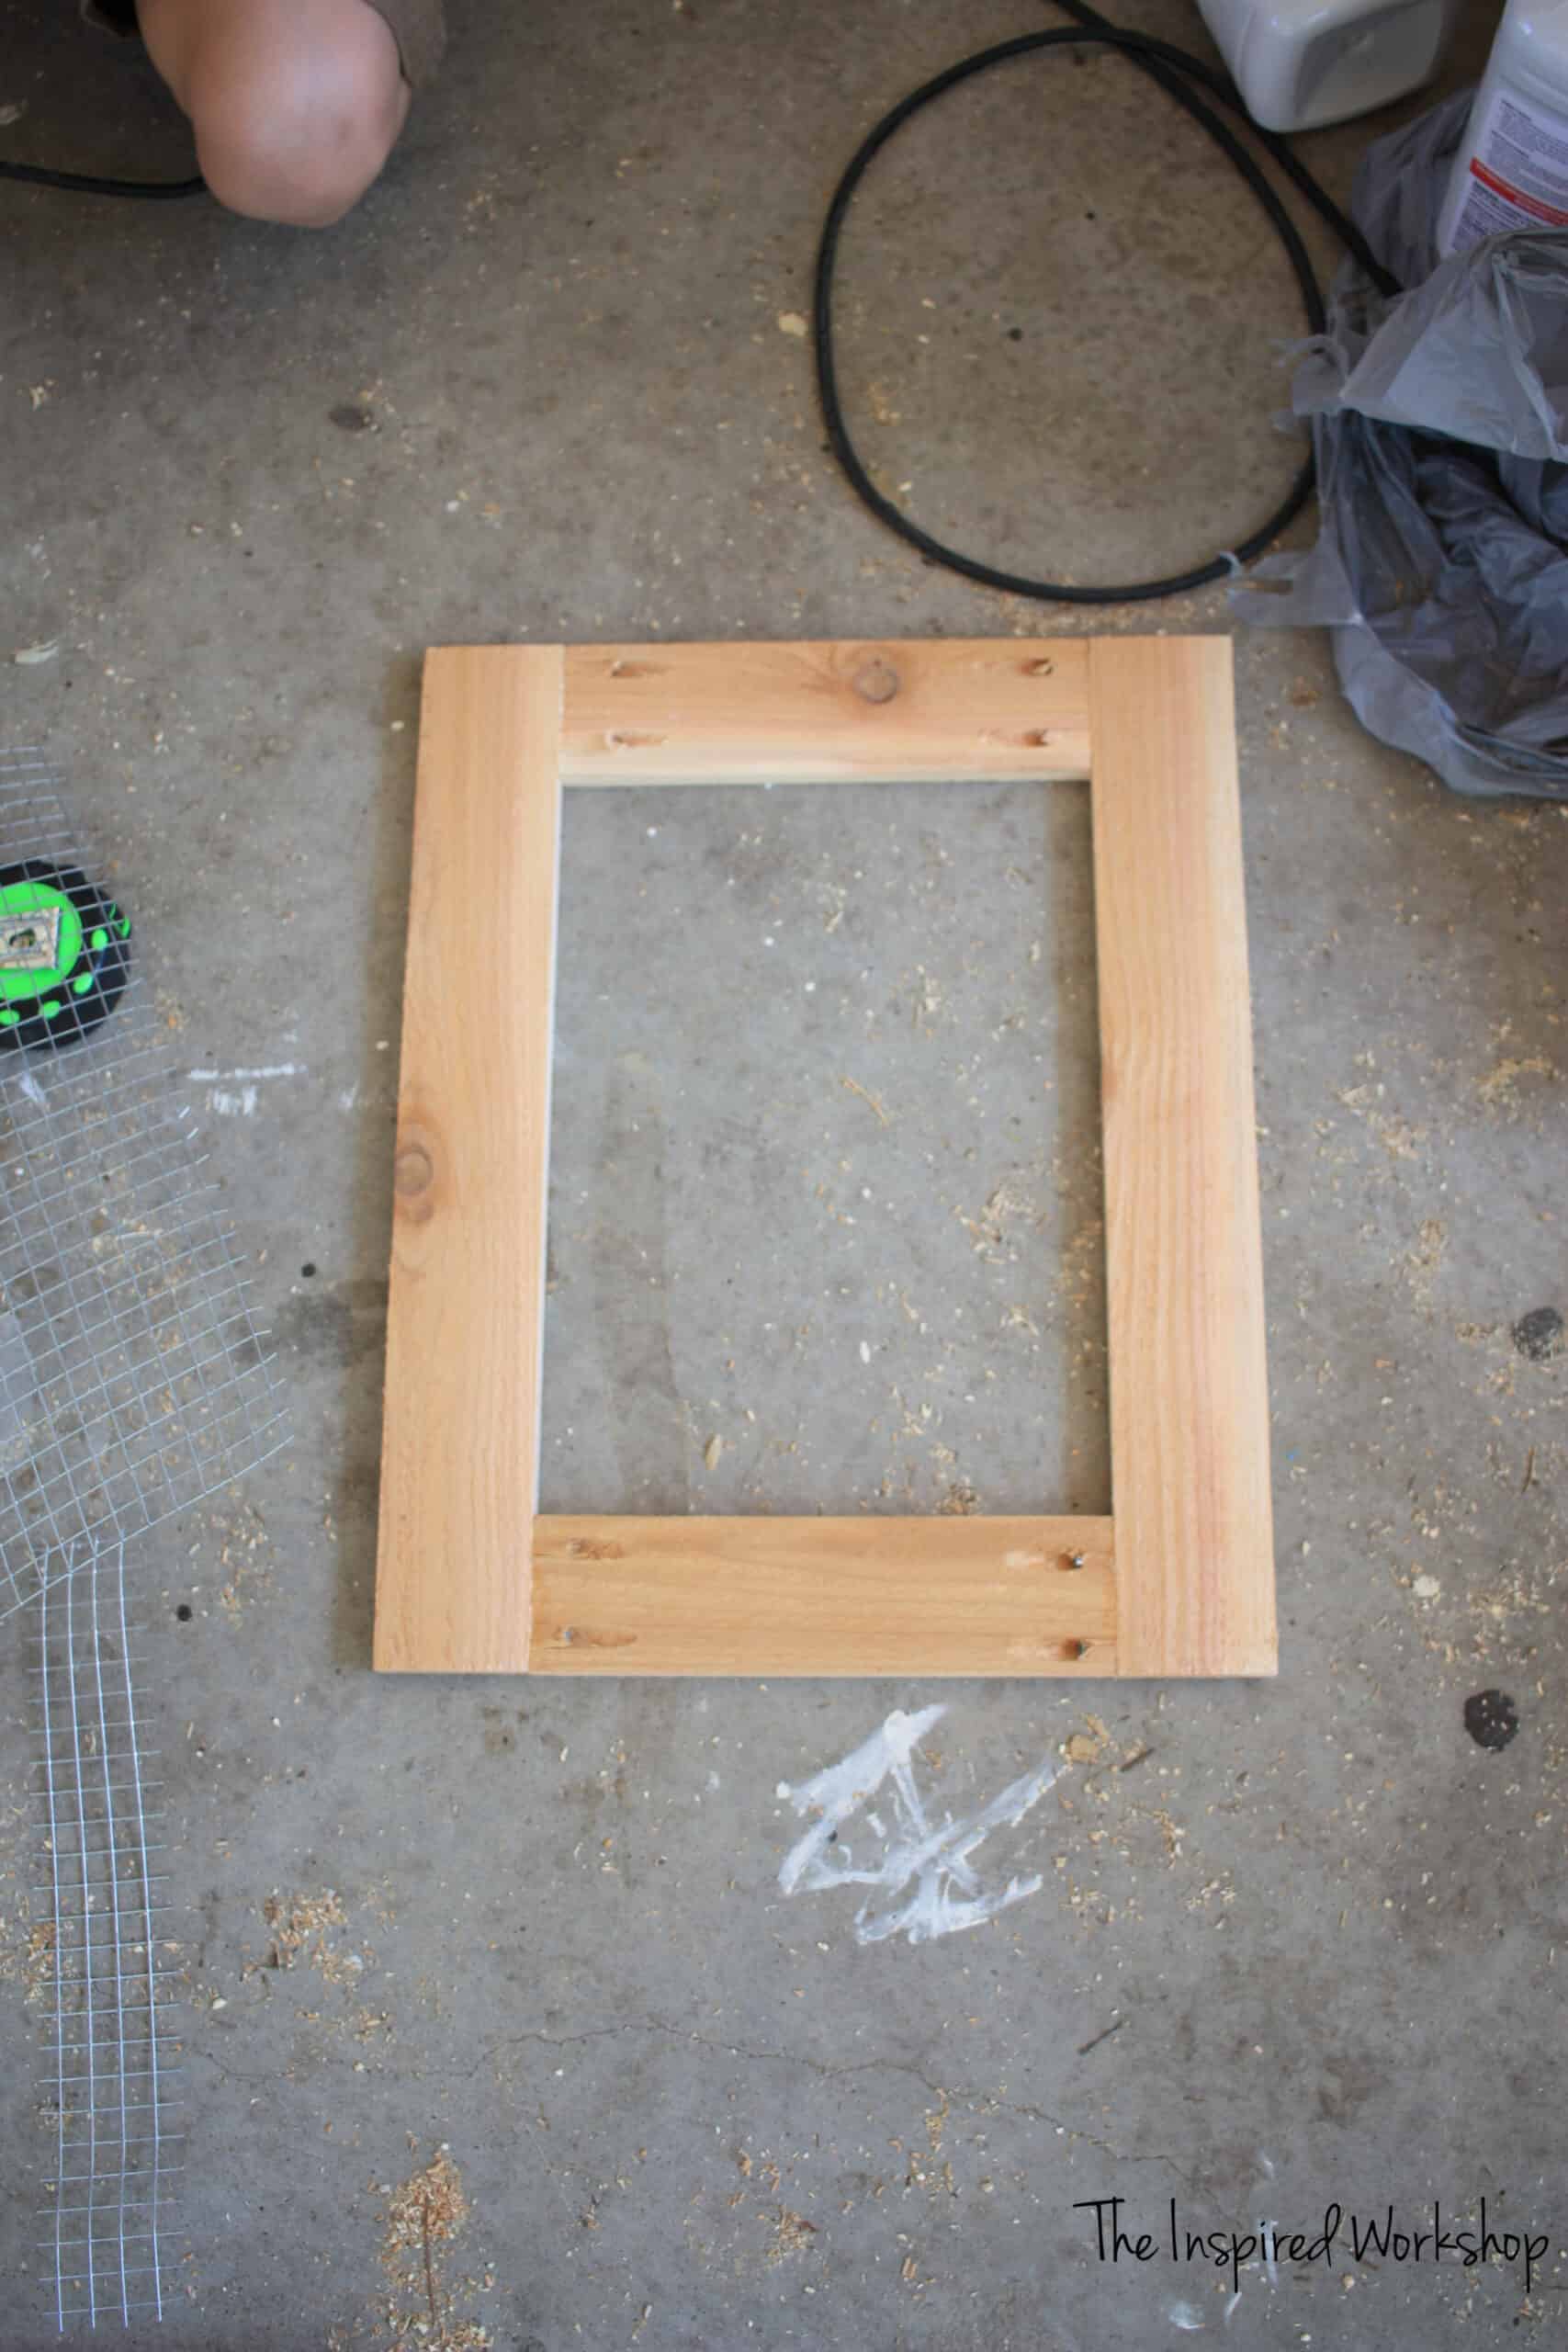
Build the front and back of the small chicken coop. You will build 2 of the pieces shown below, one for the front and one for the back.
Using 2 – 2x4s @ 48″ and 3 – 2x4s @ 41″, make a rectangle and place the 3rd board smack dab in the middle just like on the sides. Again use 1 1/2″ pocket holes, and 2 1/2″ screws to attach with lots of glue!
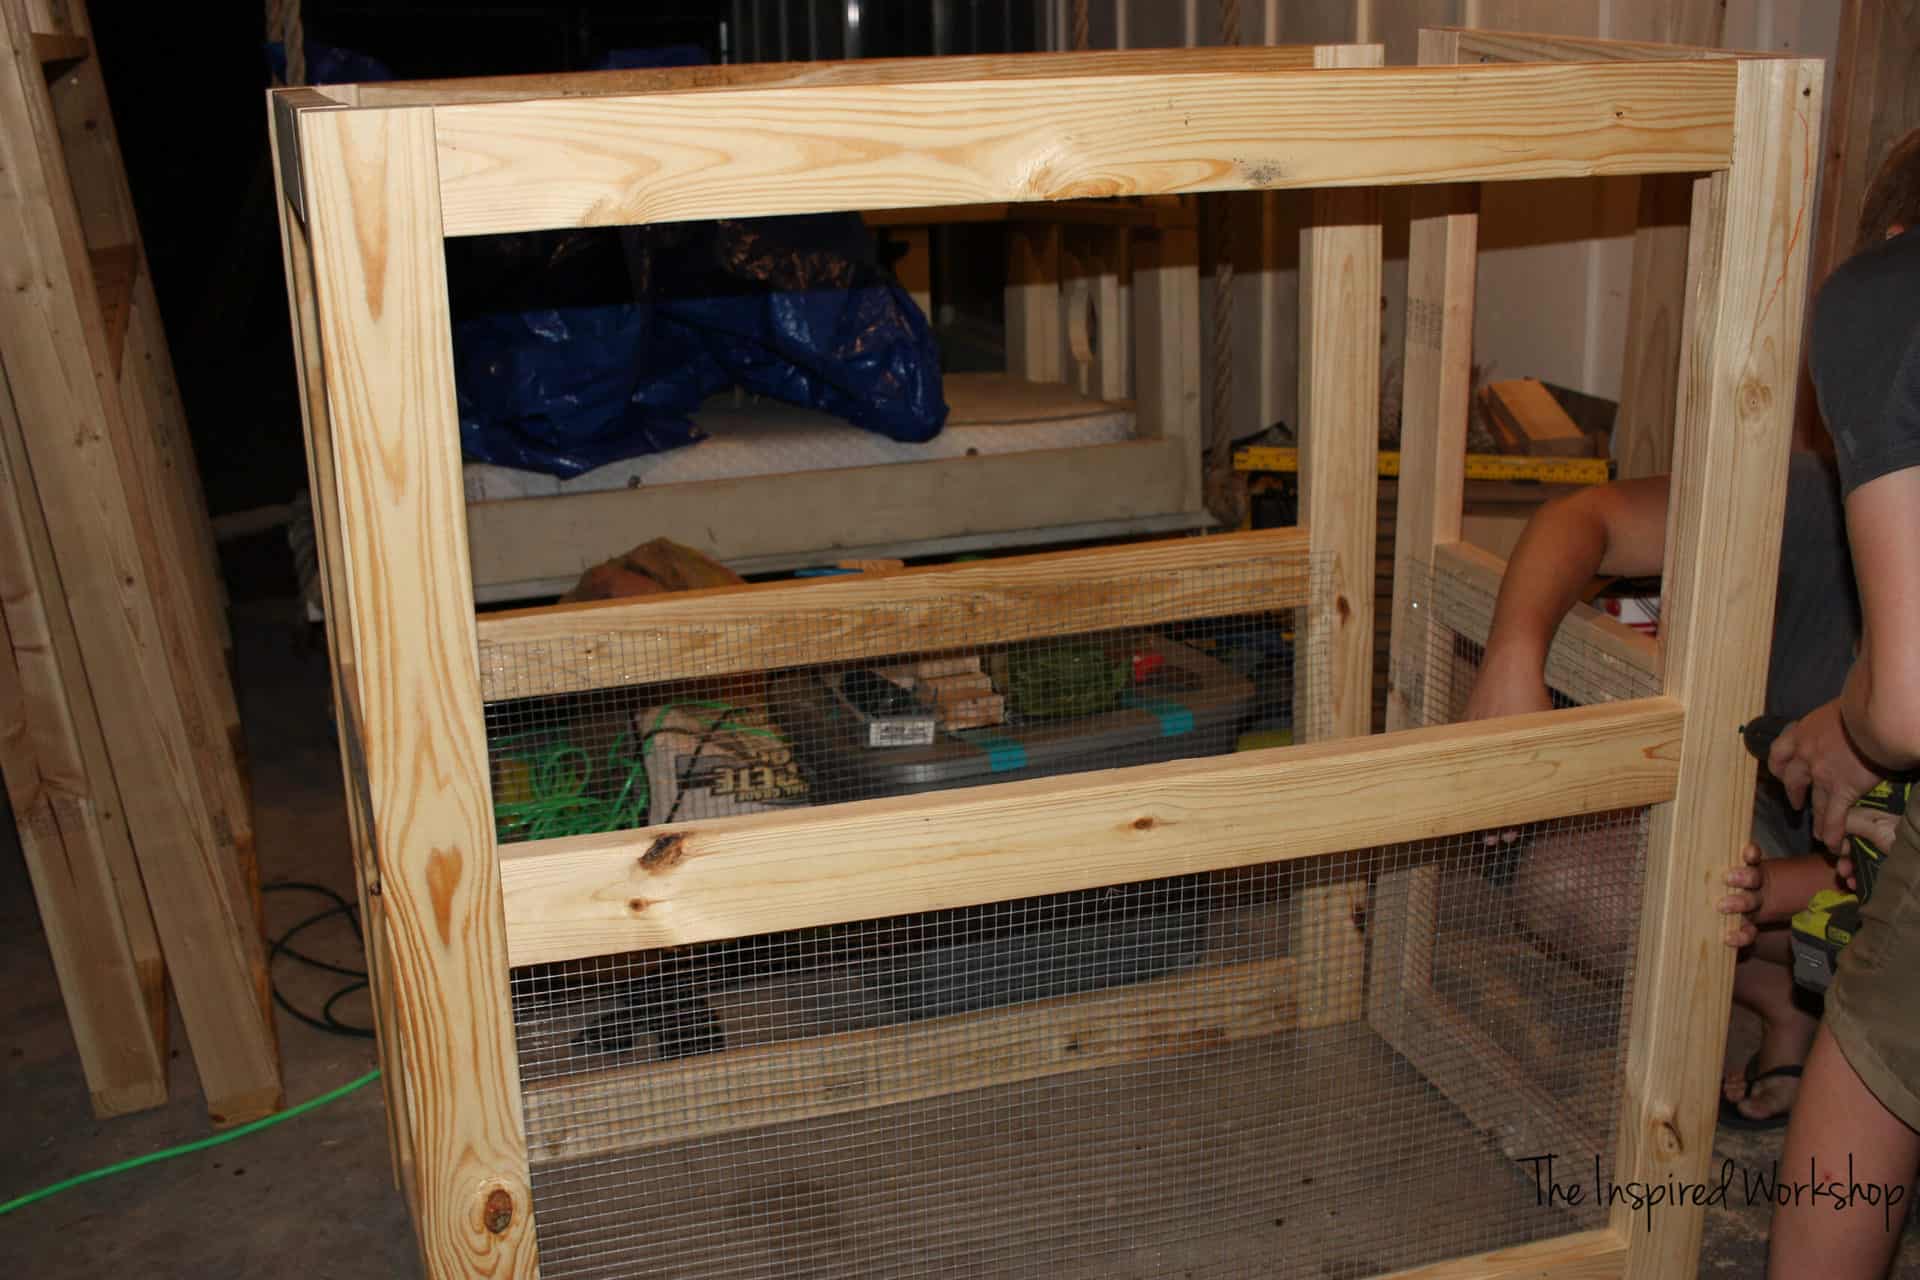
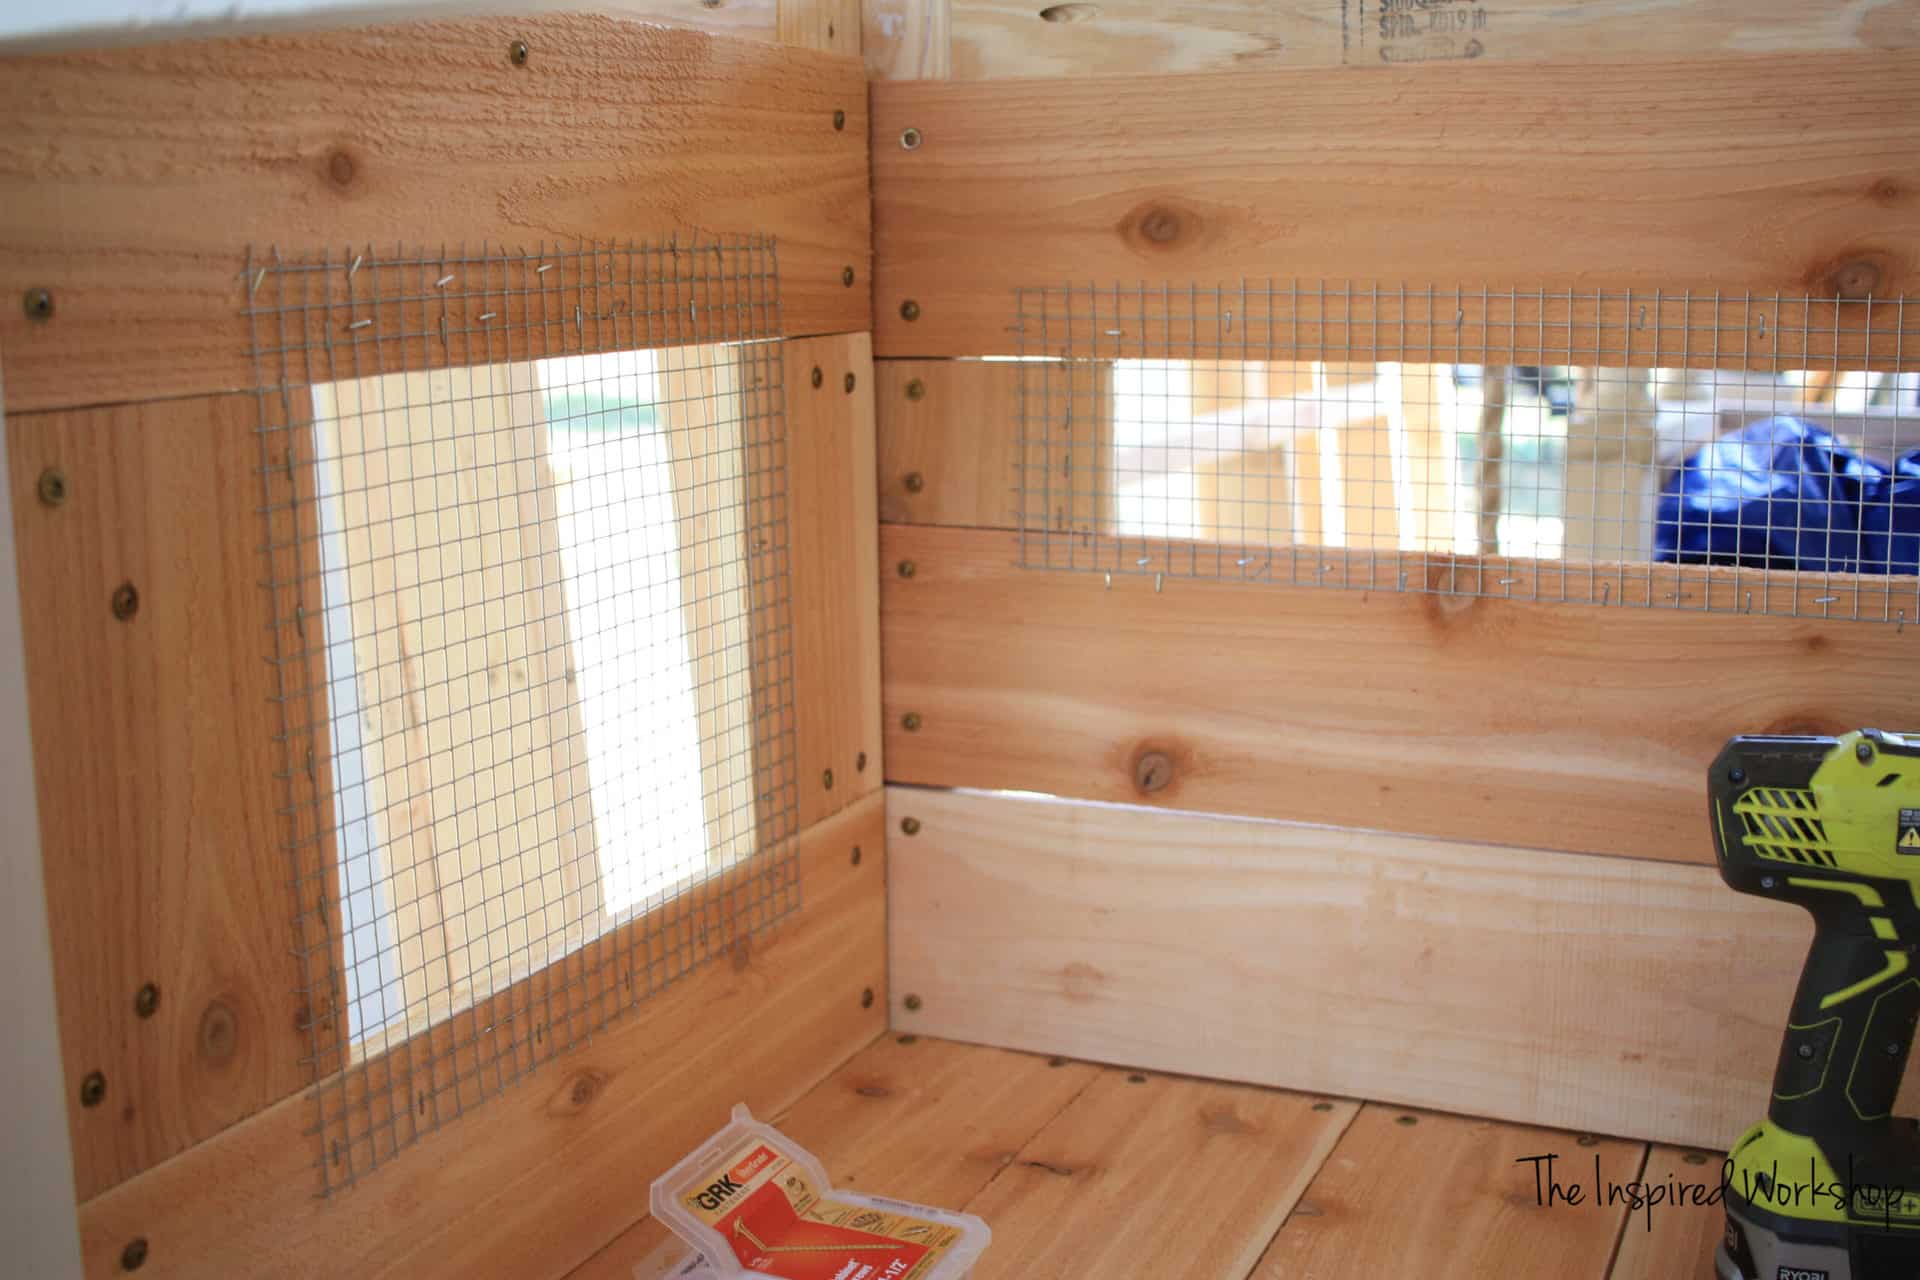
Pic is just to give you an idea of where the middle board goes, we had already started attaching hardware cloth as you can see!
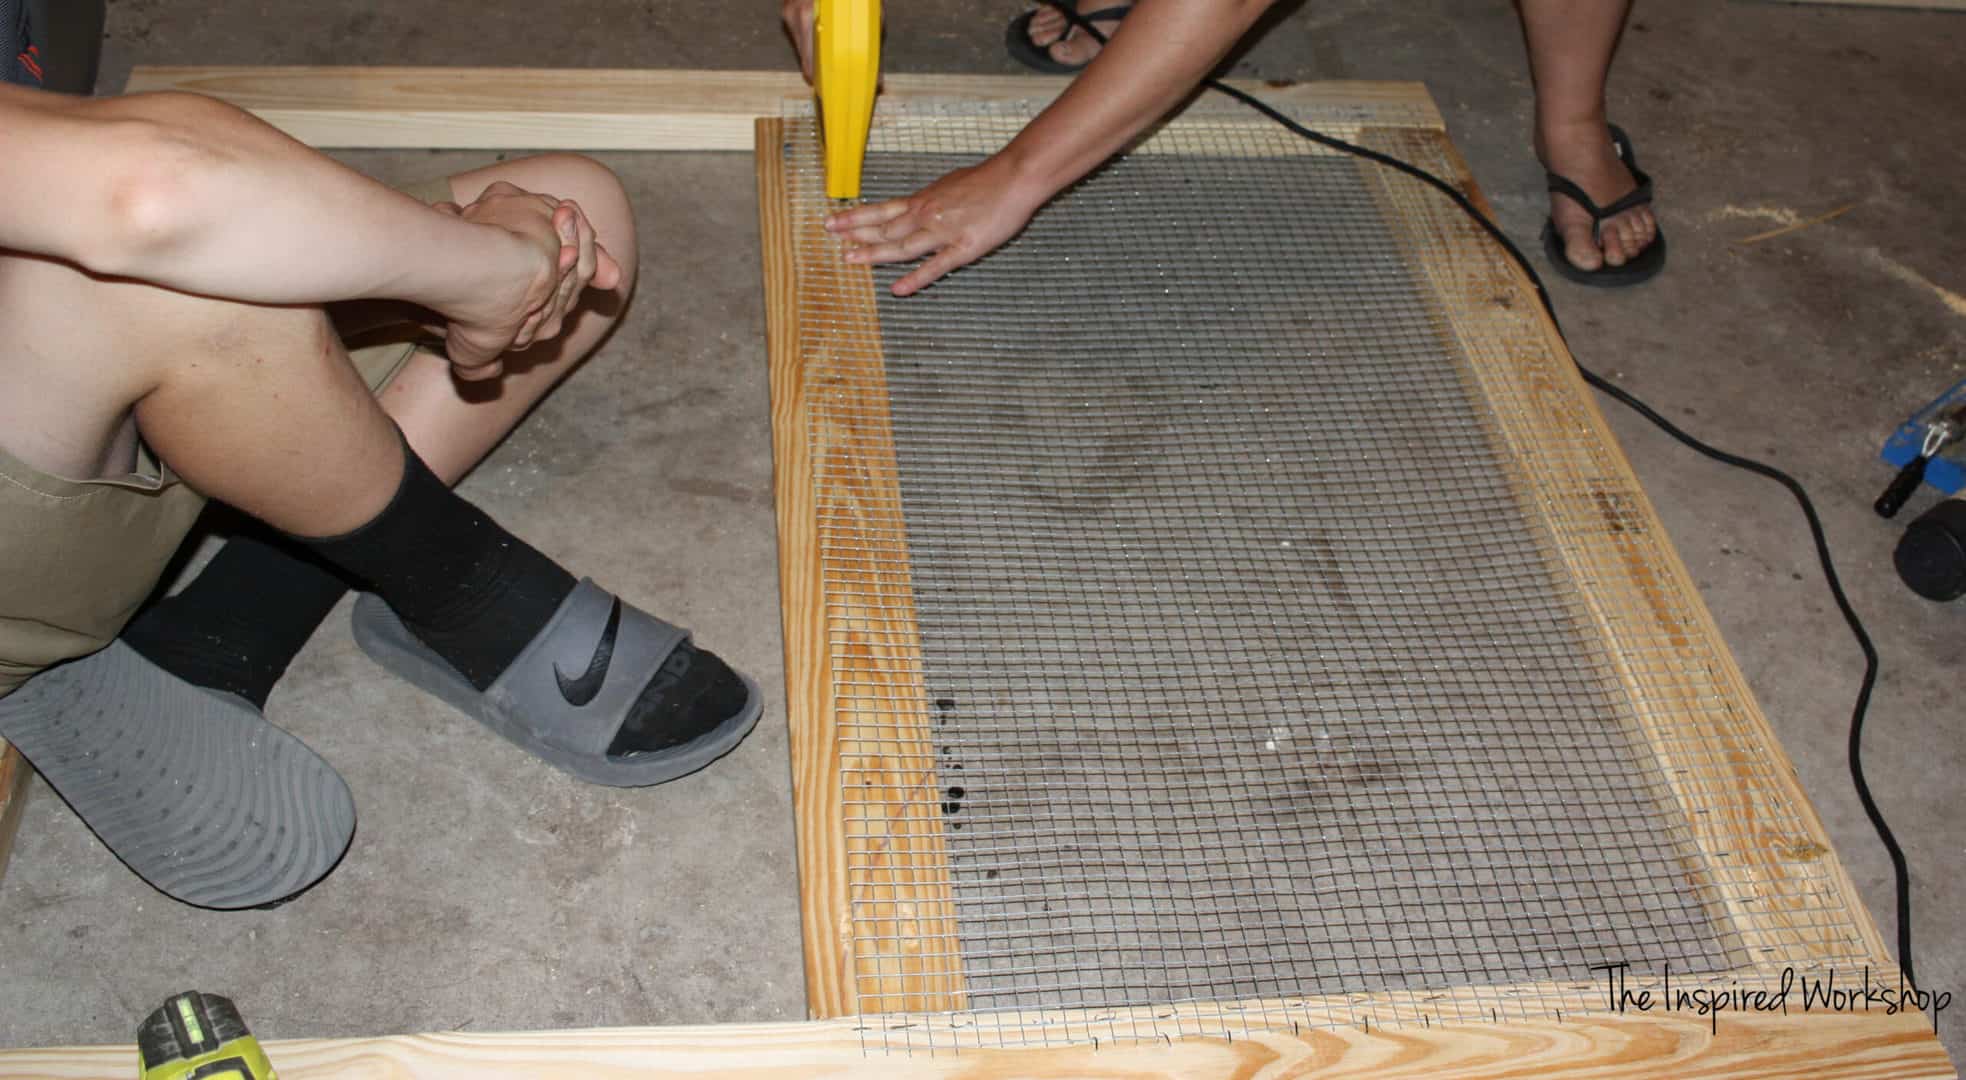
We attached the hardware cloth at this point, but 2 things…first, the front needs two more boards added before the hardware cloth is attached, my mistake…I had to cut the hardware cloth out in the section and reattach to the new boards!😬 Second, it was next to impossible to paint inside the hardware cloth, so I would paint now before attaching the hardware cloth!
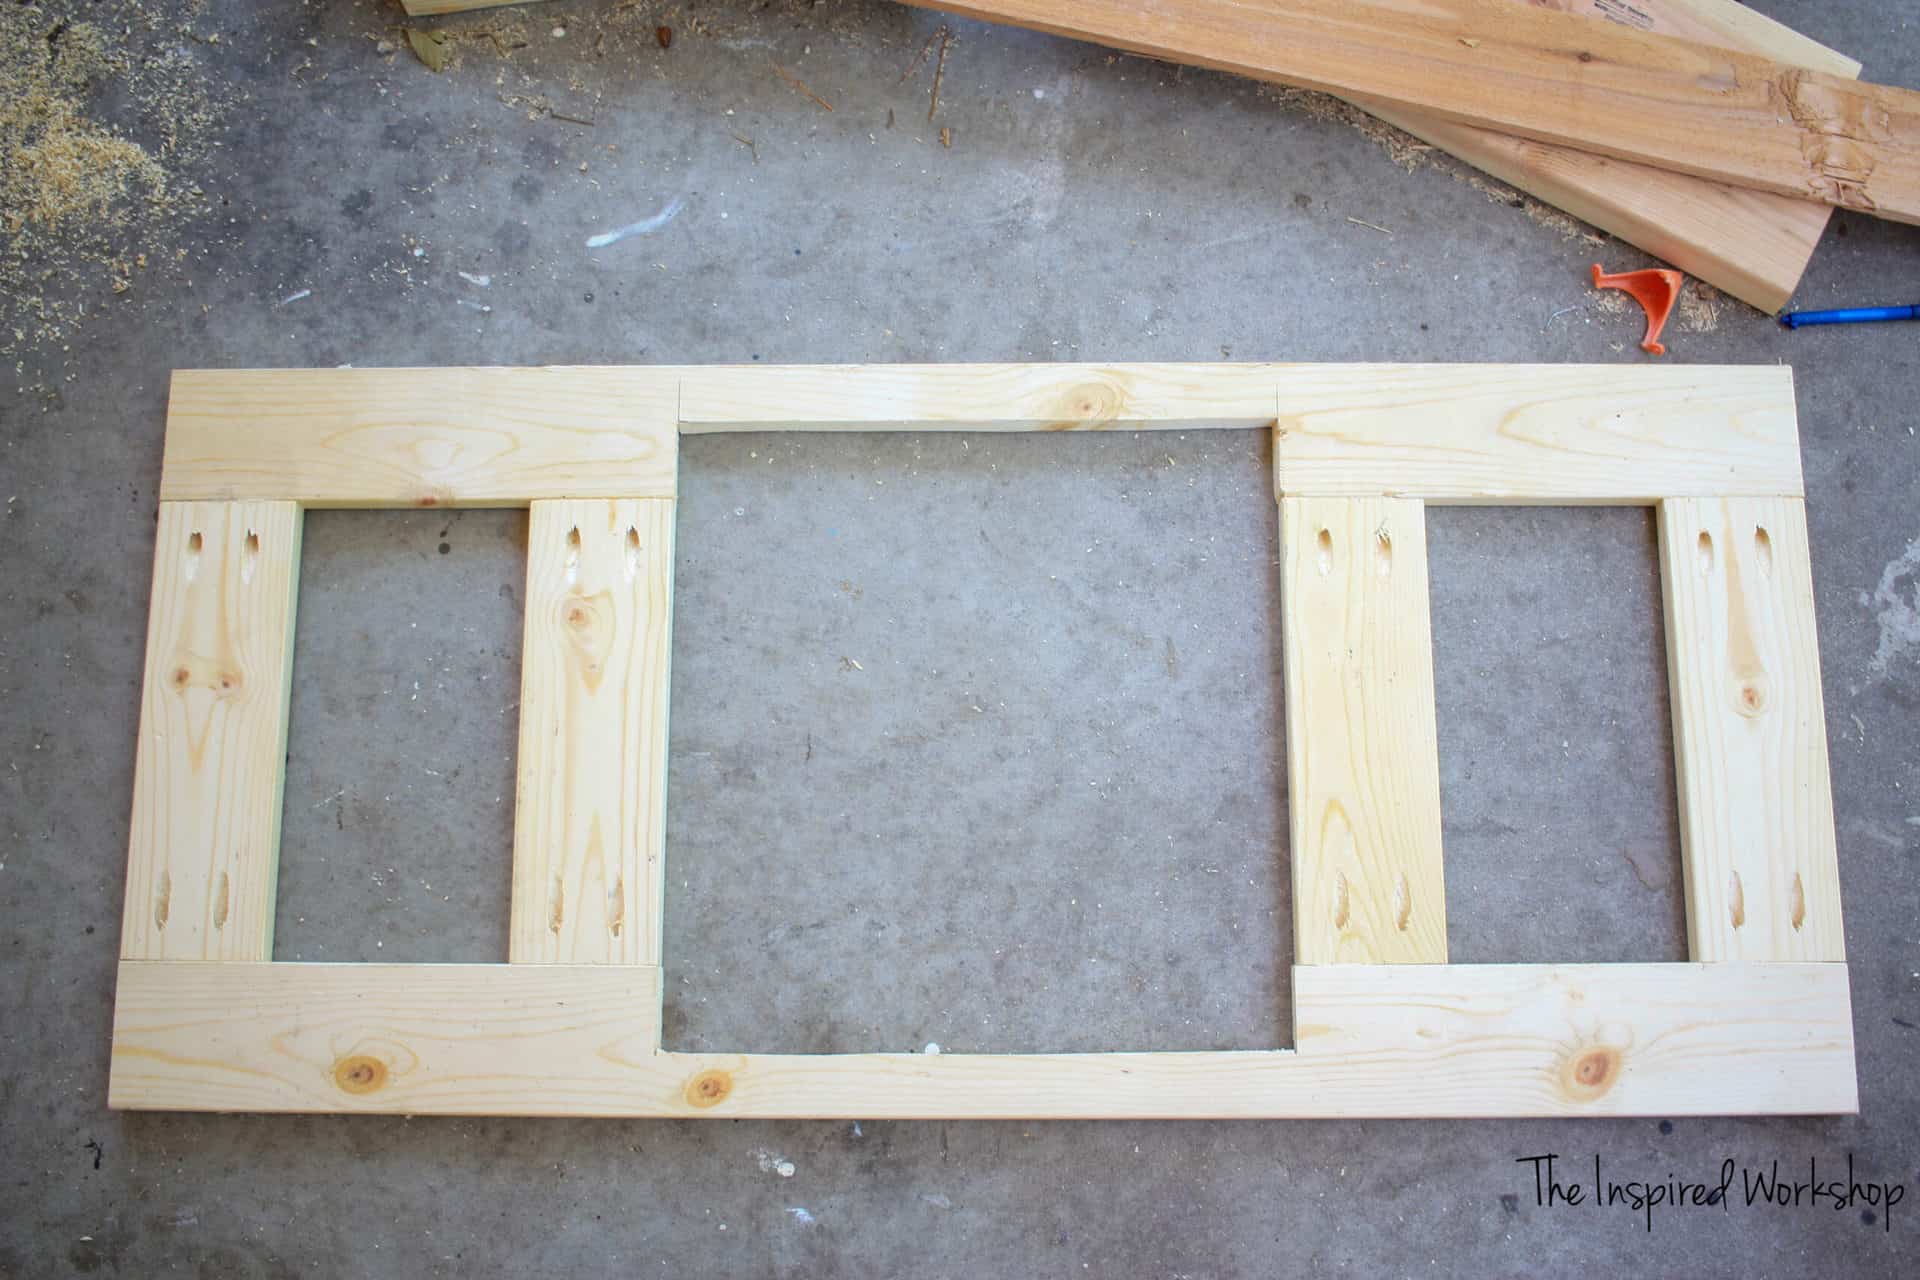
Step 3
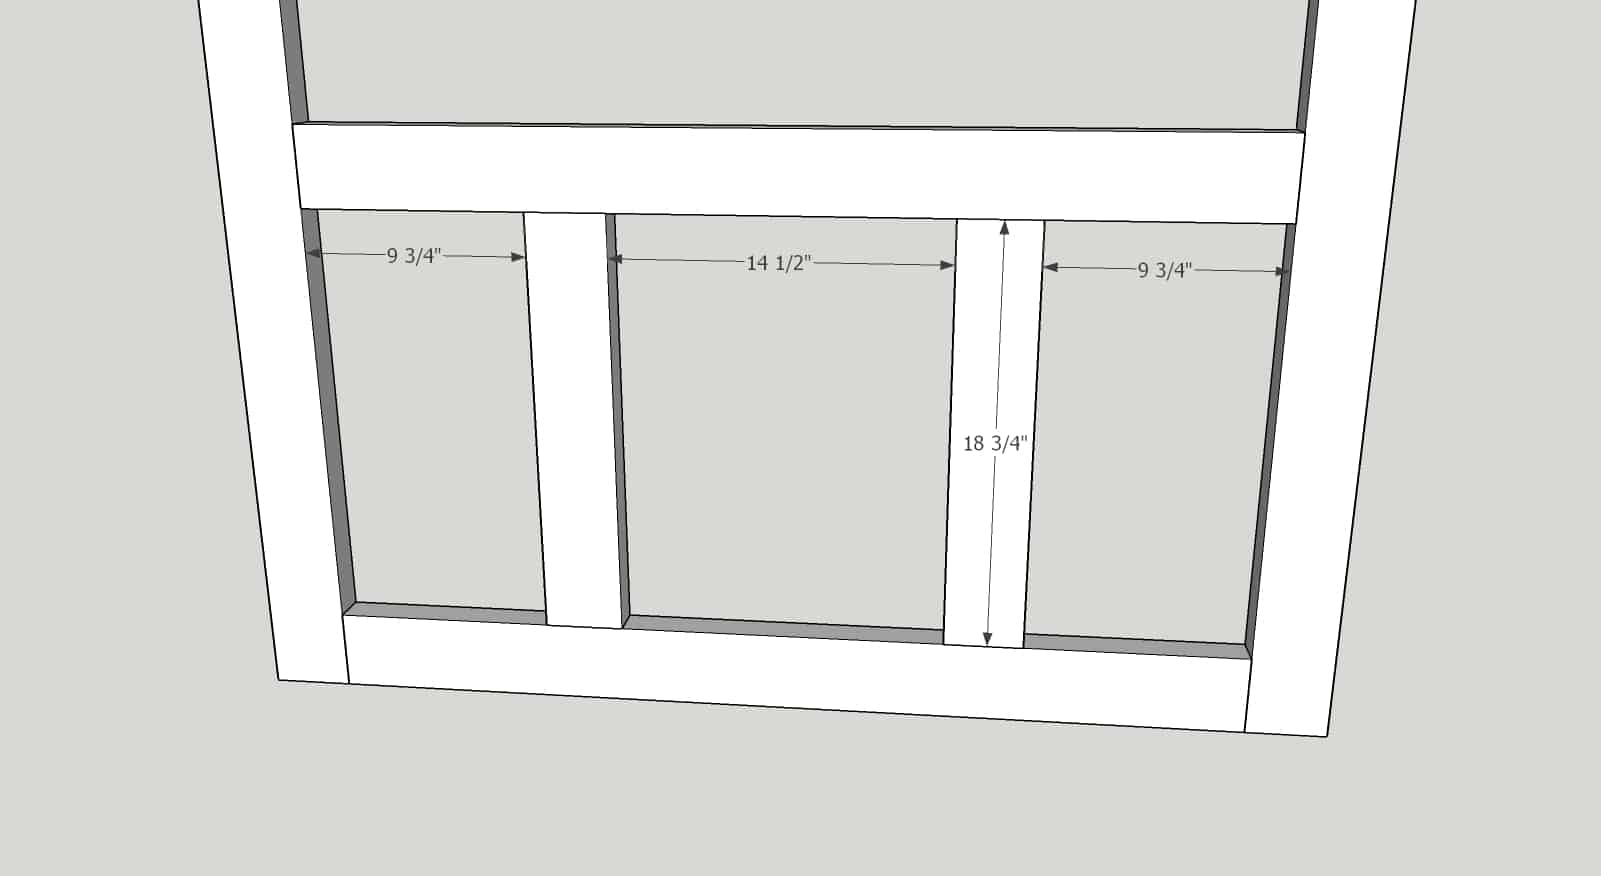
Add the 2 – 2×4 @ 18 3/4″ boards to the front of the small chicken coop. They are spaced 9 3/4″ from each side. You will use 1 1/2″ pocket holes and 2 1/2″ screws to attach.
Step 4
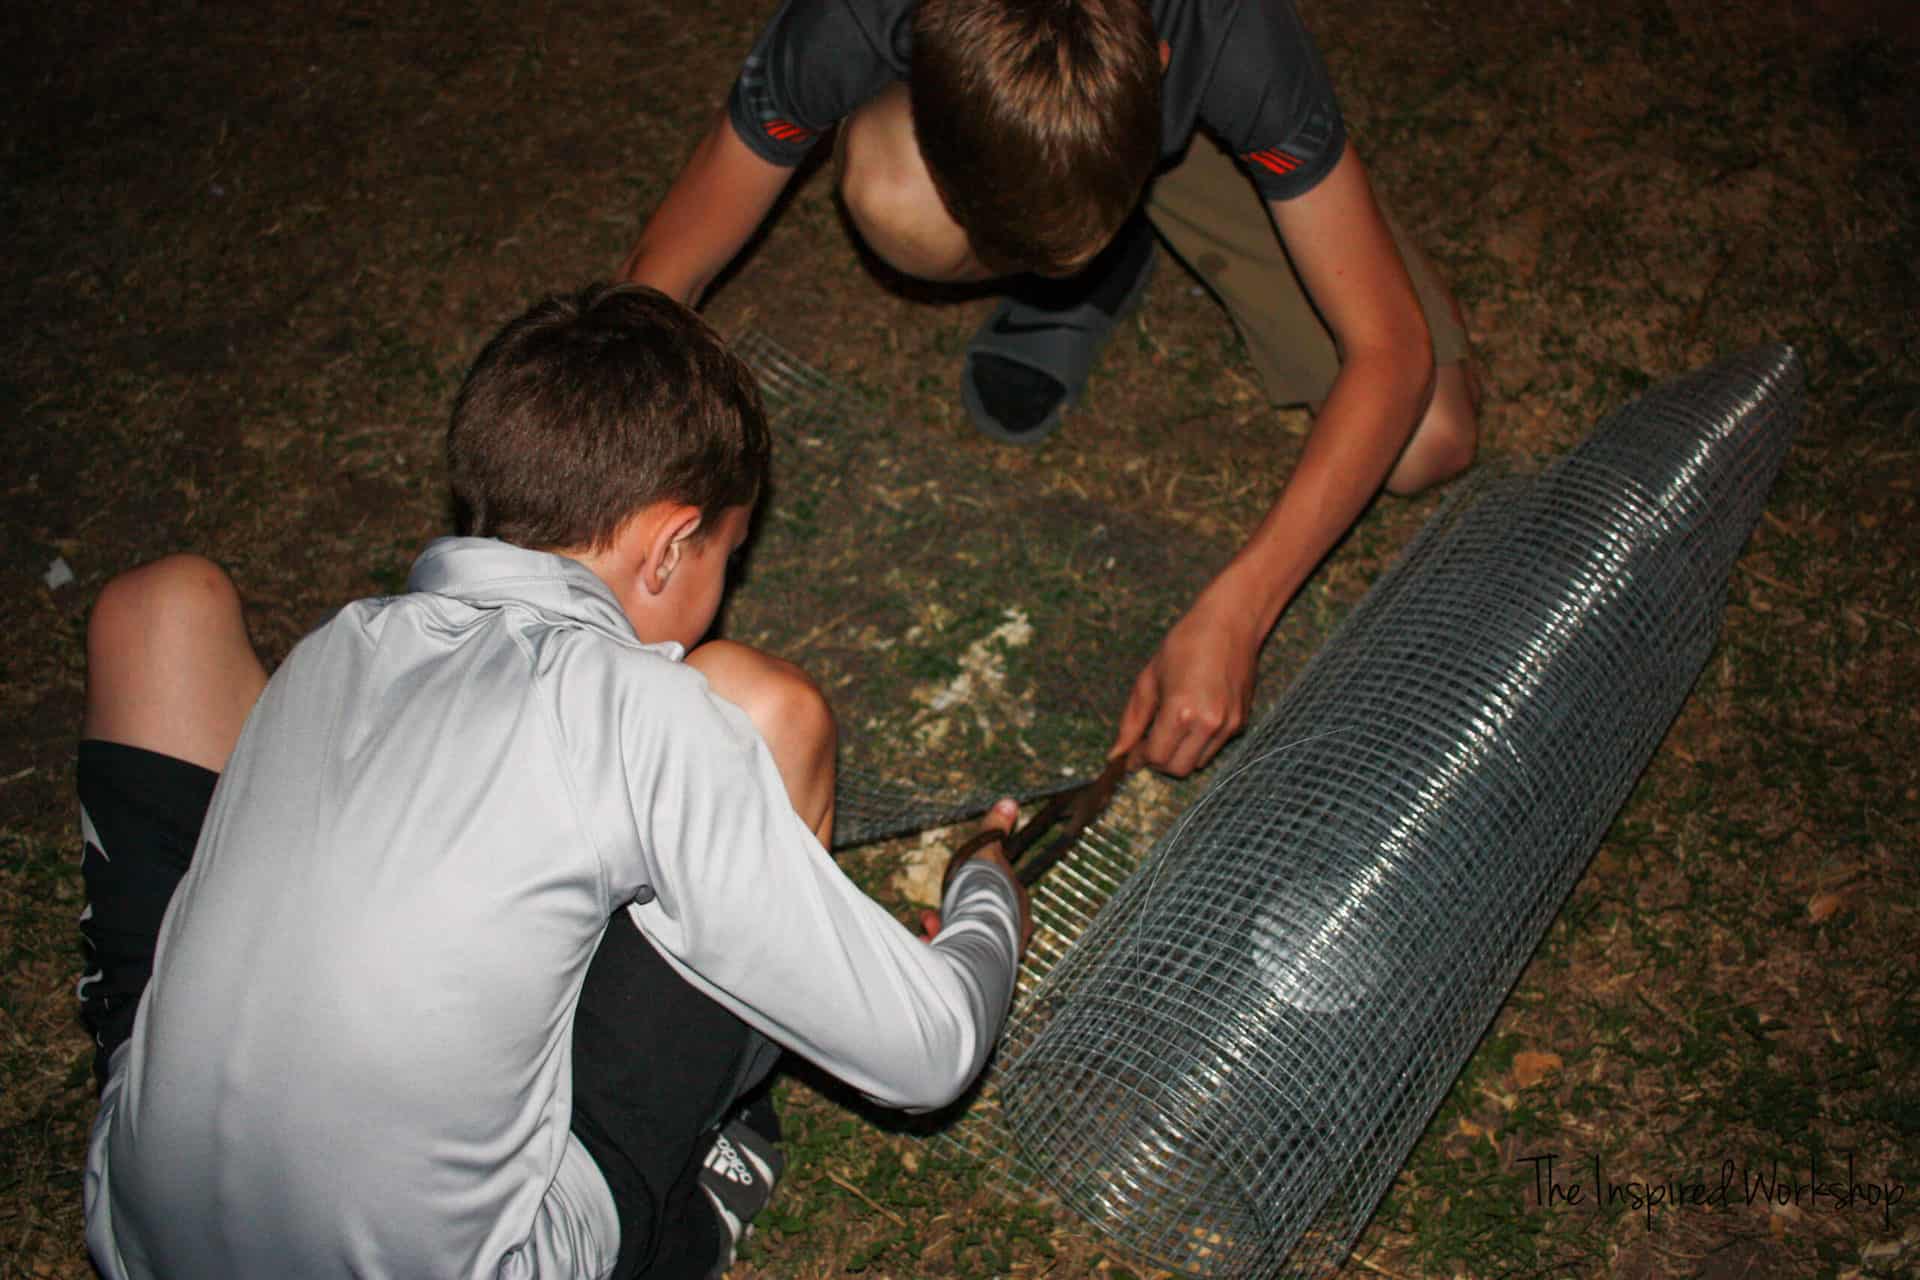
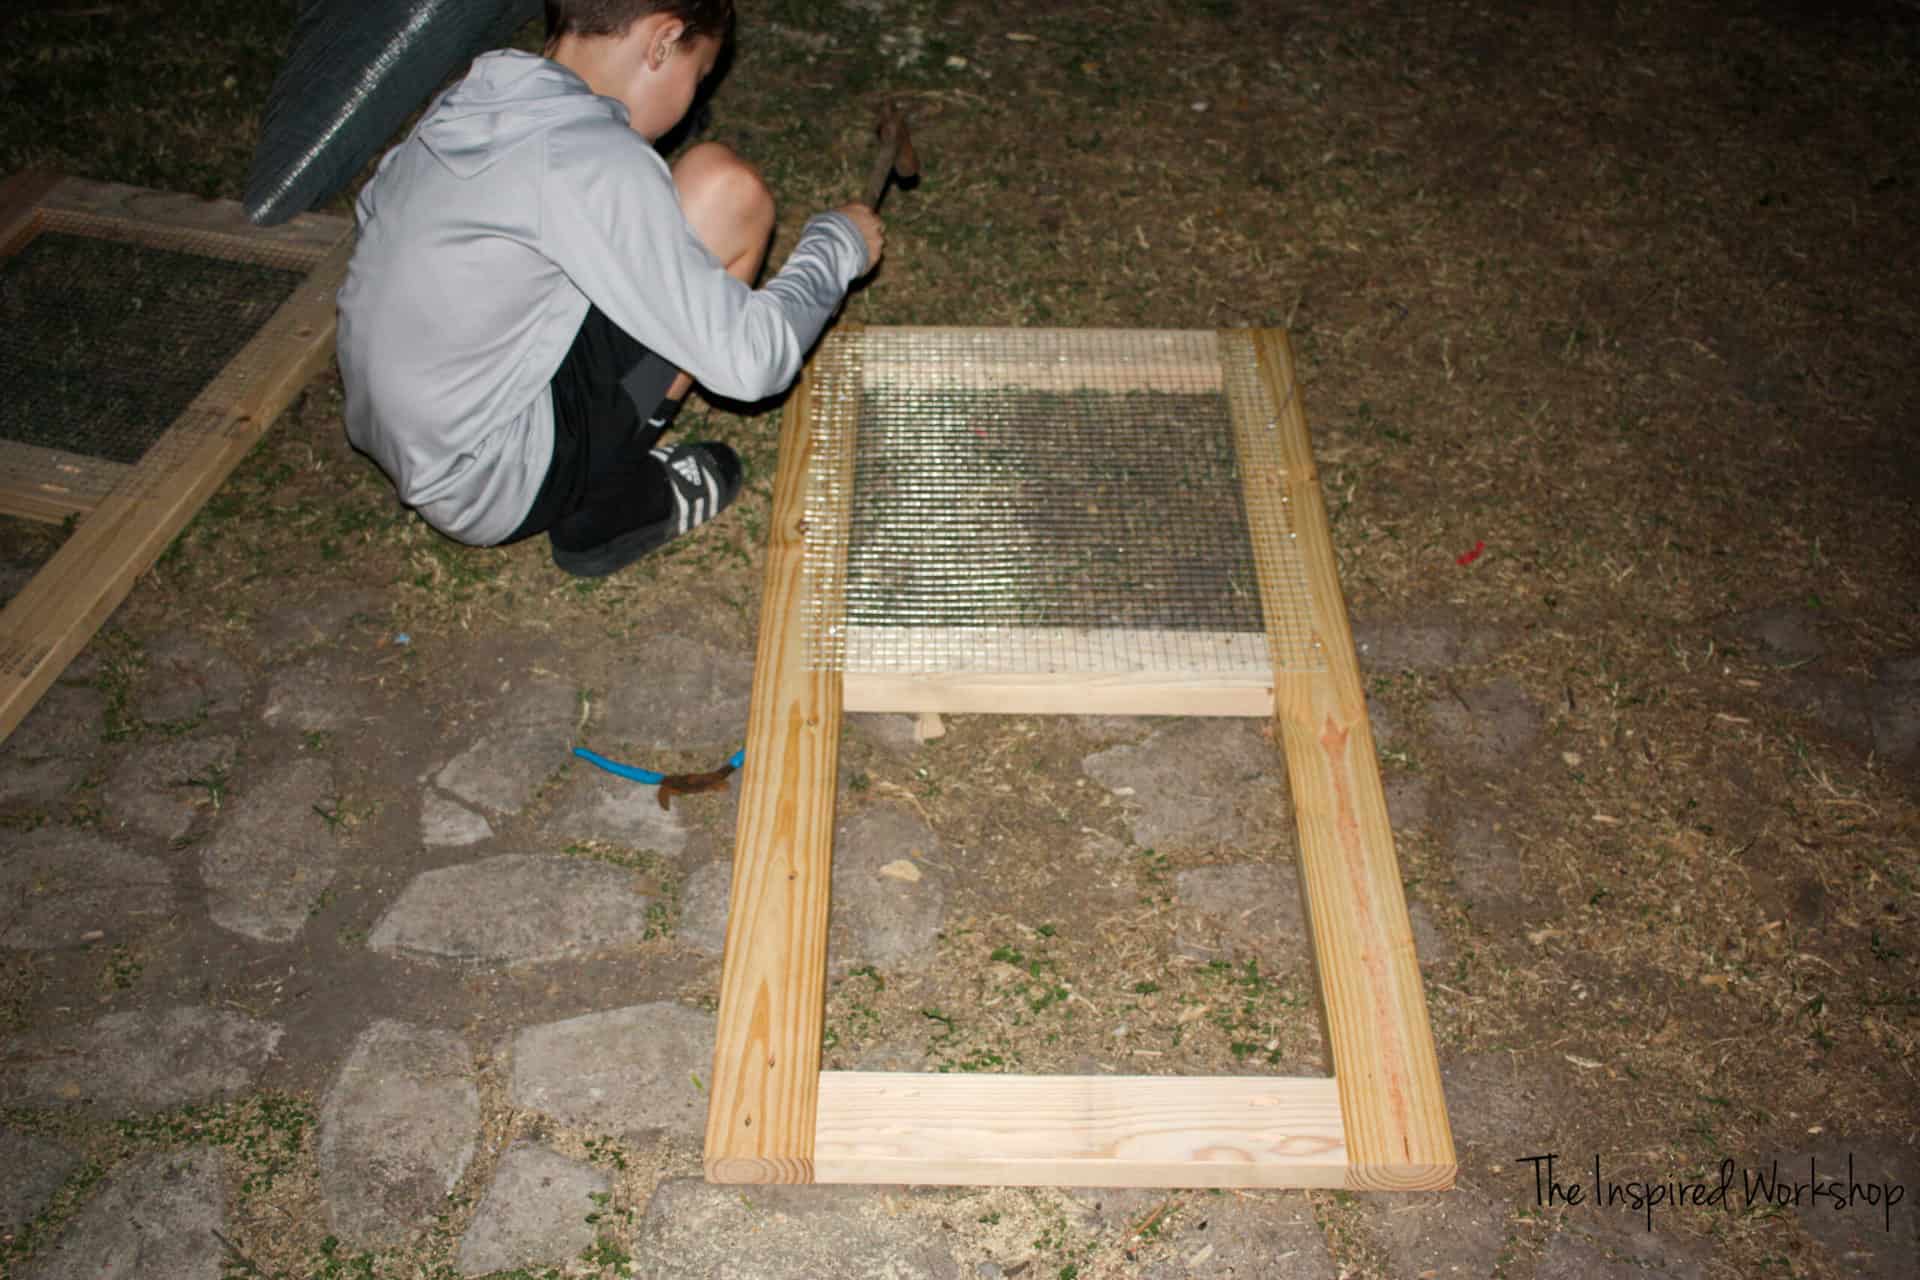
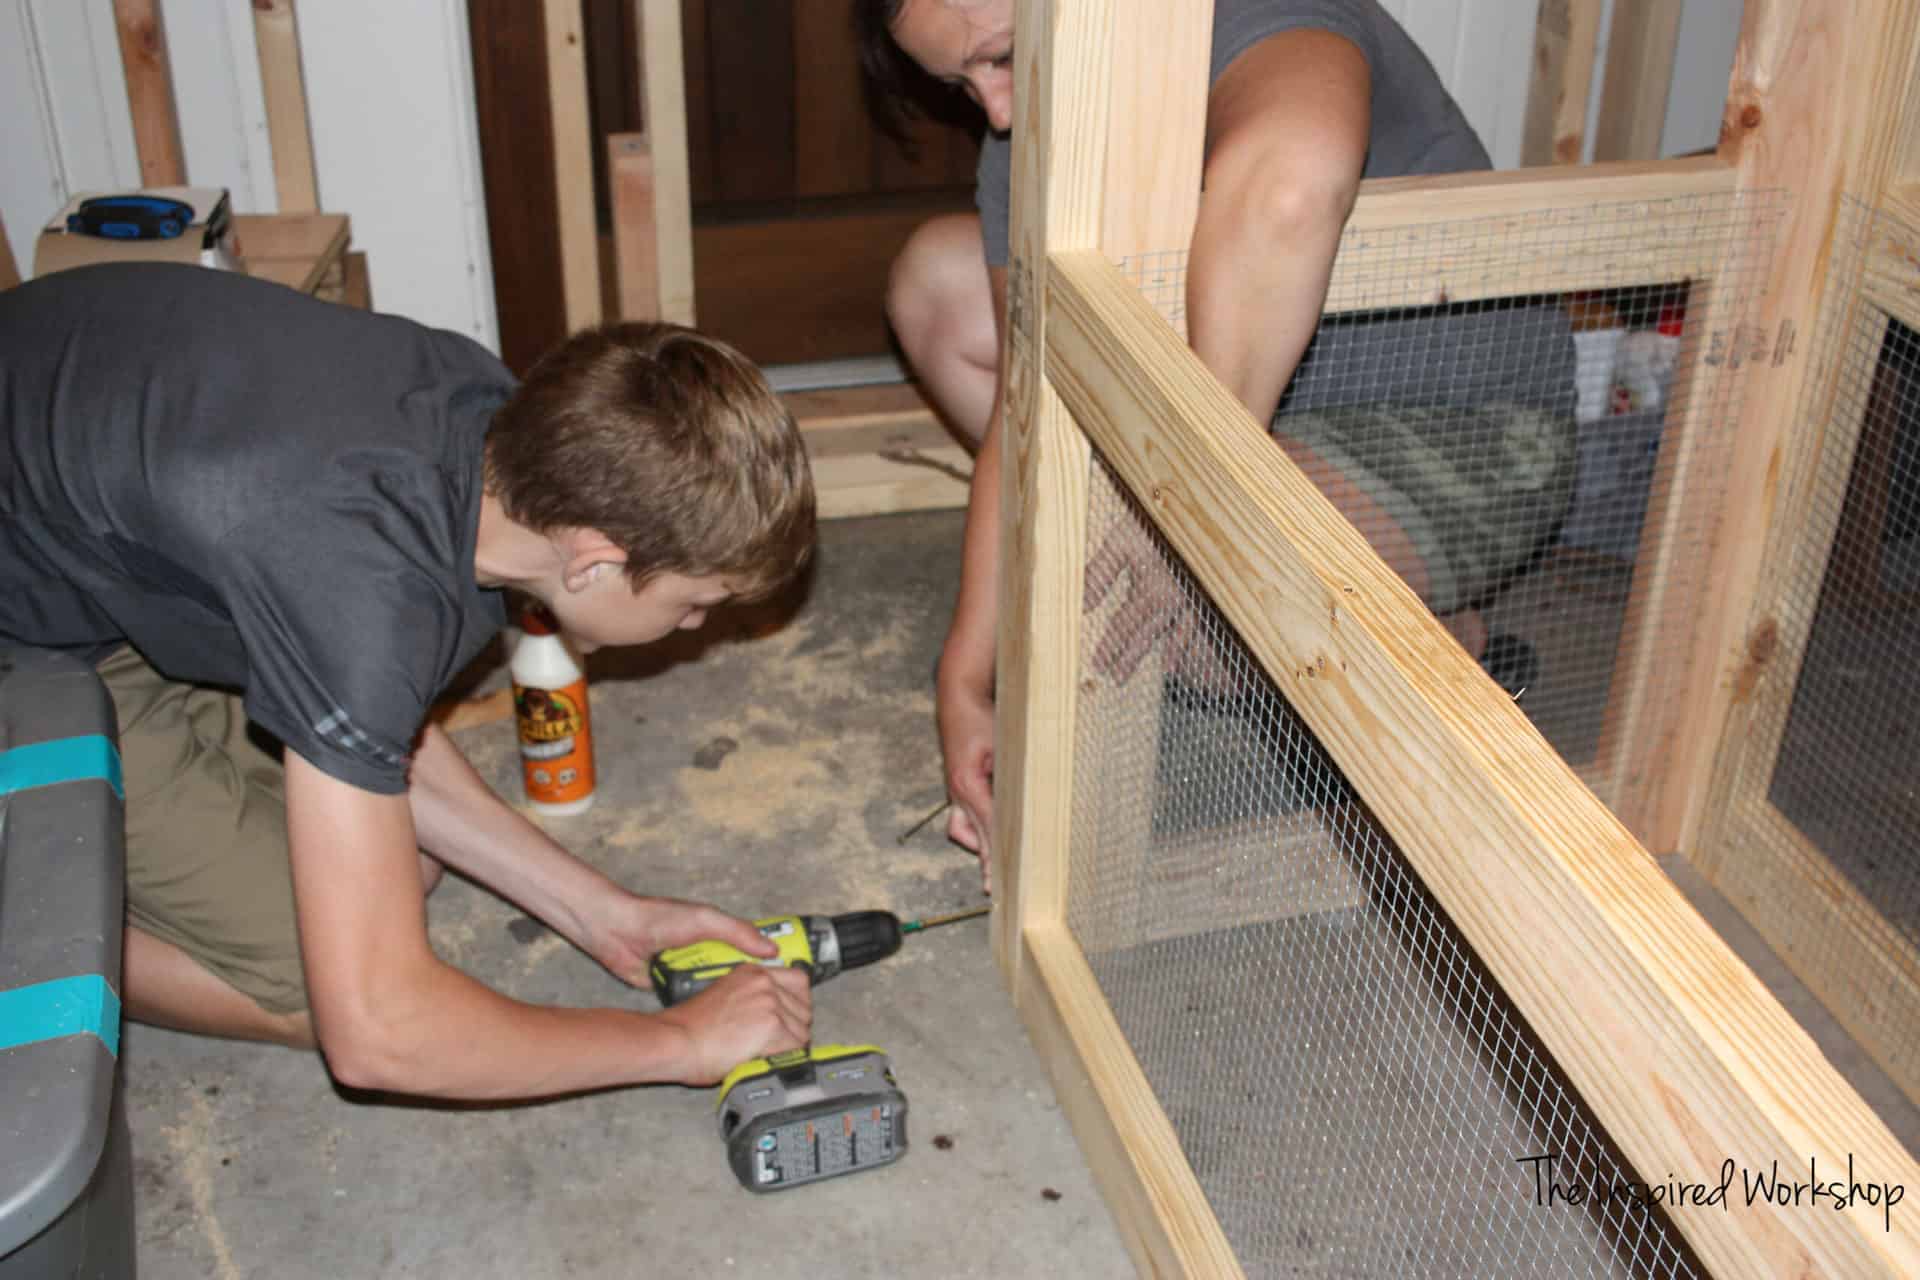
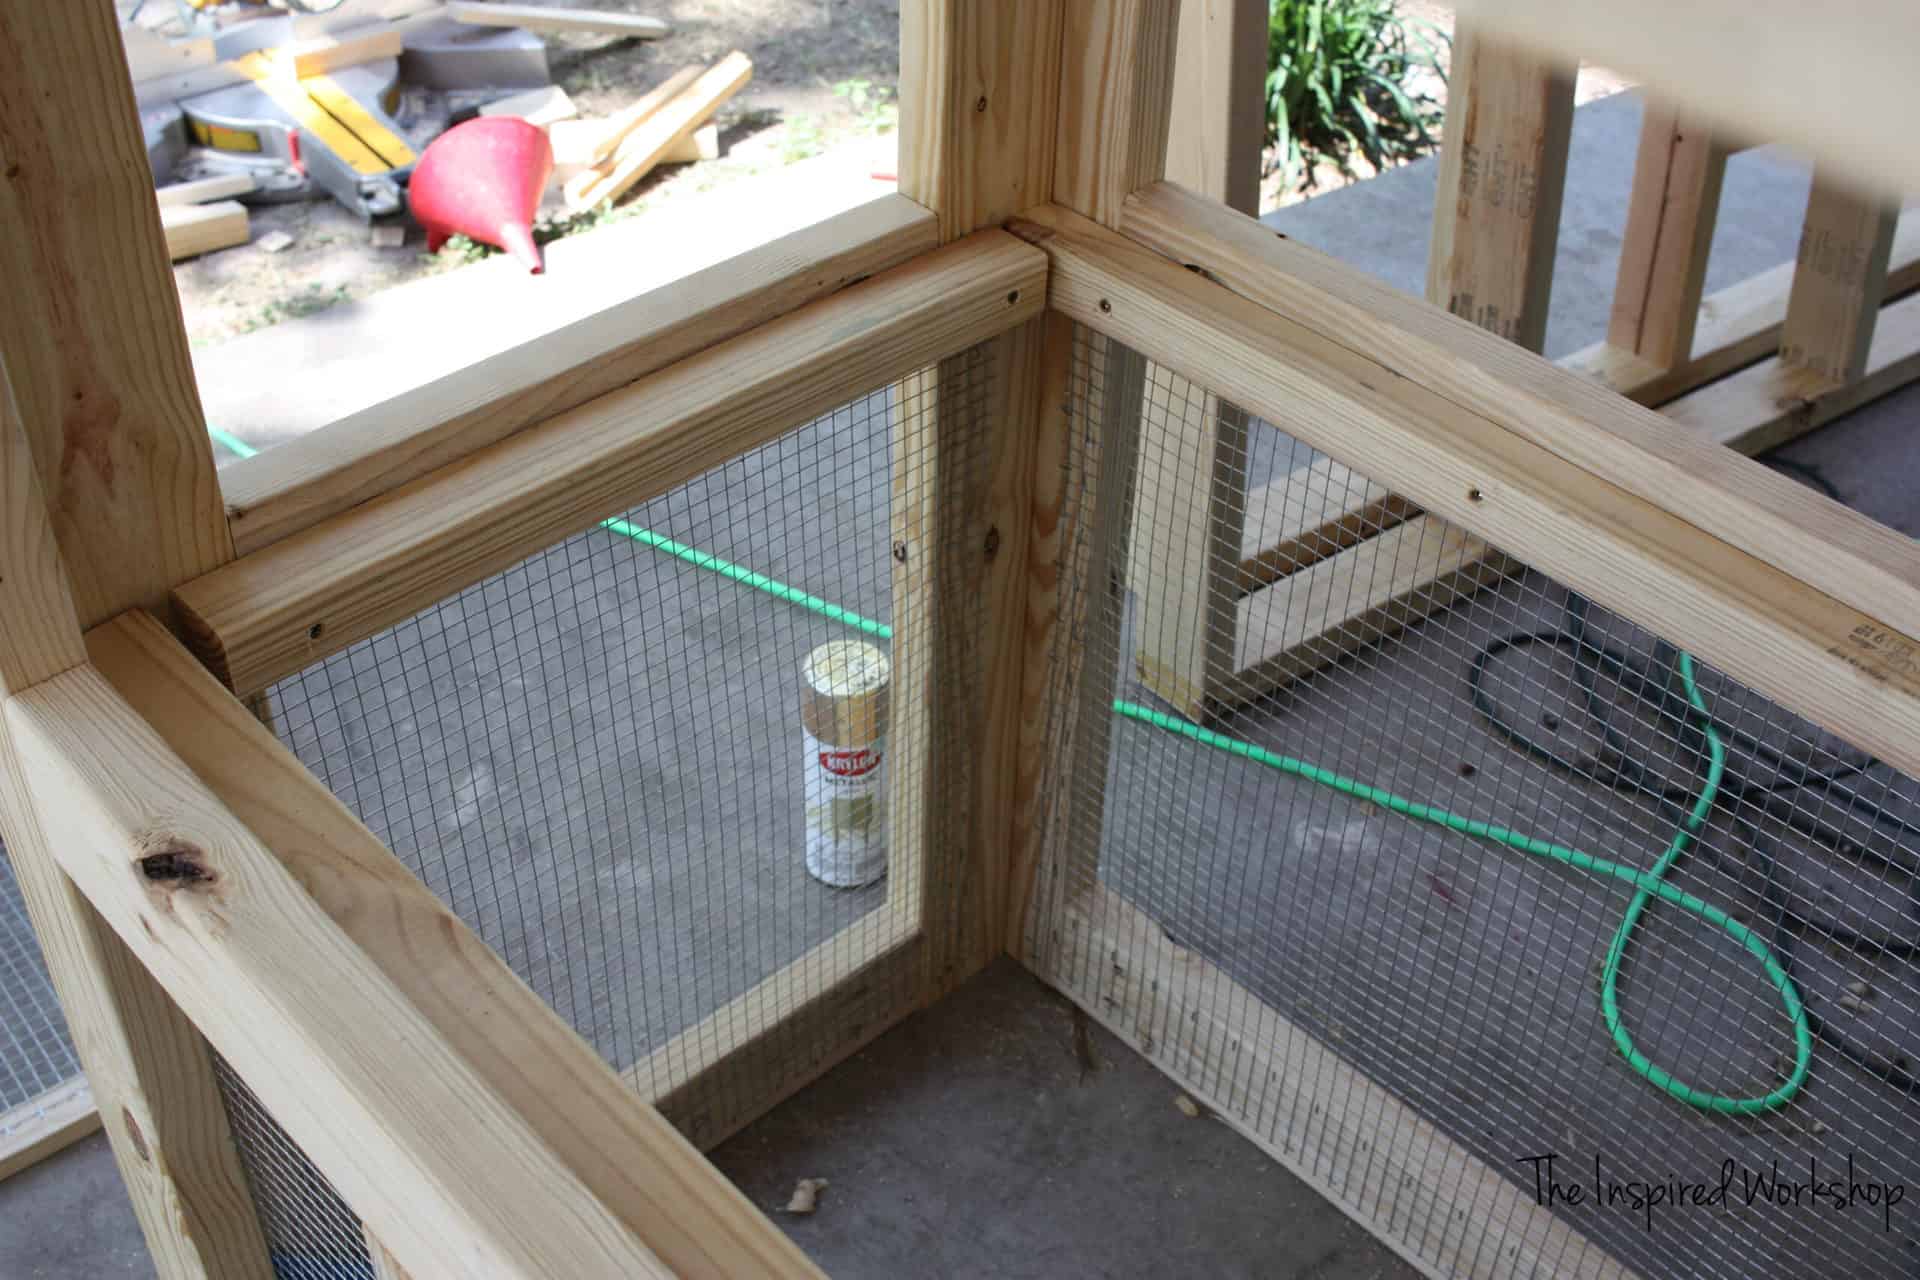
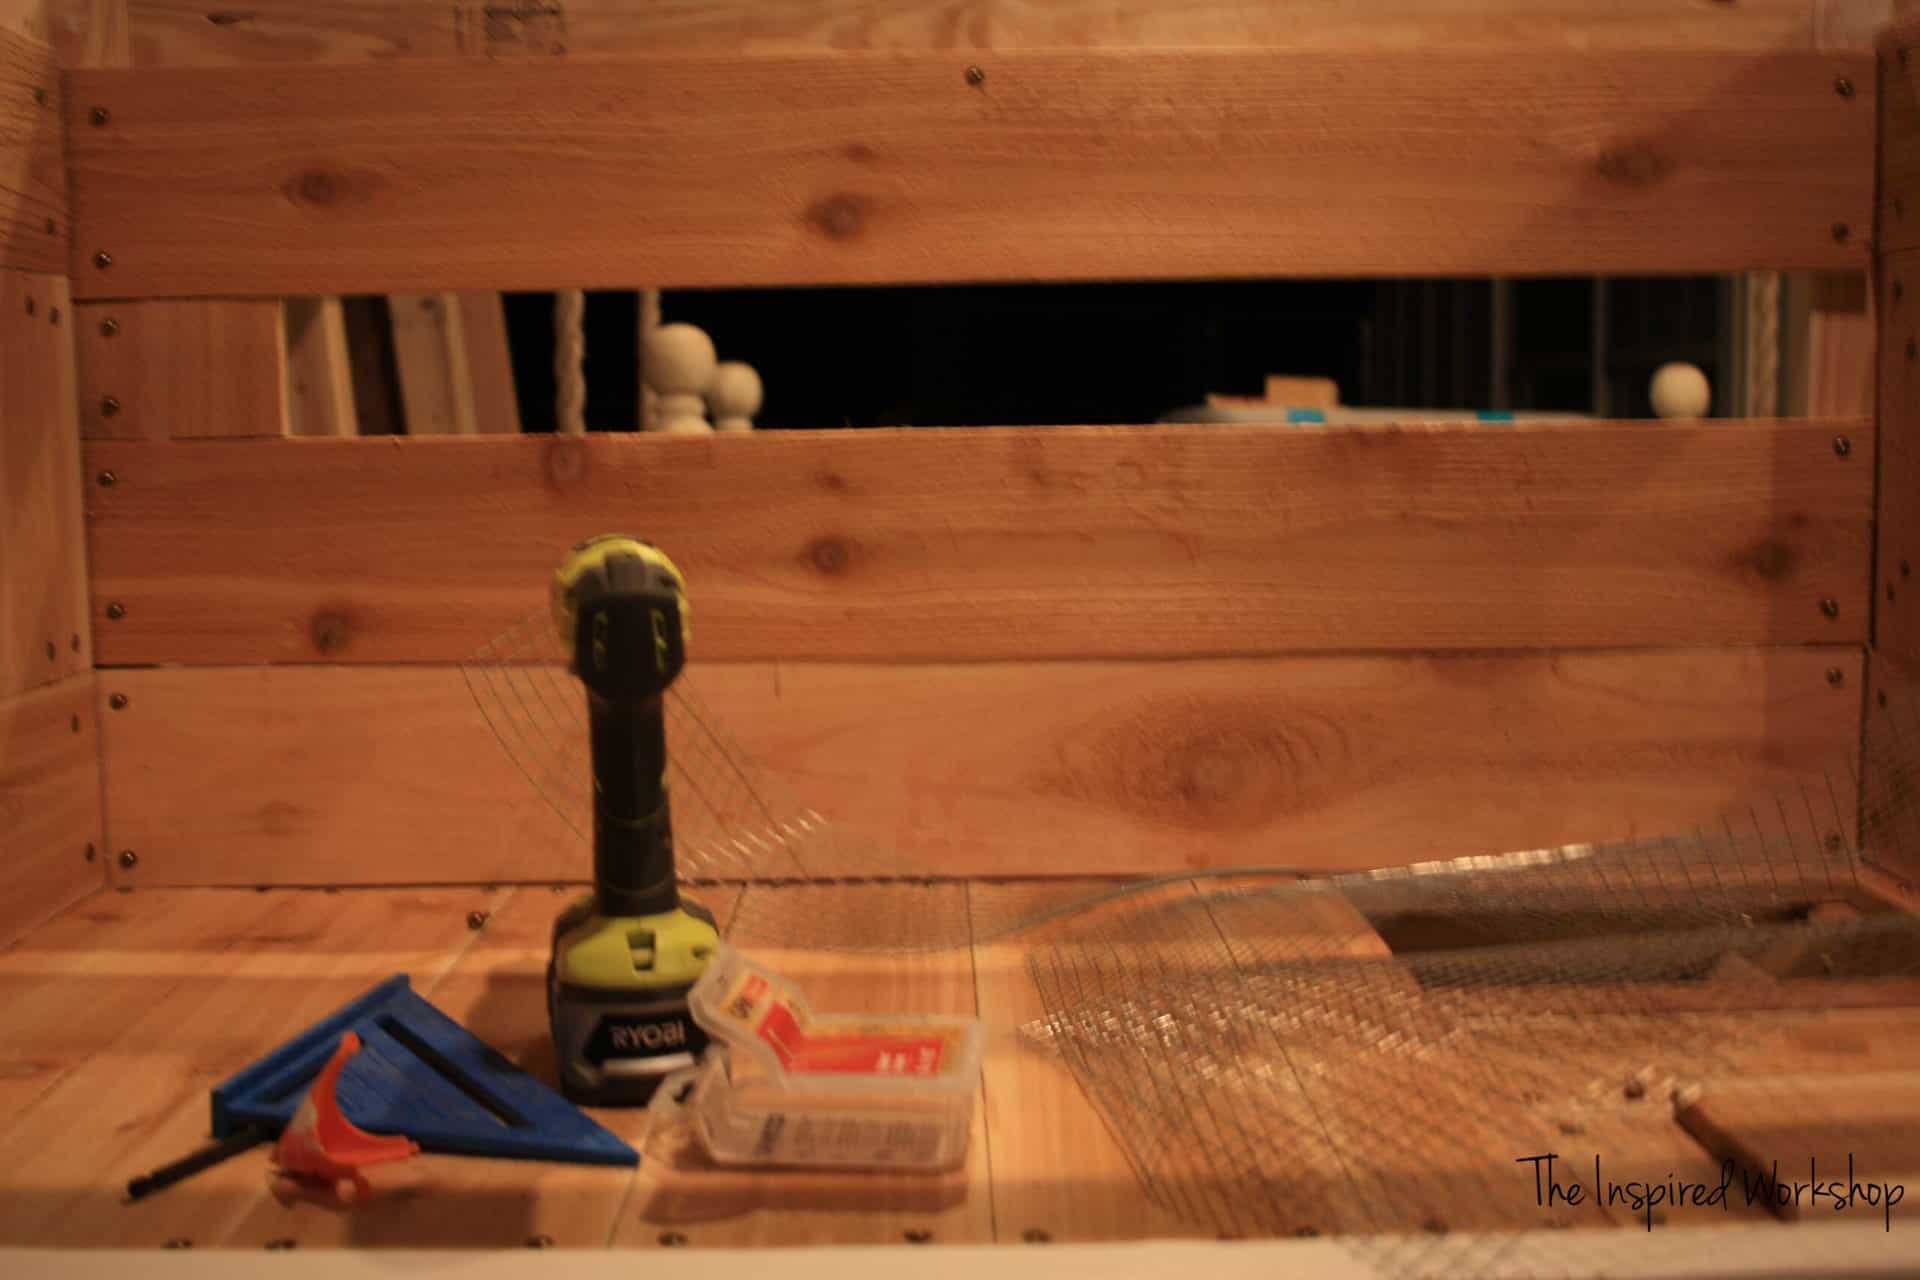
Add hardware cloth now…if you have painted, unless you don’t mind it looking not so hot at the bottom inside like ours! Lol! We used tin snips to cut the wires and an electric stapler with 1/2″ heavy-duty staples to attach. This part was easy enough for the boys to pretty much do on their own, and when their staples didn’t go in deep enough, they enjoyed hammering them in!
If you don’t have an electric stapler and don’t want to buy one, you can use wafer head screws to attach it, just make sure the head goes over the wire, I used this method on the large chicken coop and I prefer it to staples actually, it just looks so much cleaner!
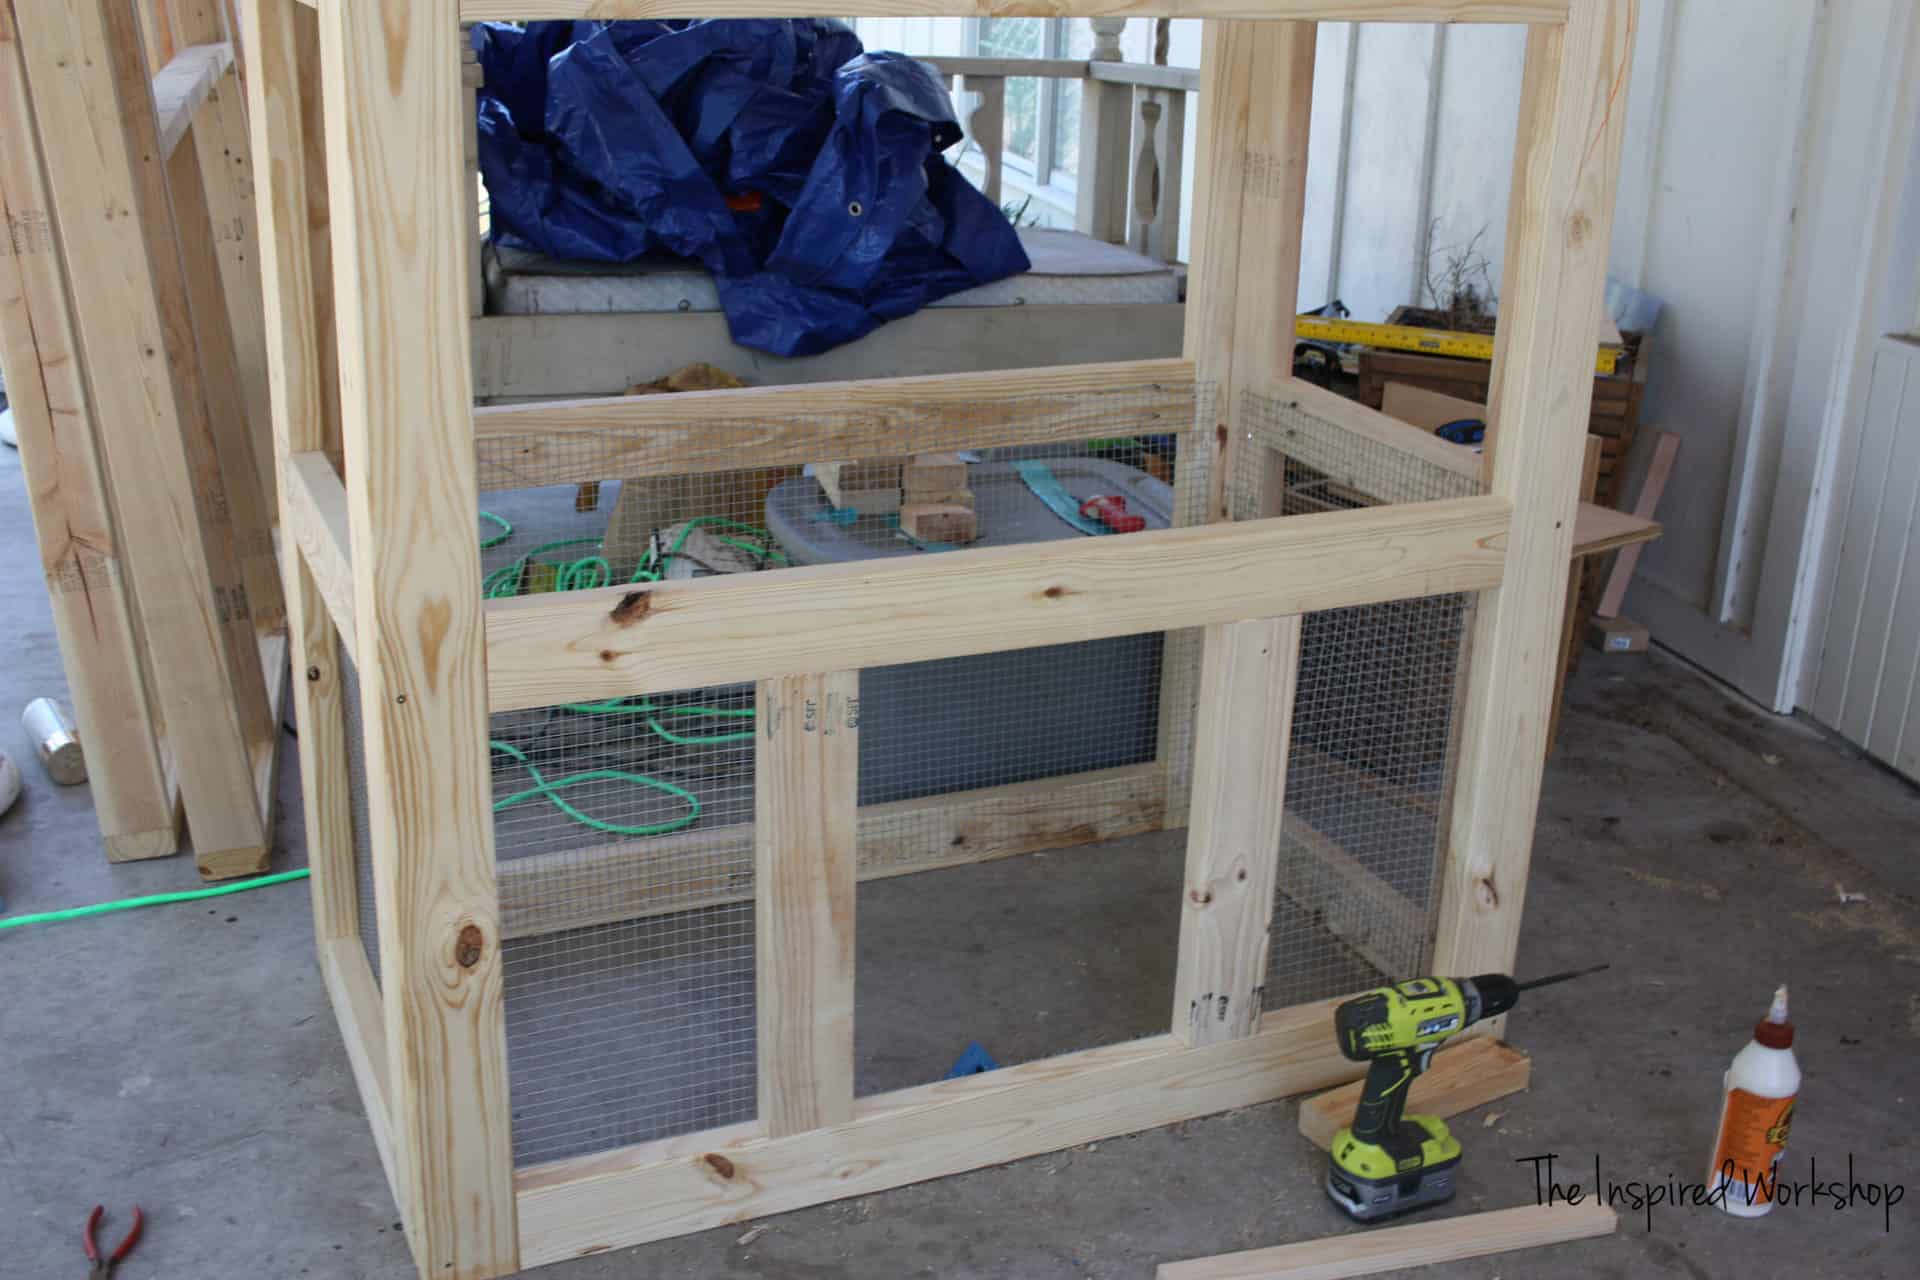
Screw the 4 walls you just built together to make the frame of the small chicken coop. Using exterior deck screws, just screw straight through the 2x4s on the outside to attach with a ton of wood glue!

We had a really fun time working together to build this small chicken coop, it was a family affair to get Richard a home in a timely manner! I LOVE that my kids are just as excited about our animals as I am! I want all the farm animals now, I mean milk goats coming soon…maybe a cow or two if I can find some!😂Would it be weird to get a buffalo?😂😜
Update: We got goats and I shared the cutest DIY Goat House so you can build one of those if you would like as well! How about a milk stand to milk them on? Or hay feeders to feed them with? I got you covered with all kinds of cool homesteading plans now, and more are coming every day!🤩
Anyway, back to the building of the small chicken coop!
Here is how it looks all screwed together! Don’t mind the COMPLETE mess on my front porch! It’s so embarrassing, but we are working on 18,572 (including building a new porch swing😍) projects right now and I just can’t do it all, so there’s a large mess…and I’ll survive…hopefully!😂
Step 5
Add floor support boards. Using 2x2s, just glue and screw straight through the front of the 2x2s. The measurements given above are for your 2x2s to fit perfectly, I just rough cut mine because they are going to be under the floorboards and not seen!
I painted at this point so that I wouldn’t have to tape off the cedar boards. Hopefully, you already painted before attaching your hardware cloth! Lol! I used Behr Exterior paint color matched to SW Pure White (7005), it’s my FAVORITE white EVER! 😍
Step 6
Build and install the ladder on the small chicken coop.
Using 2 – 2x2s @ 34 1/2″, miter the ends at 45 degrees off square ends not parallel, but don’t cut all the way to the edge of the board. (Already made the cut in the photo)

Then flip the board over and cut at 45 degrees off square against the end you left on the first cut. (Haven’t made the cut yet in the pic below)
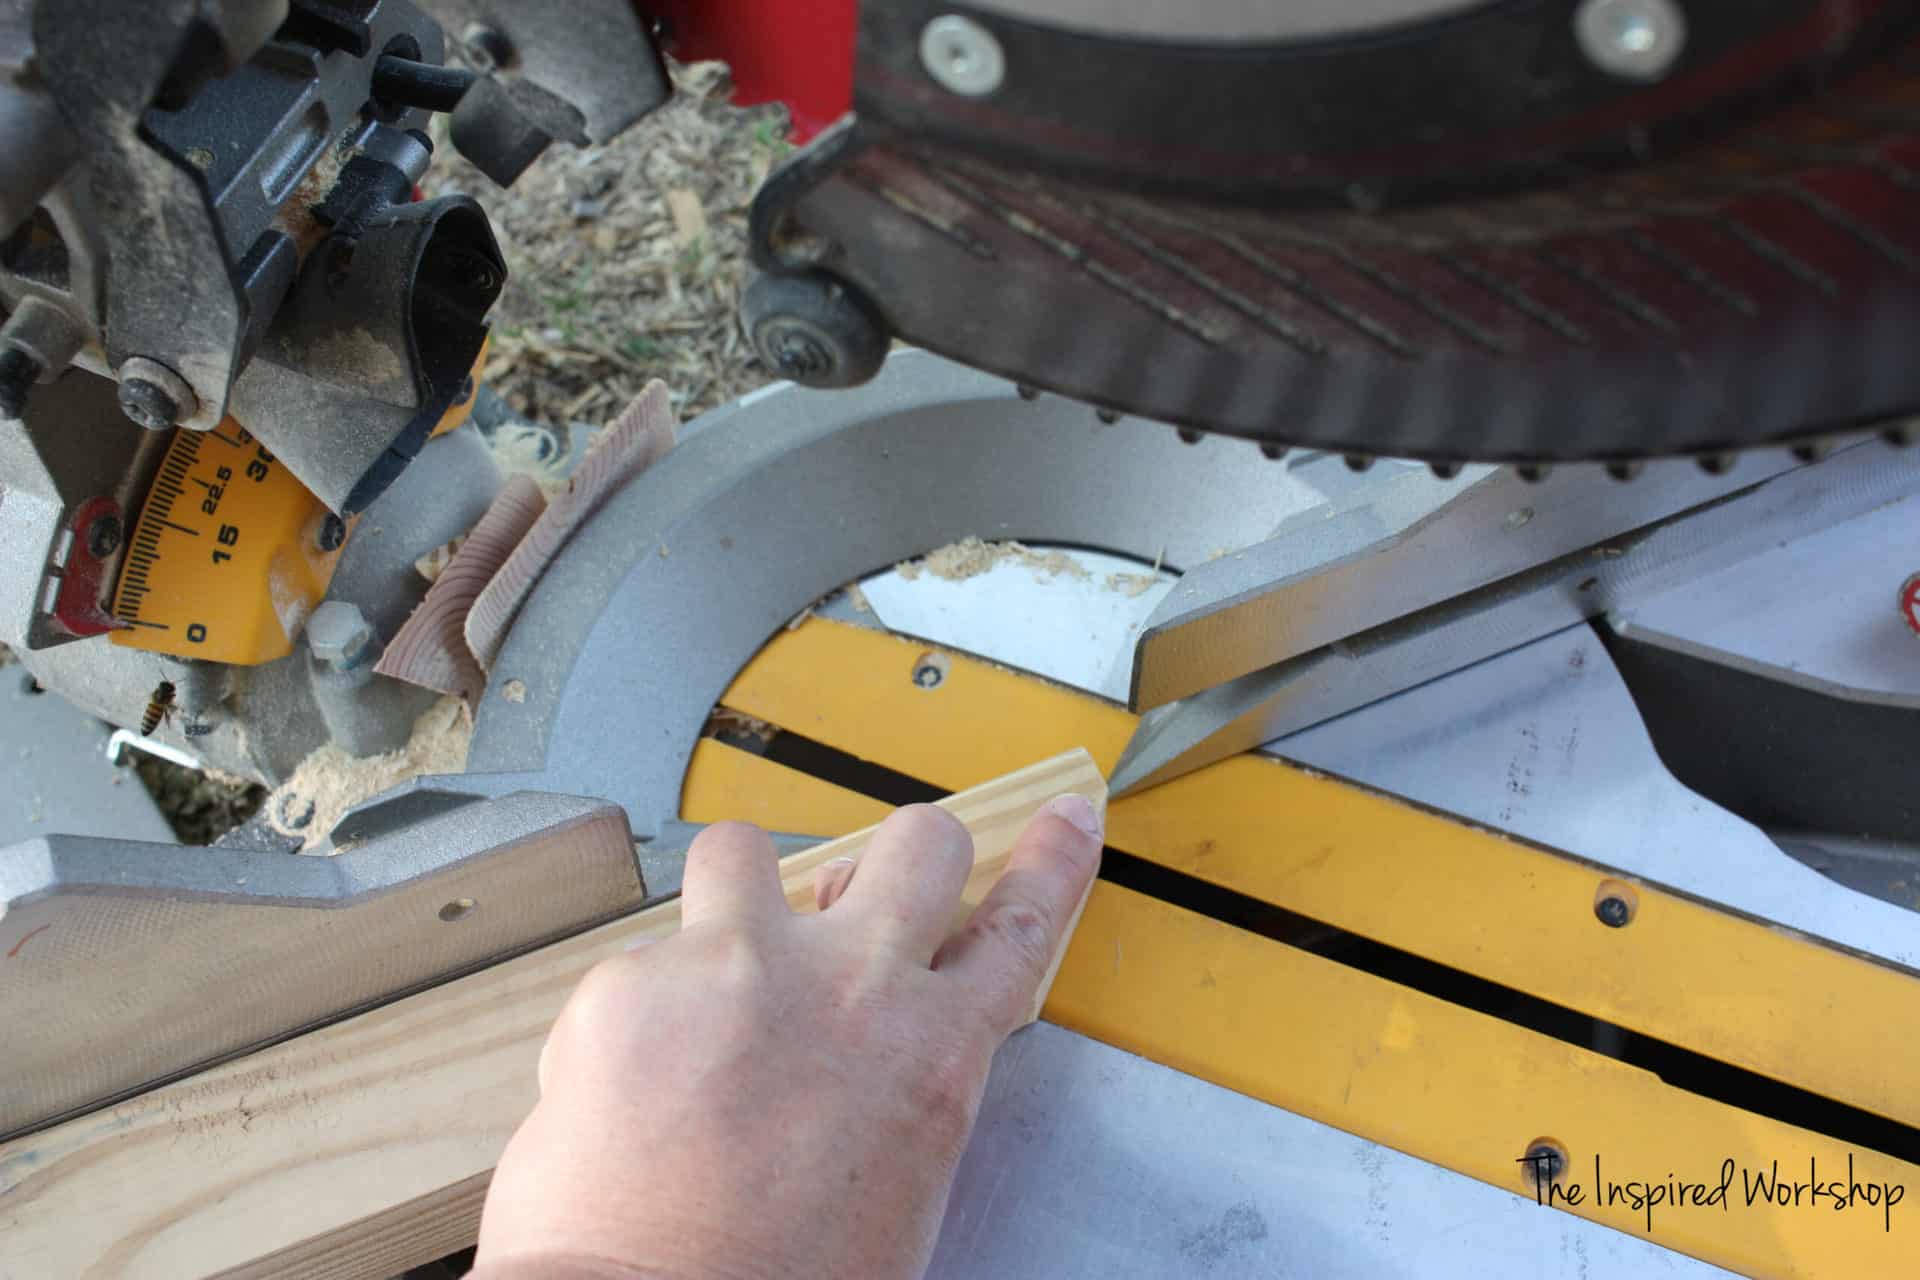
That will give it a flat top when you attach it to the chicken coop. Though it will look like a silly pointed board until you attach it! Lol!
Using the 2 – 1×4 @ 7 inches, rip them down to 1″ strips on the table saw. If you do not have a table saw, you can grab a 1″ square dowel rod and cut 6 – 7″ pieces from it.
Glue and brad nail them to the 2x2s that you cut earlier in this step. I sanded the edges of the rungs pretty well because chickens don’t like sharp edges on their feet, they prefer rounded edges!
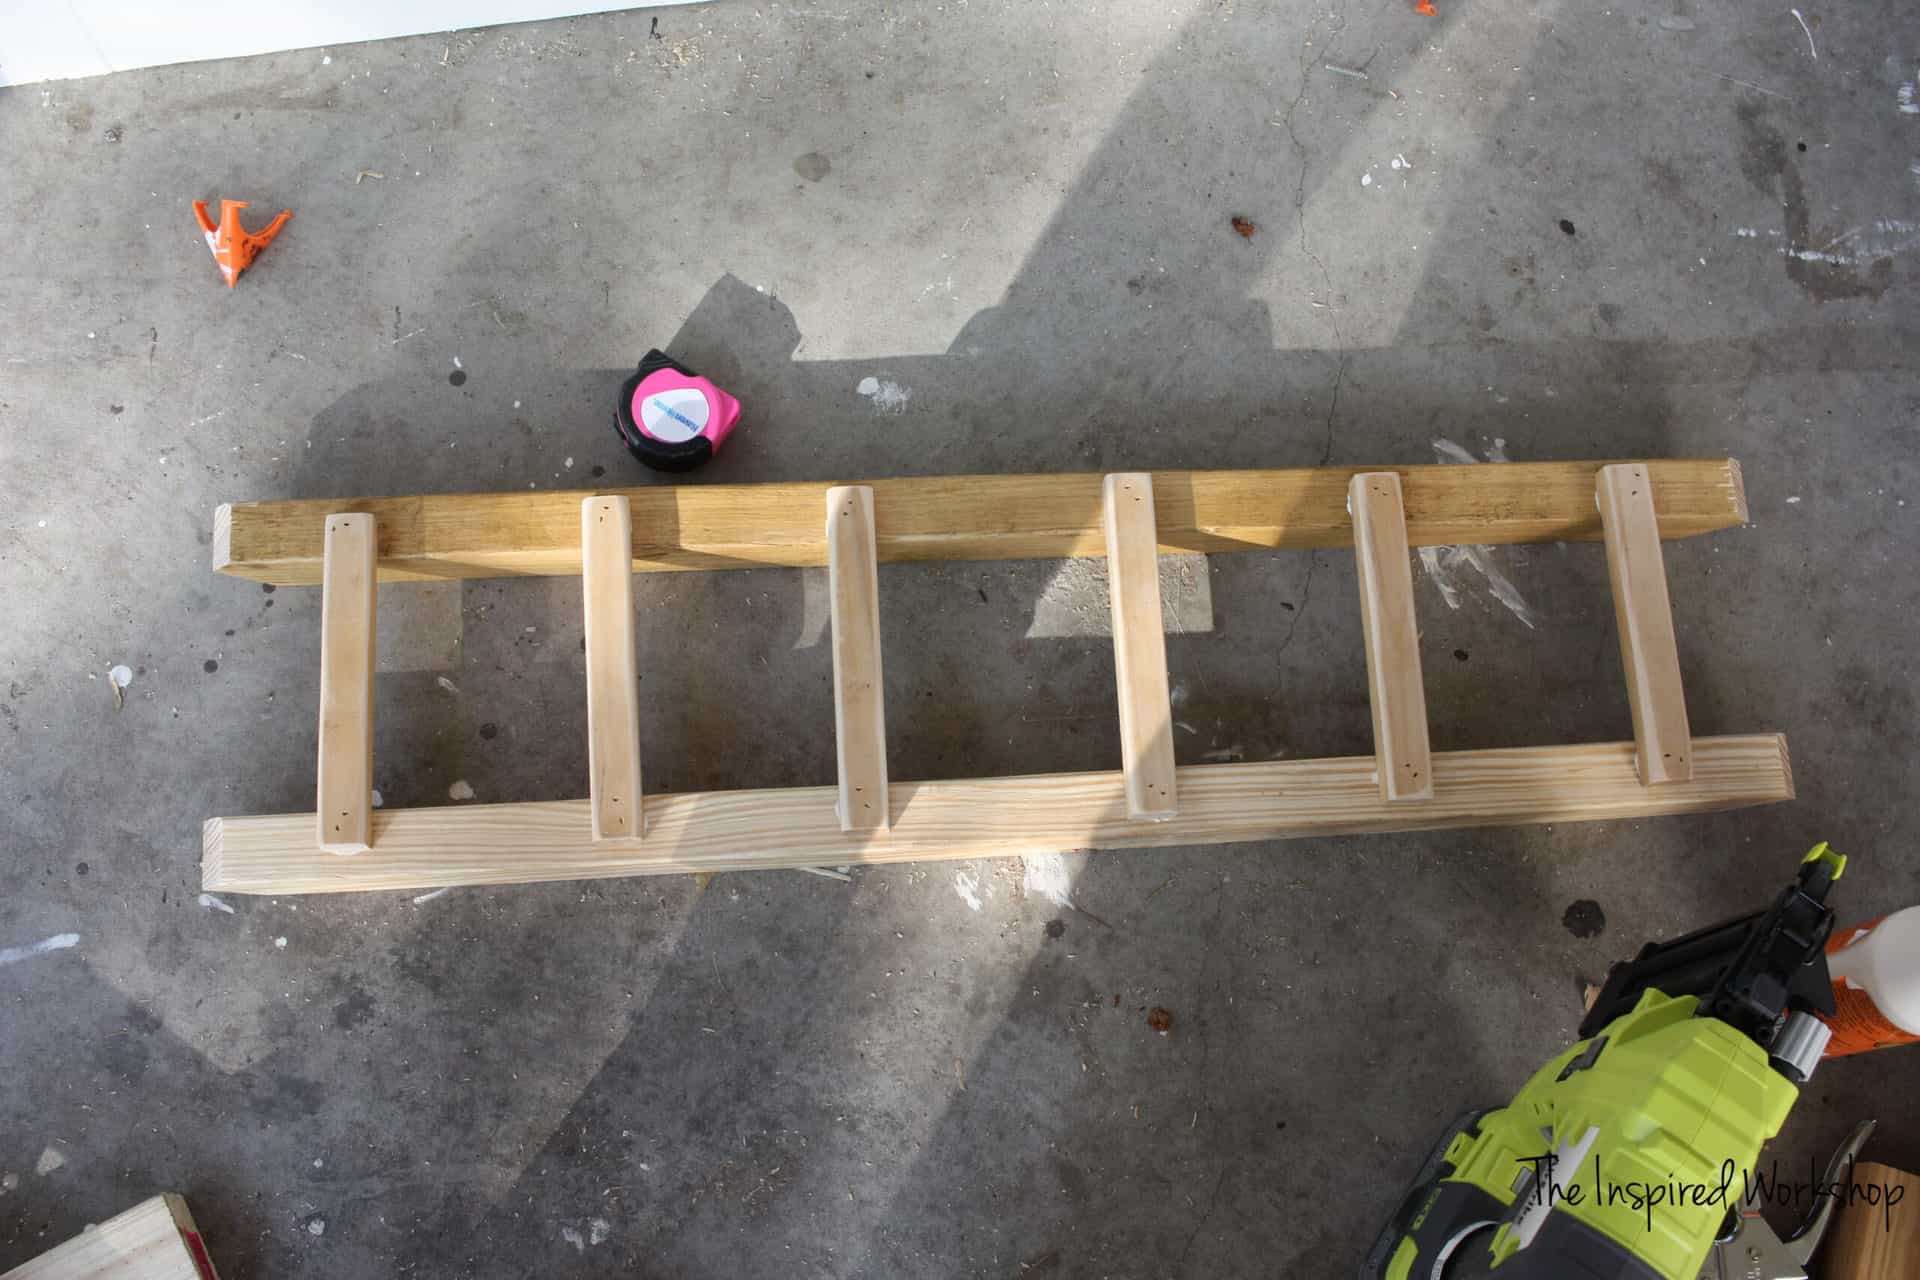
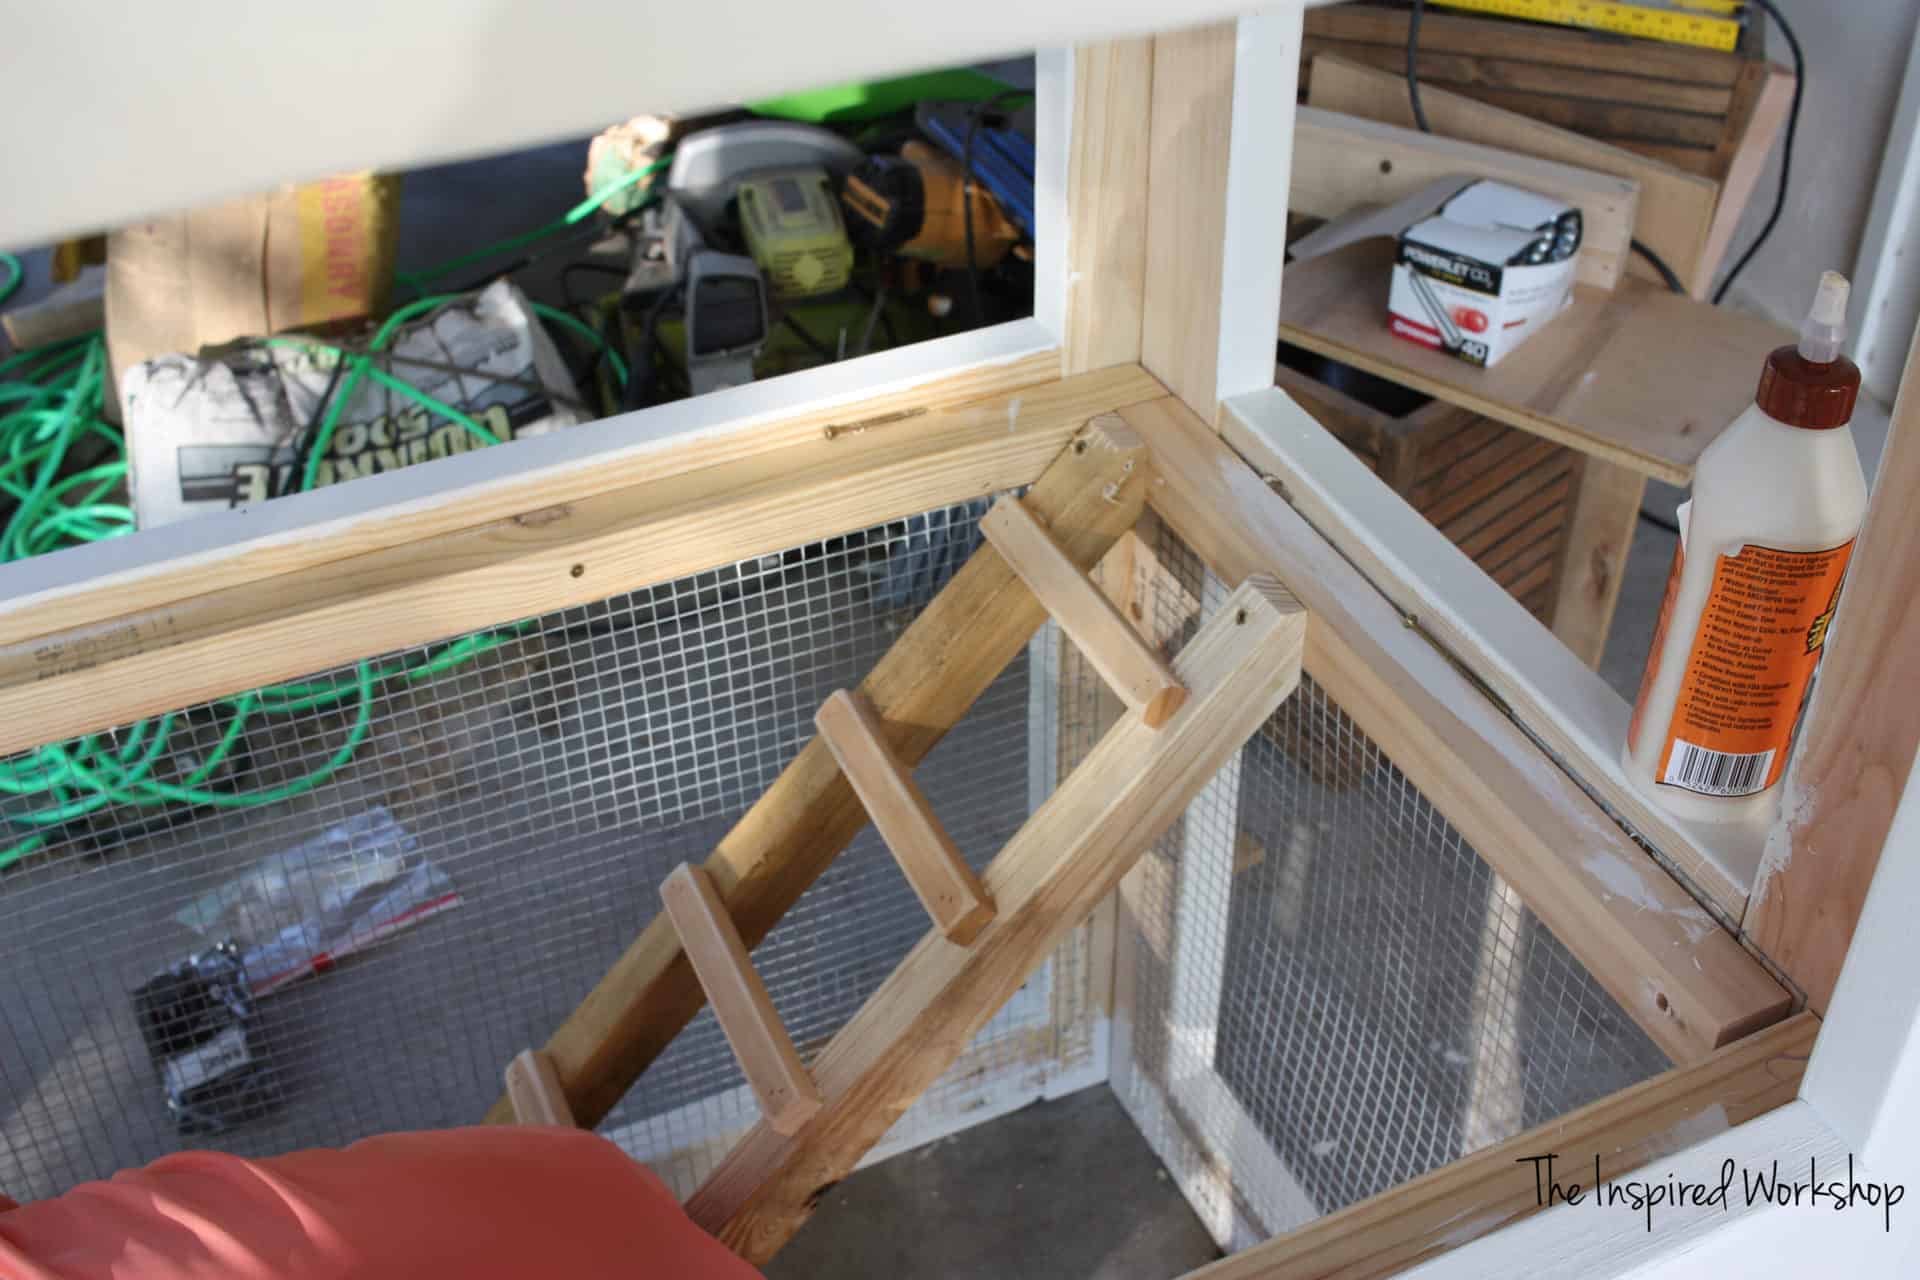
Attach the ladder in the coop while you have an open floor! We just glued and screwed through the front of the ladder rungs.
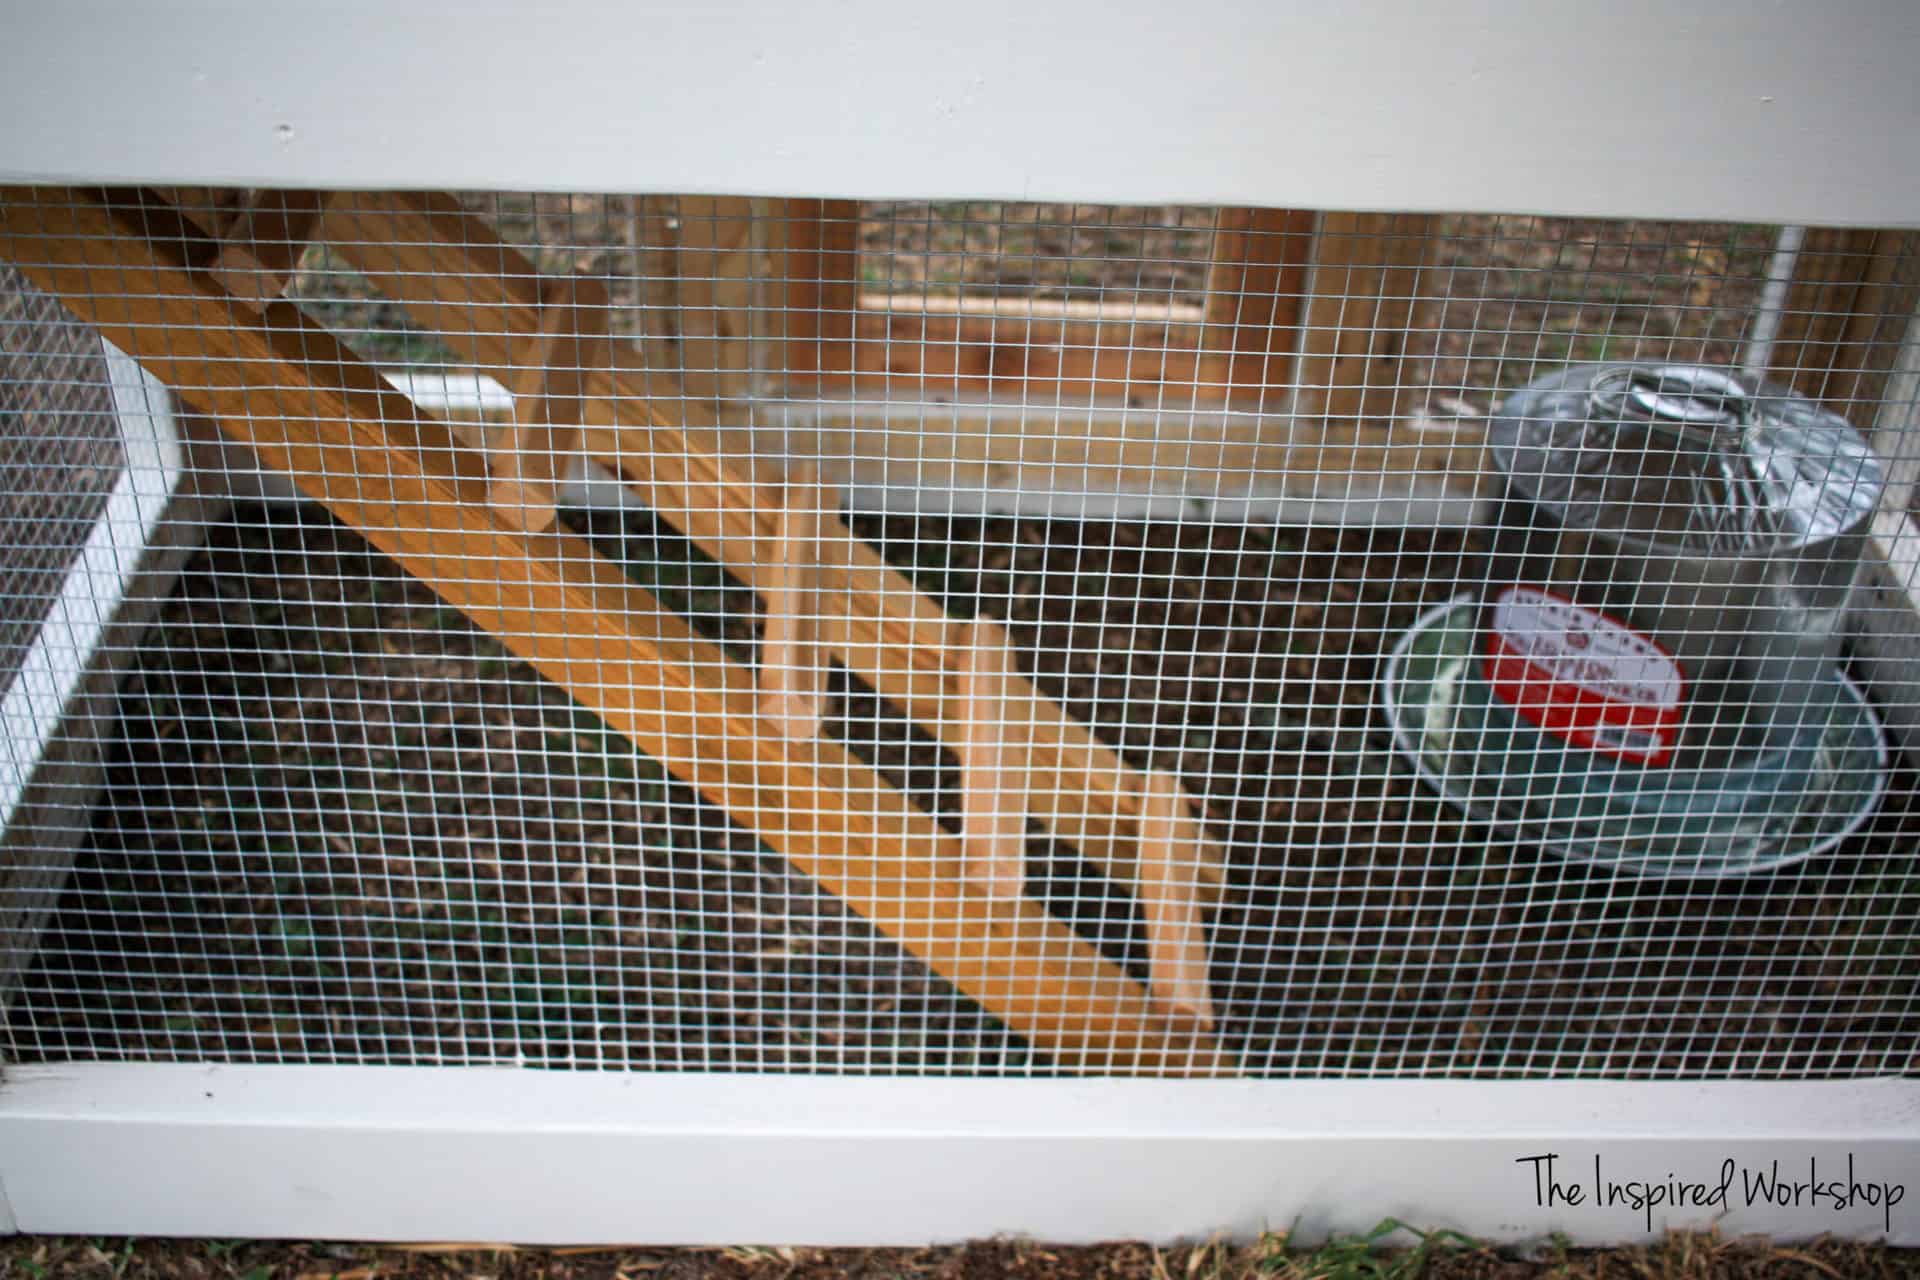
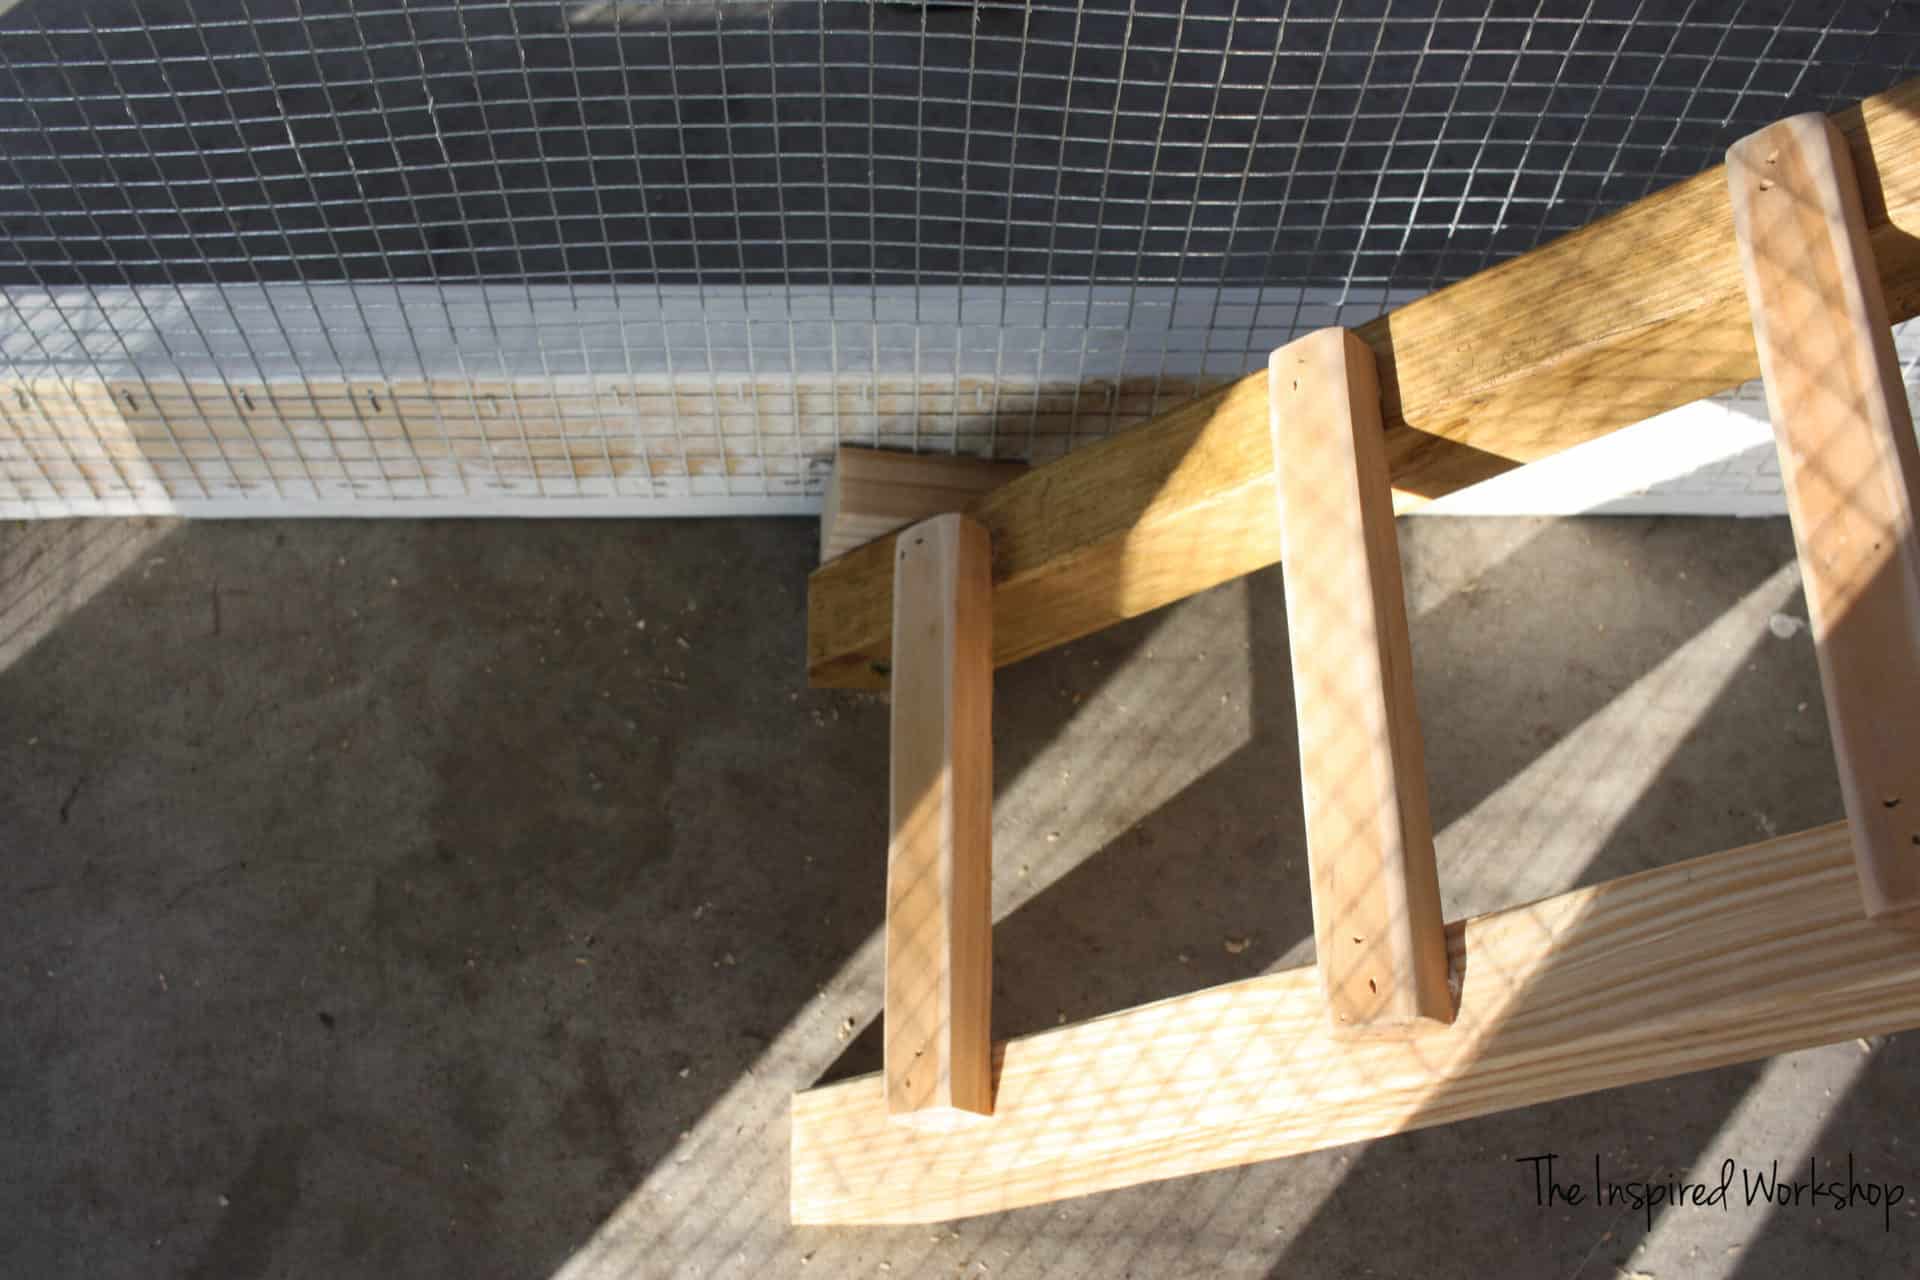
At the bottom, we attached a small woodblock so that when we picked it up to move it we wouldn’t break the ladder.
Step 7
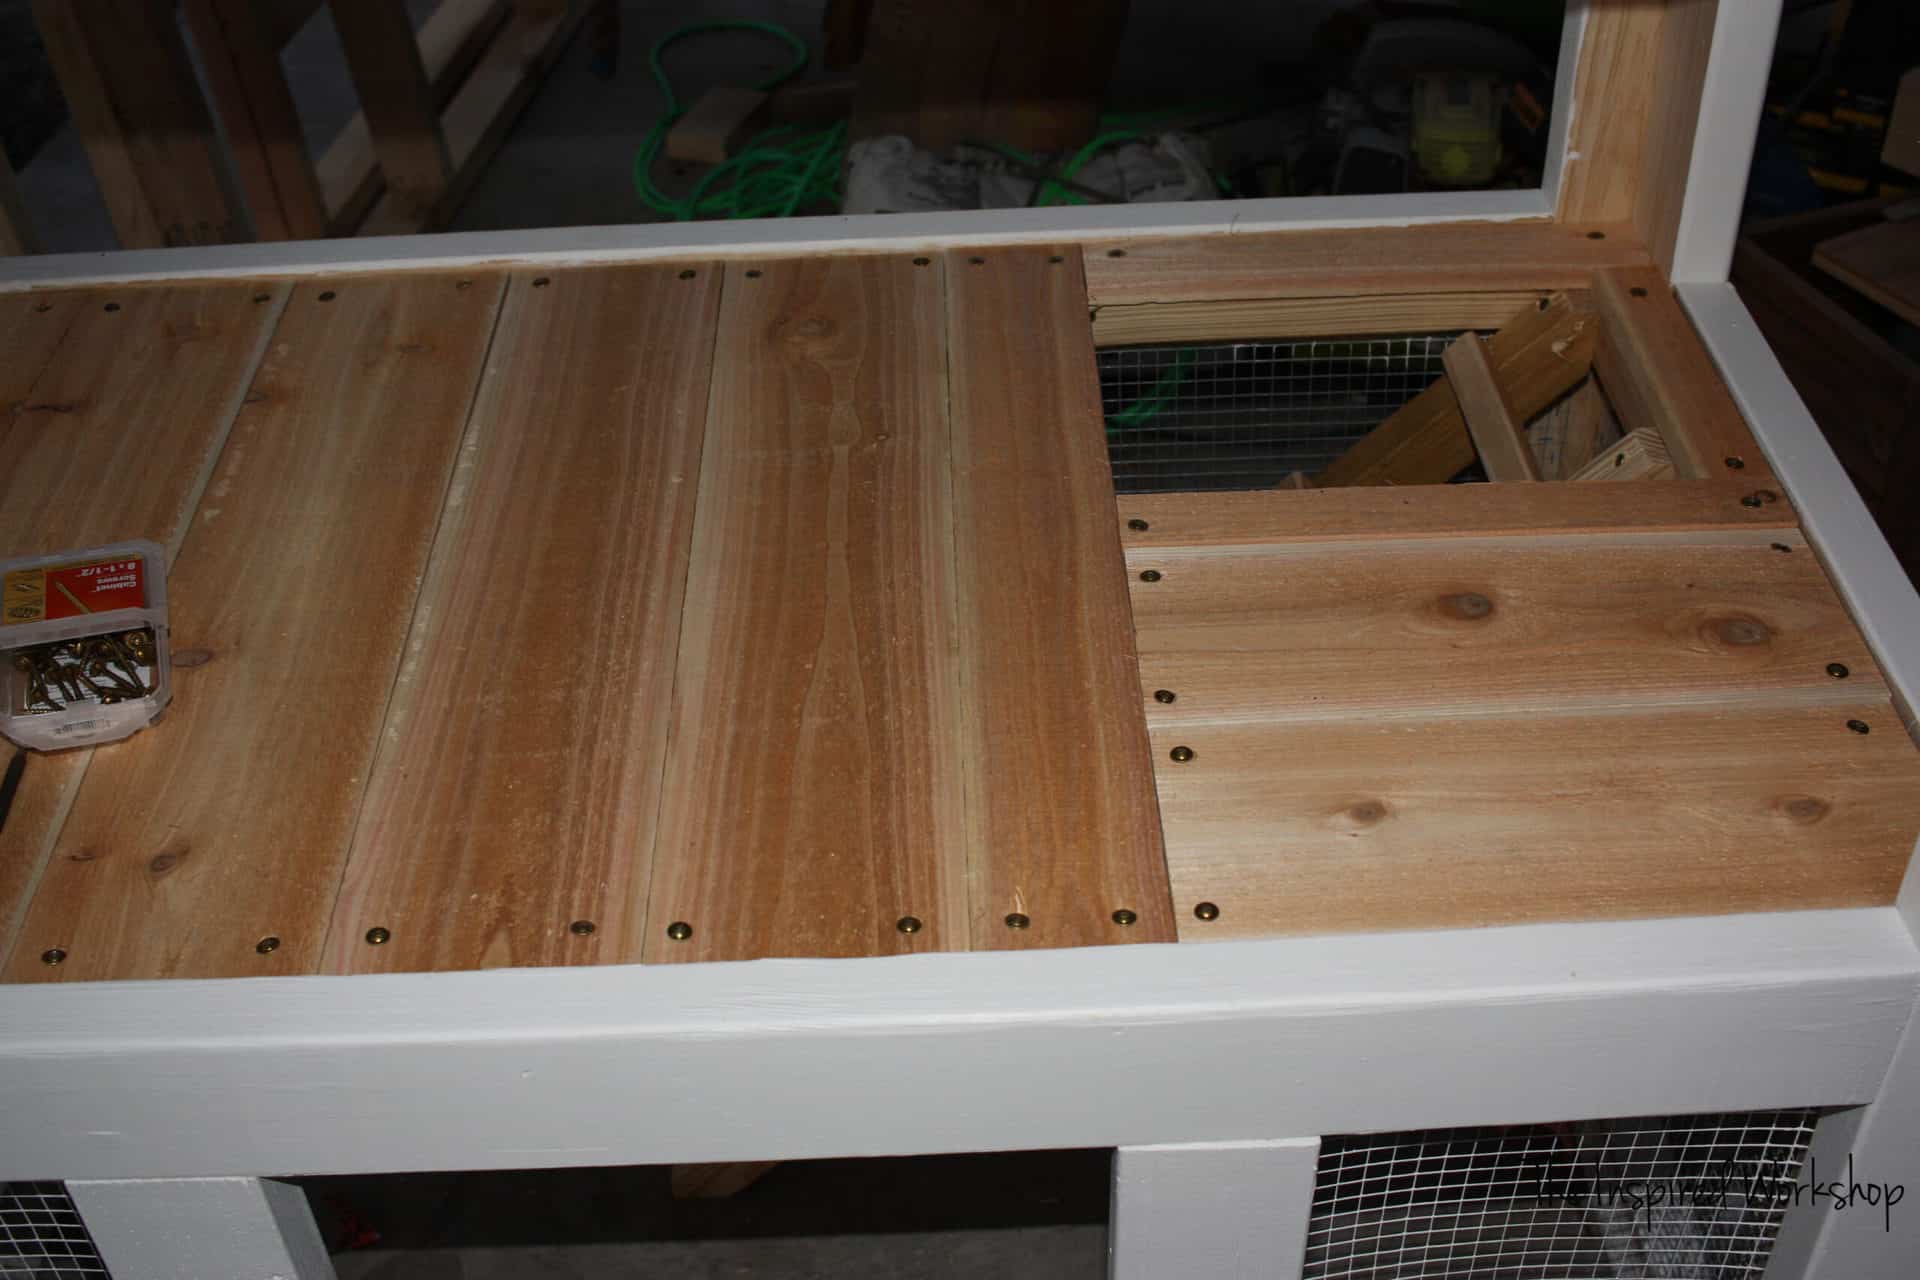
Attach floorboards to the small chicken coop.
I did NOT use glue when attaching the floorboards because I want to be able to change them out easily if they get really nasty or start to rot from poo! Ewww!
Also, make sure and seal these boards with some polyurethane to give them a surface for cleaning! You could also use hardware cloth instead of cedar boards, you will have plenty left over to do that with if you would like.
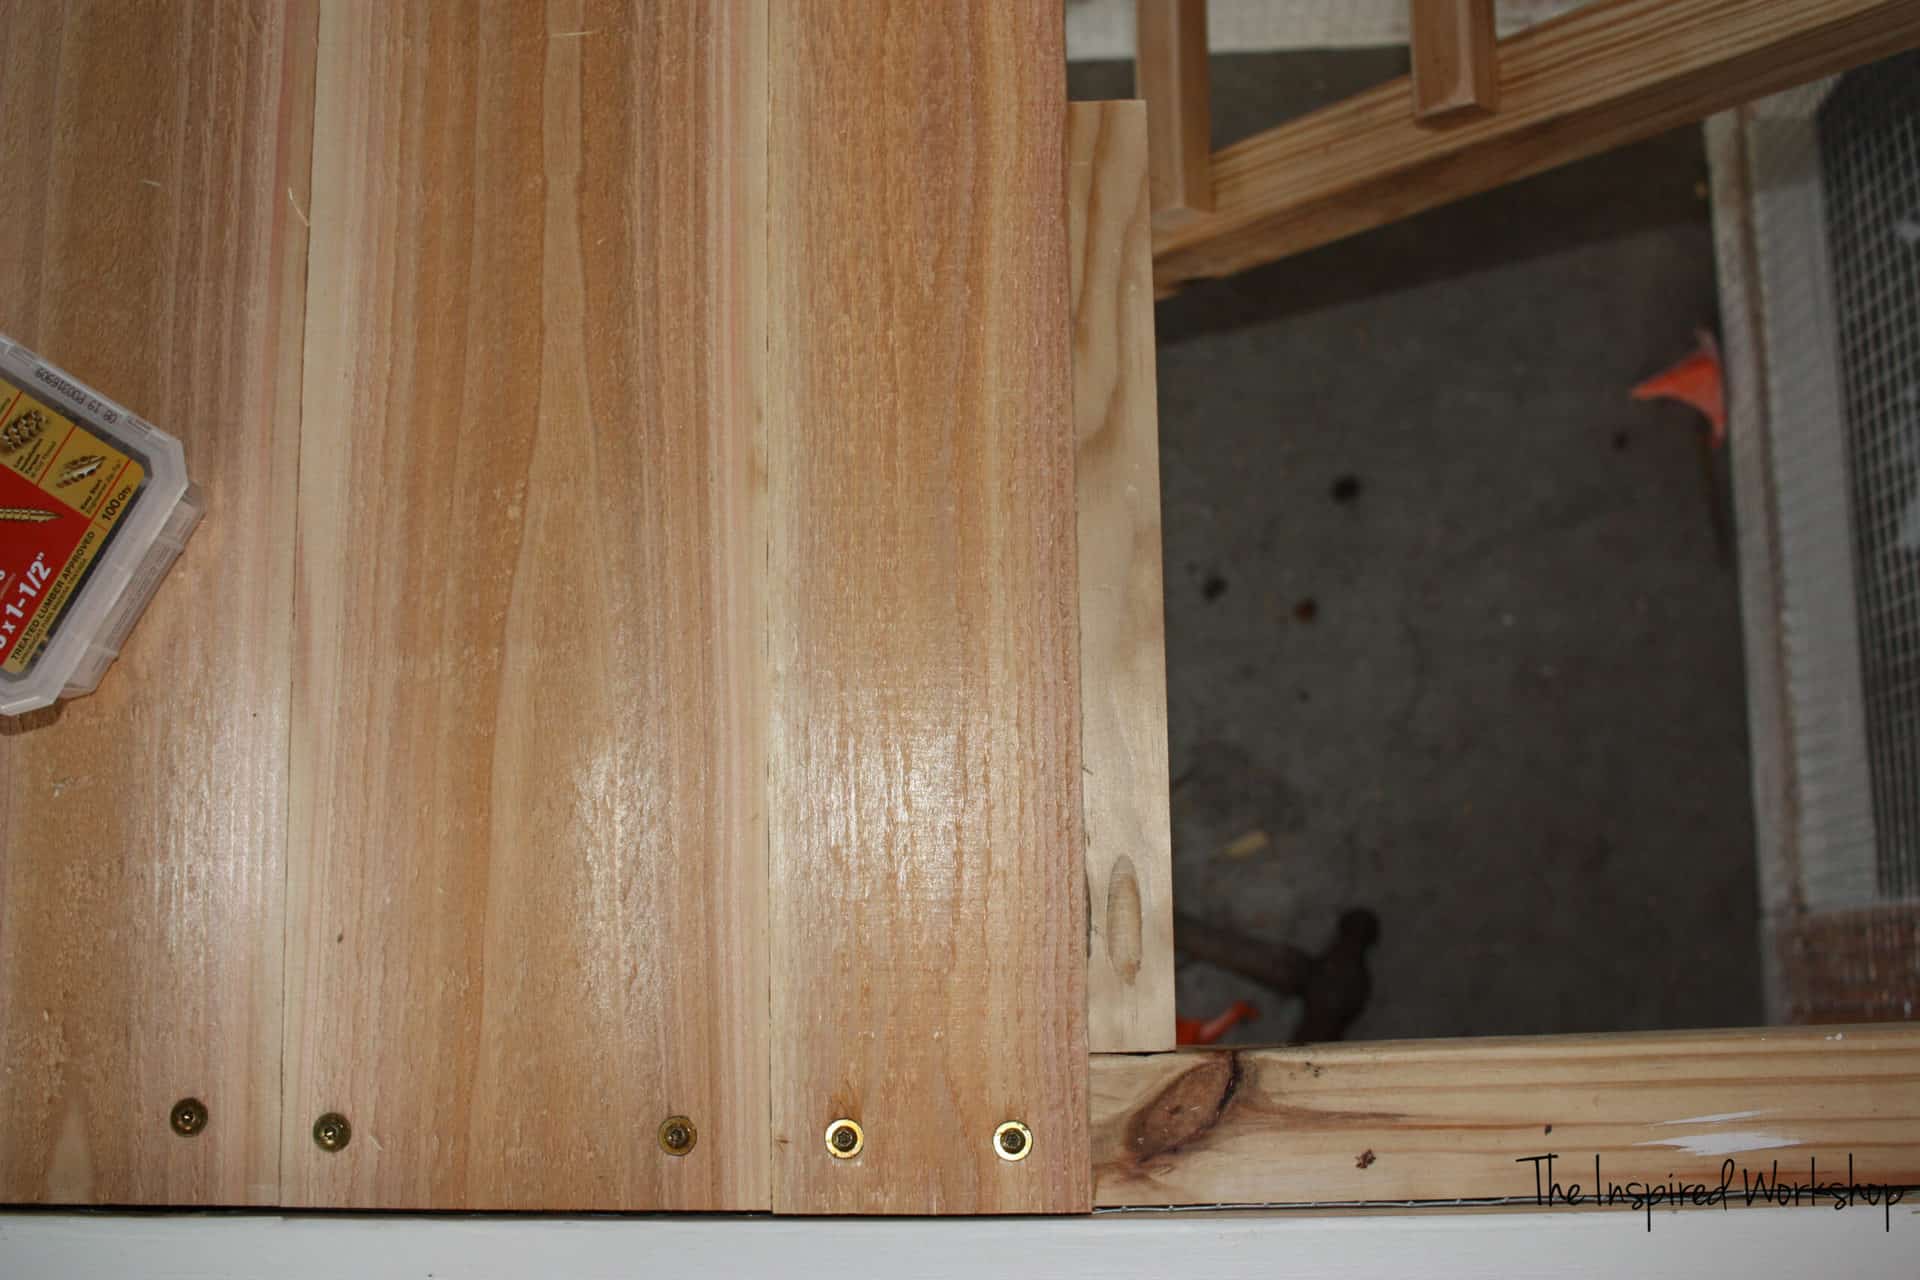
I just used 1 1/2″ wafer head screws to attach the 1×6 (fence pickets) @ 24″. They were not cut perfectly, my kids kept telling me that Richard just wanted a bigger house, he didn’t care if the boards weren’t perfect! 😂 So yeah, the boards aren’t perfect at all!
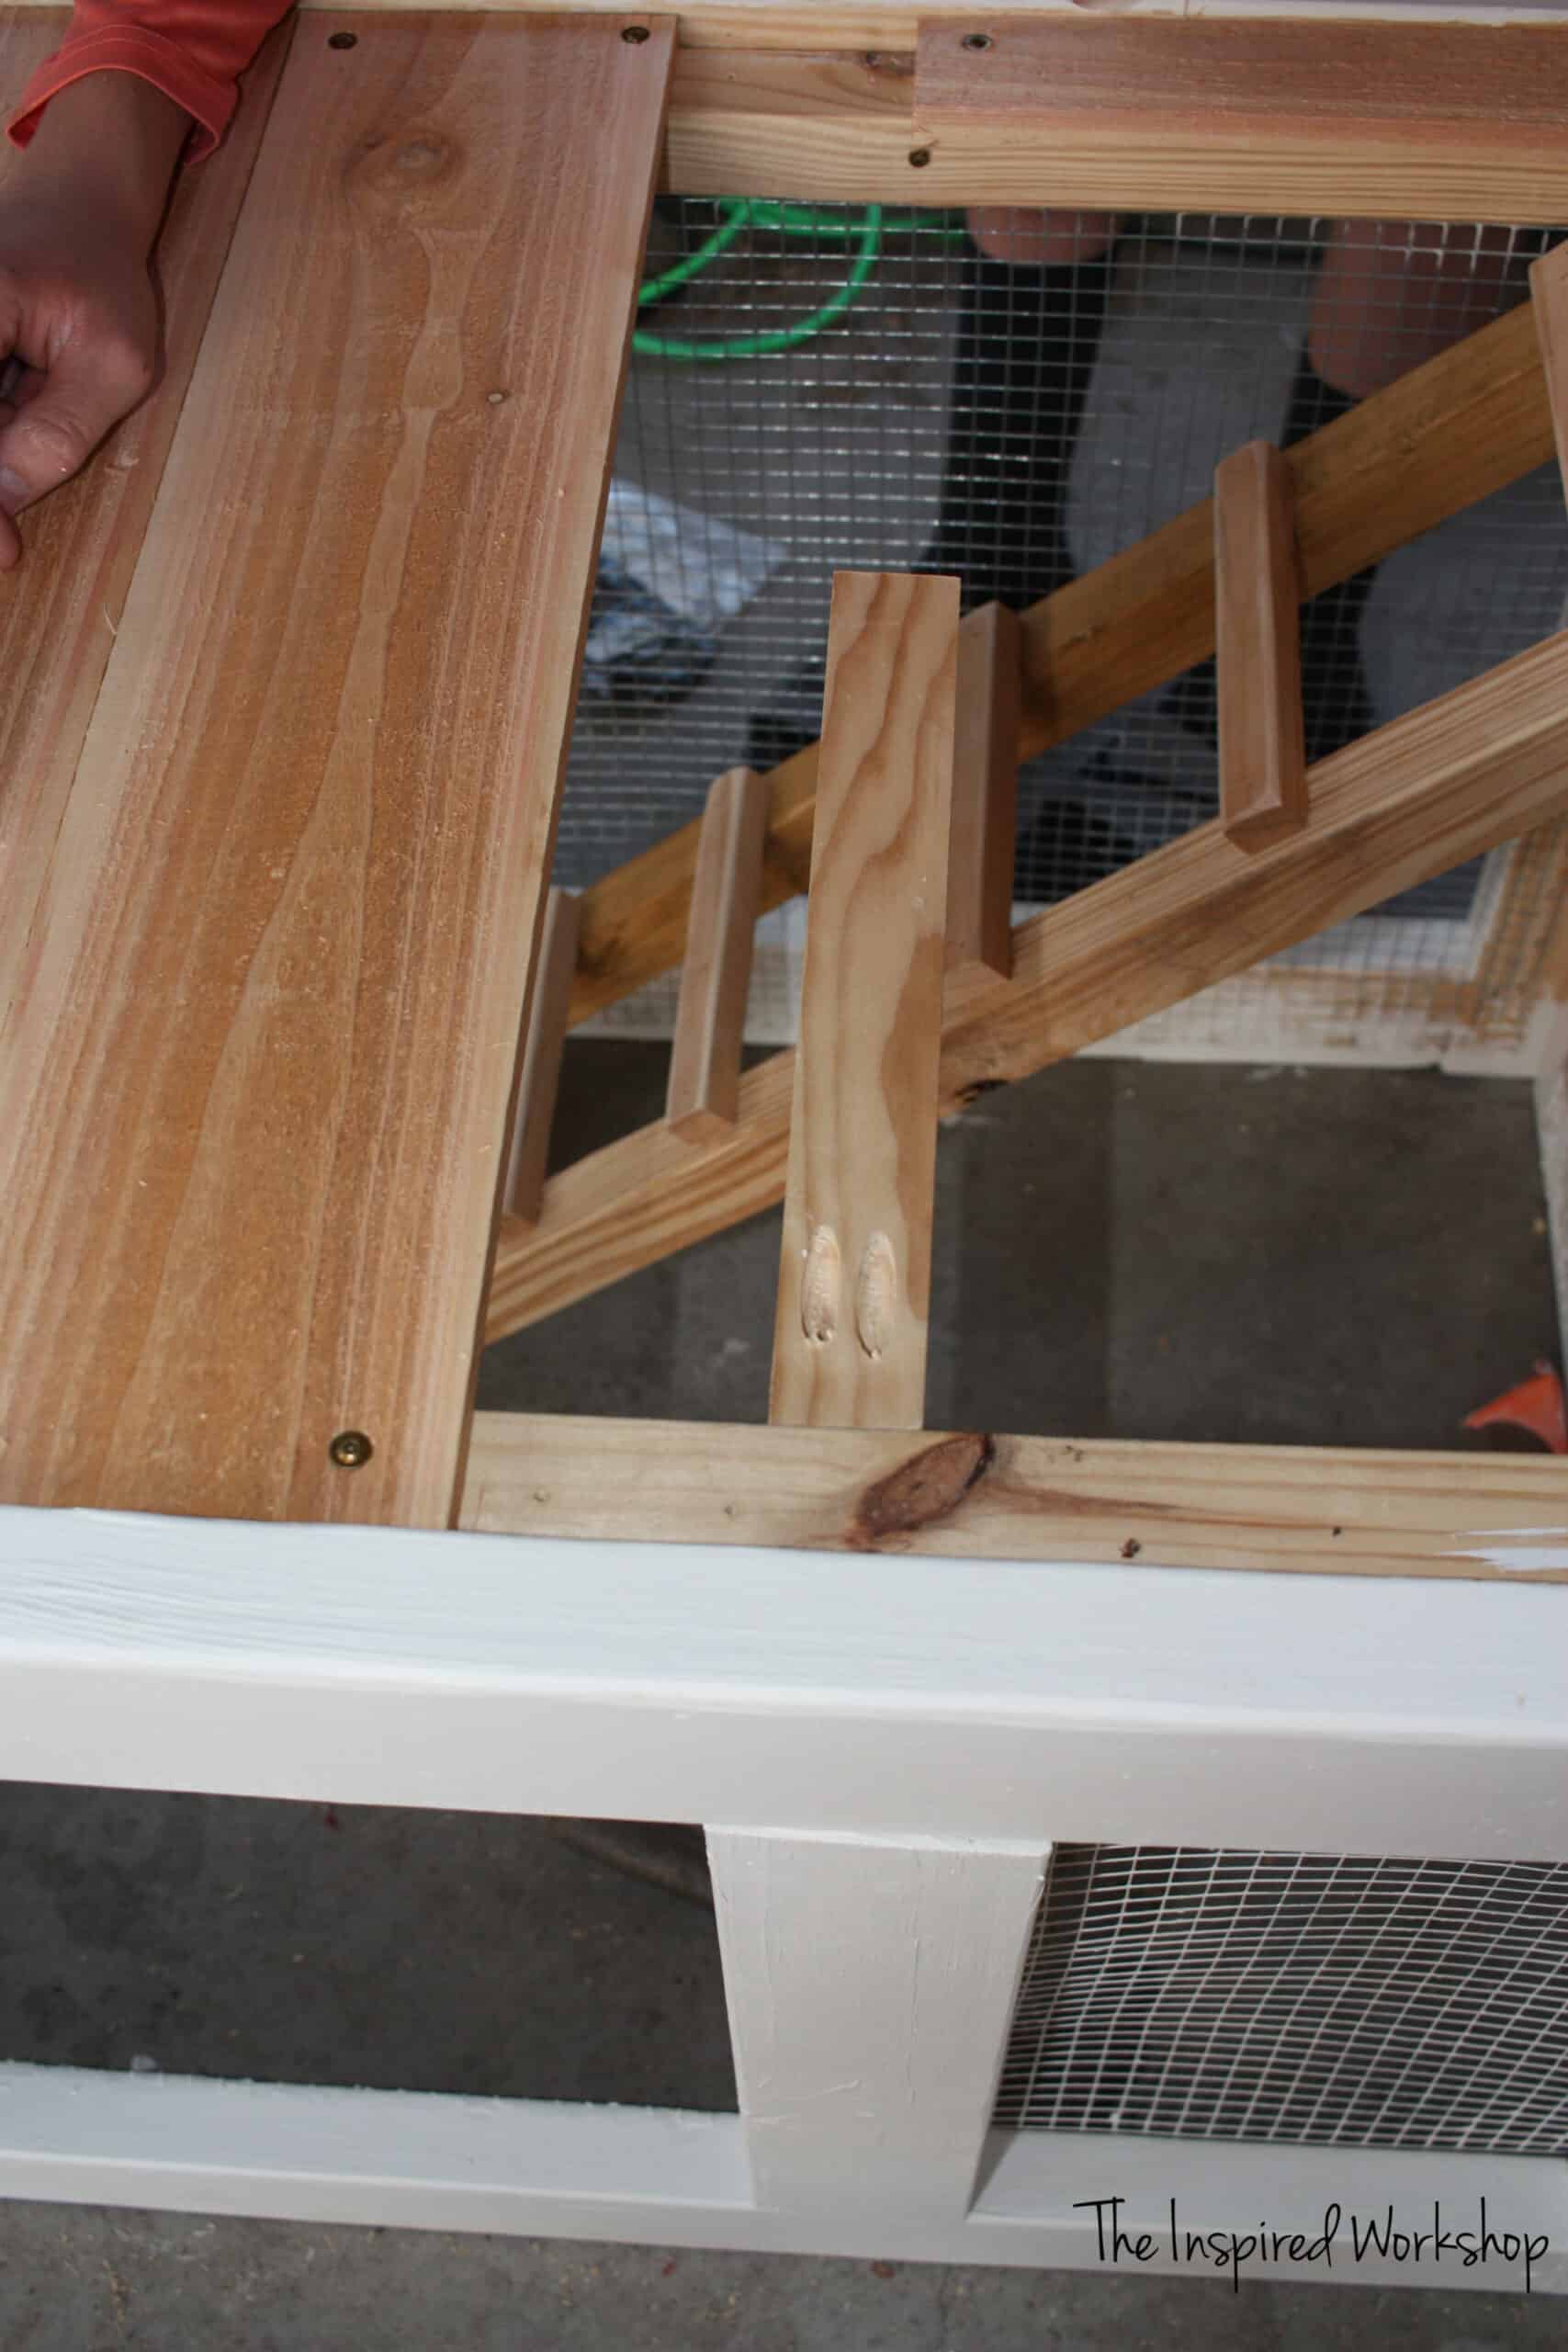
Now when I got to the spot where the opening was to go up and down the ladder, I had to add a small board with pocket holes to attach the opposite running boards. I hope that makes sense in the pics. Make sure and glue it in, pocket holes will be drilled at 3/4″ deep (since this is a 3/4″ board (1×2)). Using 1 1/4″ screws attach it to the frame where it will sit slightly under the last board in the row and leave a little room to screw the opposite running boards.
Now you can cut the other boards to attach to this ledge.
As you will see in the above photo, I ripped some boards down to 1 1/2″ and placed them over the exposed 2x2s around the ladder.
Step 8
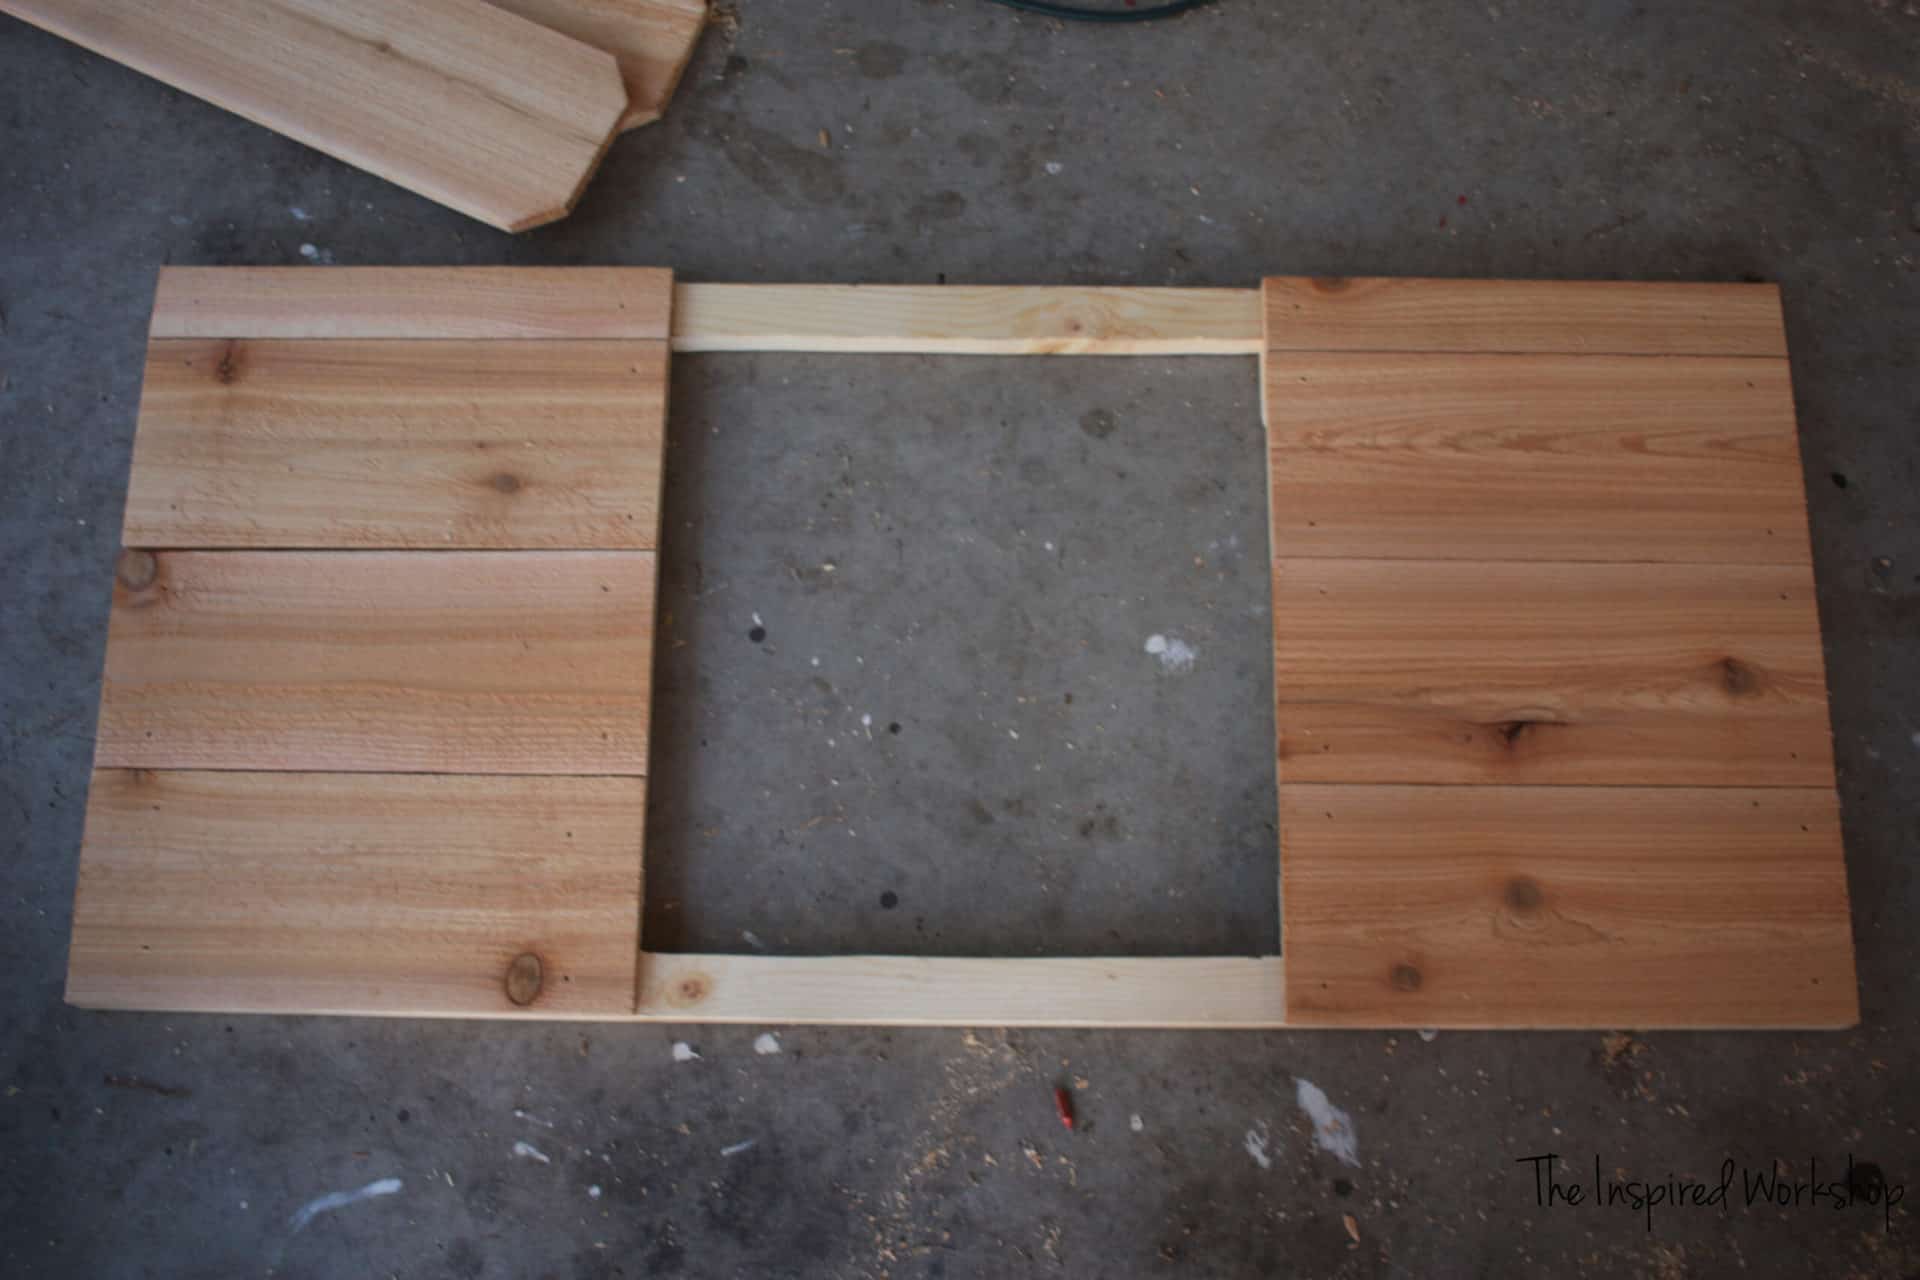
The floor is done, moving on to the walls of the small chicken coop!
I wanted windows because it is so hot here, there is no way to survive even at night without a breeze. You can always board straight across if you don’t want or need windows though. Again, I just screwed the boards in without glue.
I cut the horizontal boards at 22″ roughly! Again, I didn’t measure precisely because the opening is only 17″ wide so as long as the opening was covered, I was happy! Lol! You can get very precise and make sure they fit perfectly if you would like, just measure the space and cut your boards to that size…it should be 24″.
The vertical boards are cut at 9 1/2″.
You could pocket hole the verticle boards as well if you wanted, I knew the hardware cloth stapled would hold it all together well enough. If you want to pocket hole them, drill the holes at 1/2″ and use 1″ screws to attach.
I did the same thing on the other side and then the back. I just wanted a small narrow window here so that he could get a breeze while on his perch but yet the dogs couldn’t bother him…yes they are bothering him, I hope they are only doing it because he is new and not because they are spoiled little brats that don’t like all the attention that he gets!😂 It really does seem like they irritate him when they get jealous of him!
So the back is almost solid, with just a small section of a window. And yes, I had not added the other small piece on the right side! Lol!
Step 9
Attach hardware cloth over the windows!
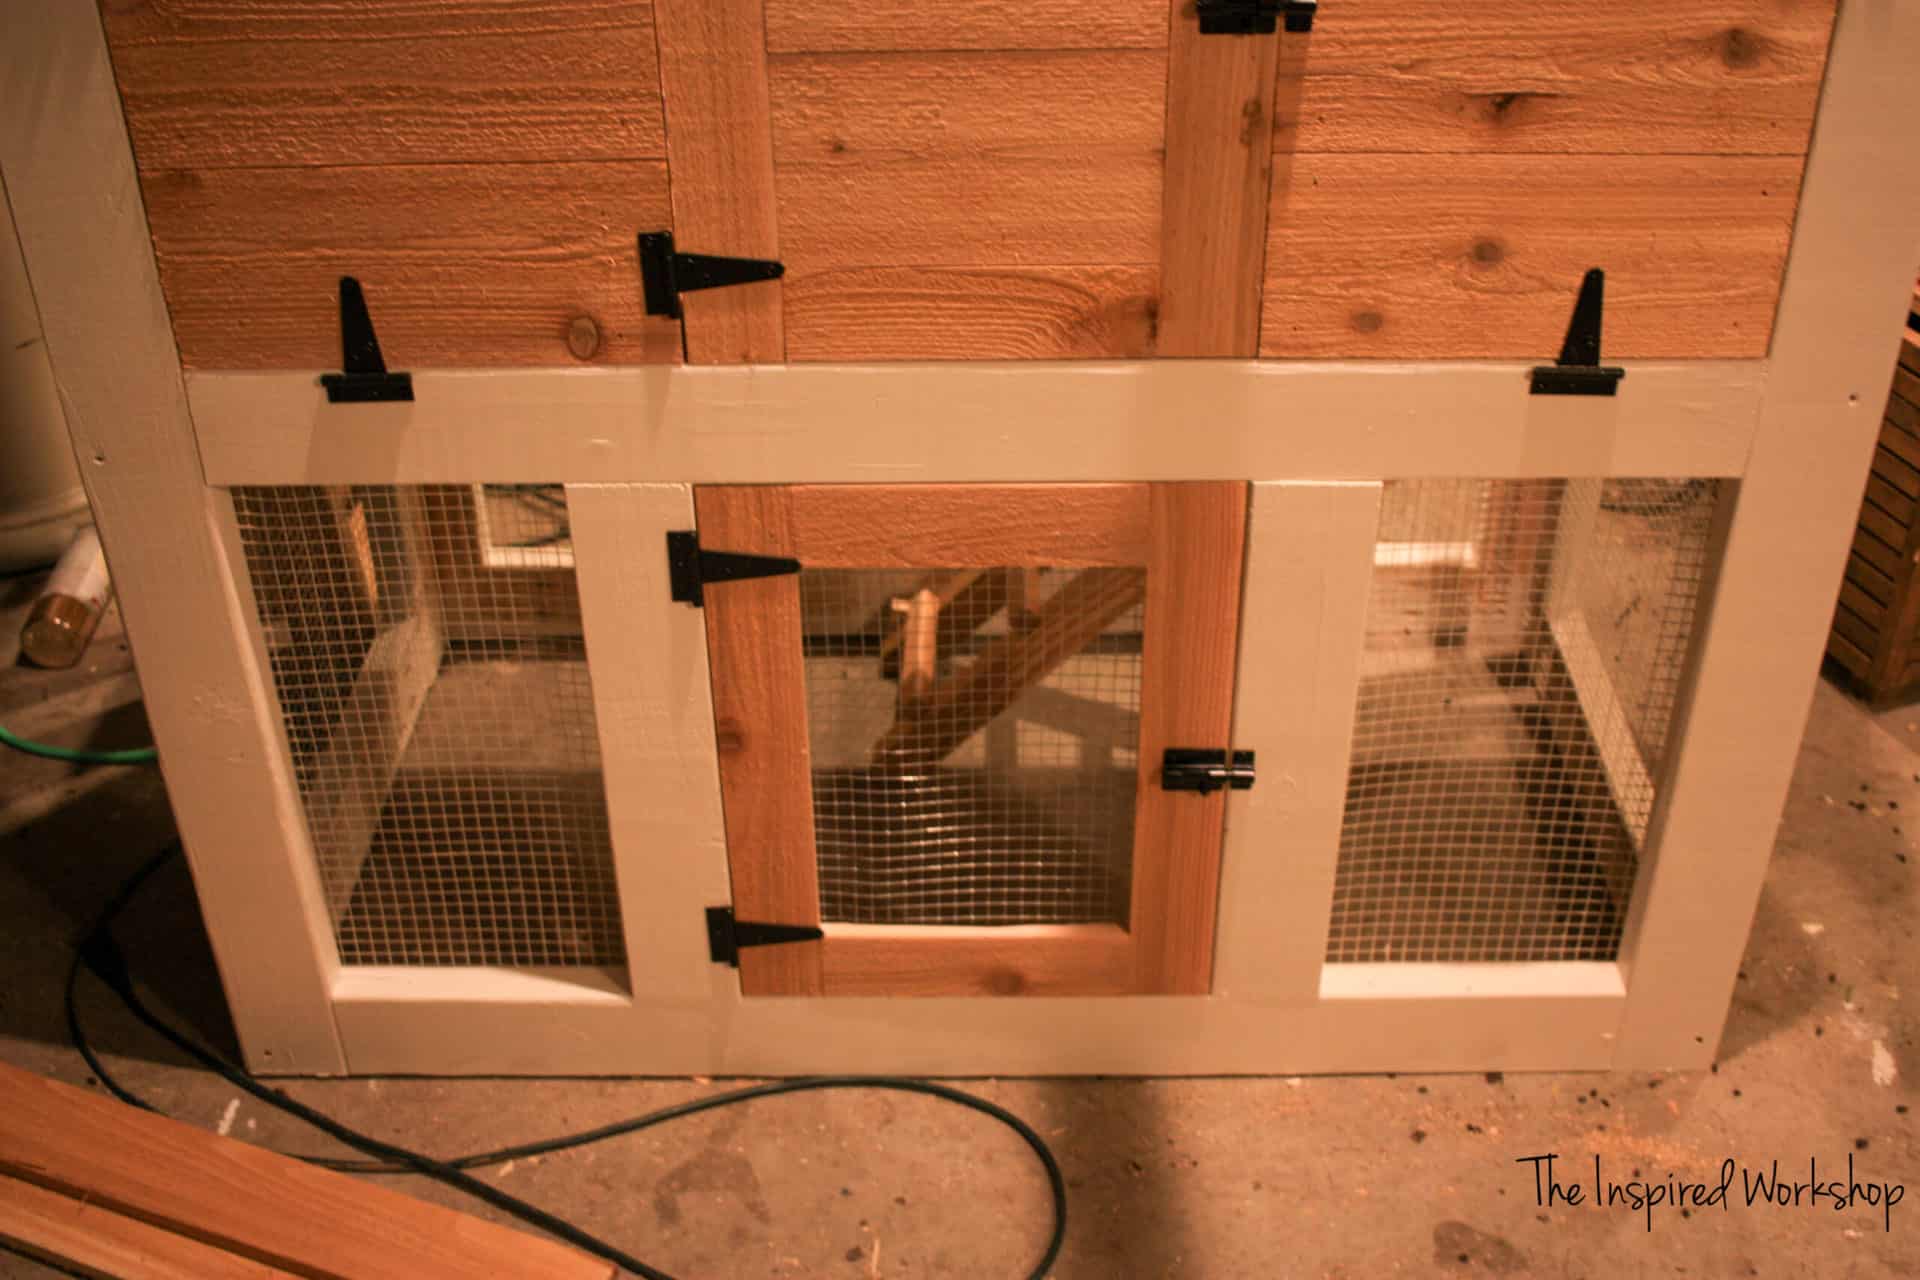
Building the doors for the small chicken coop!
Step 10
The bottom door, I built first because it was the easiest…duh! Lol! I ripped a fence picket into 2″ strips and pocket holed them together with 1/2″ deep pocket holes and 1″ screws. Make sure and use wood glue!
Cut the hardware cloth to fit the door, and staple it on!
Make another frame just like the one above, and then fill the inside with fence pickets, I pocket-holed them (same depth and screws as the frame). I used two full-size pickets pieces, and then had to rip one down to 2 1/4″ to fit in the middle!
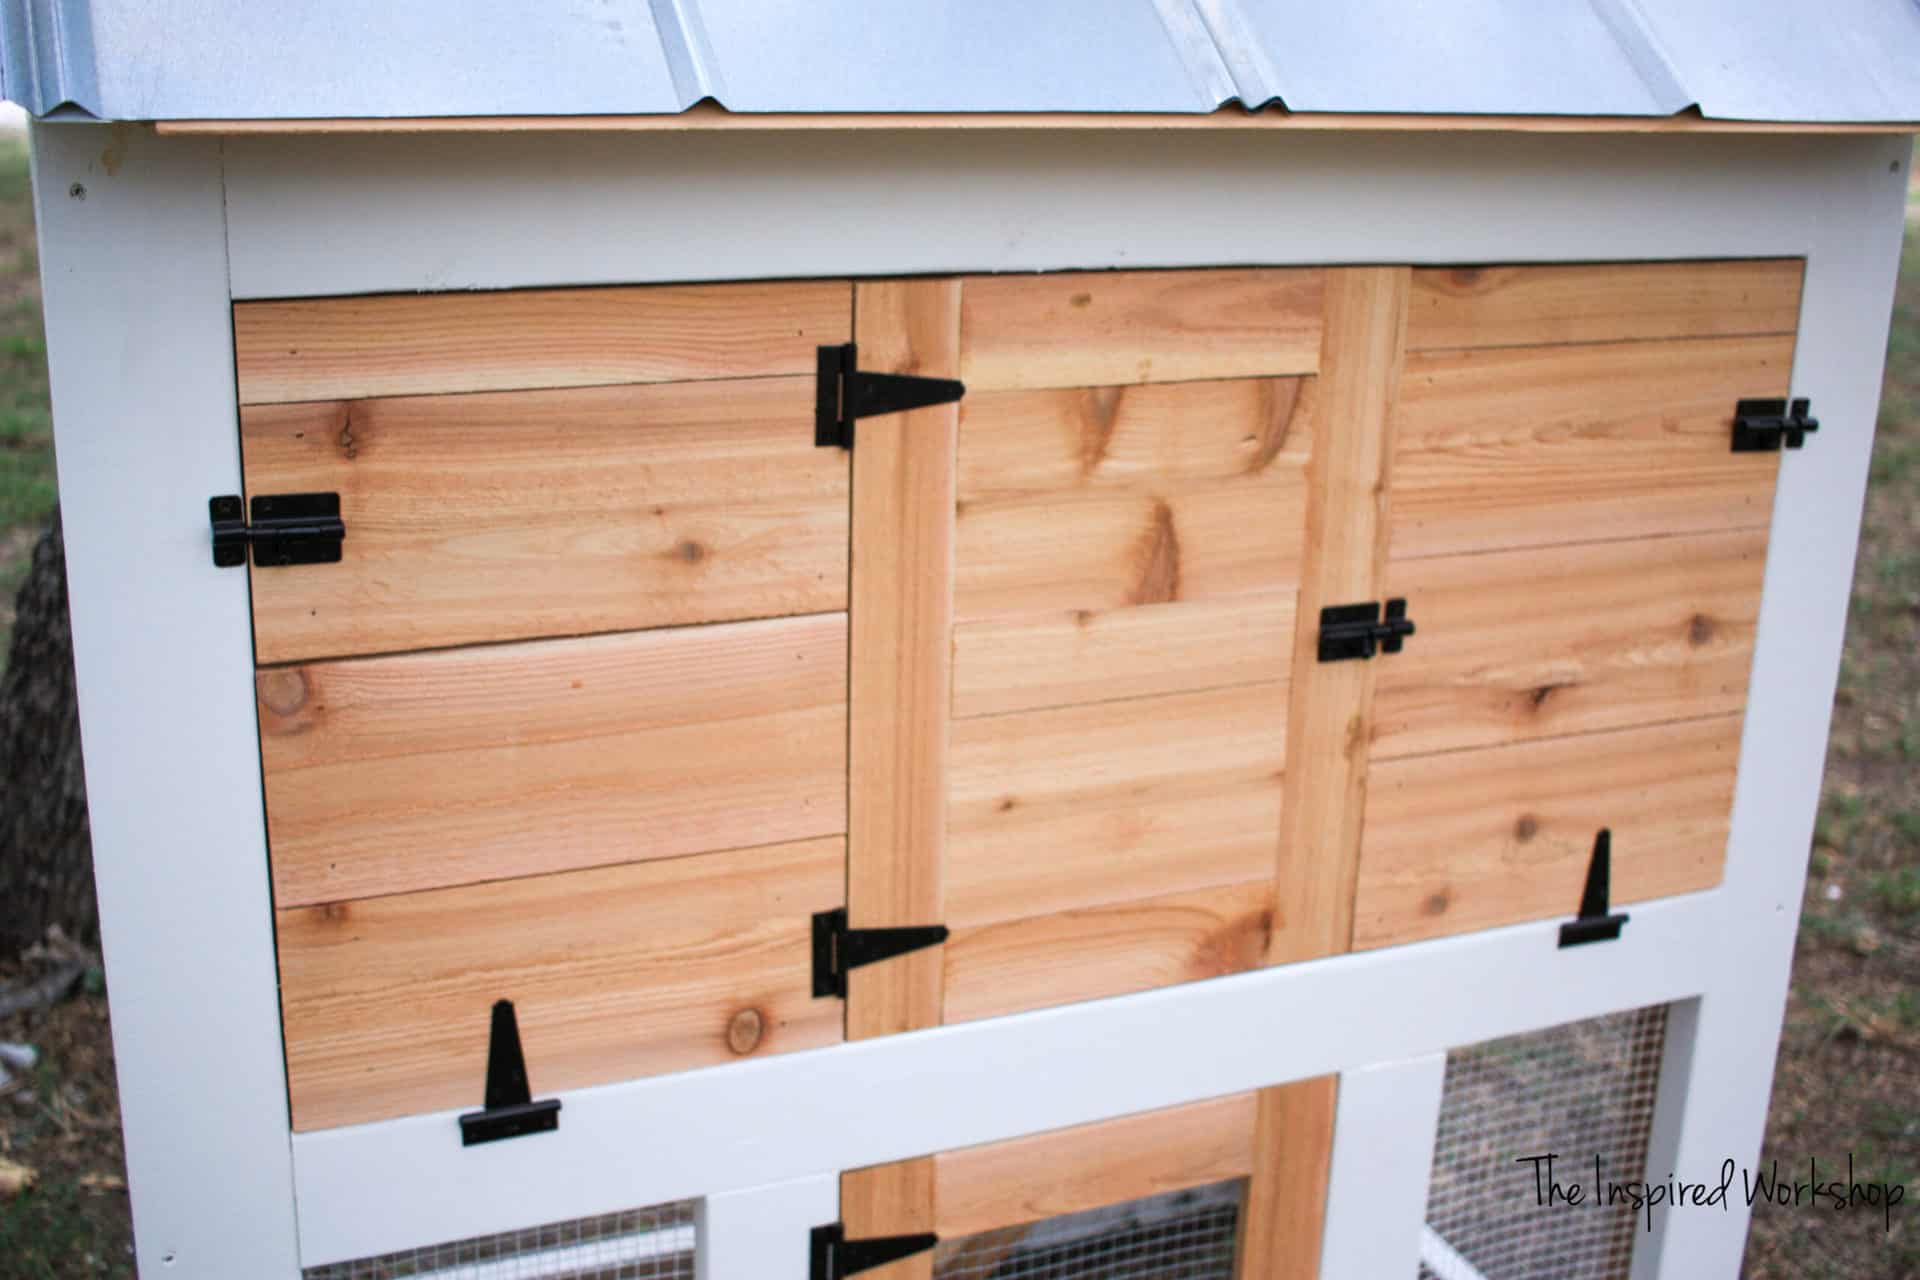
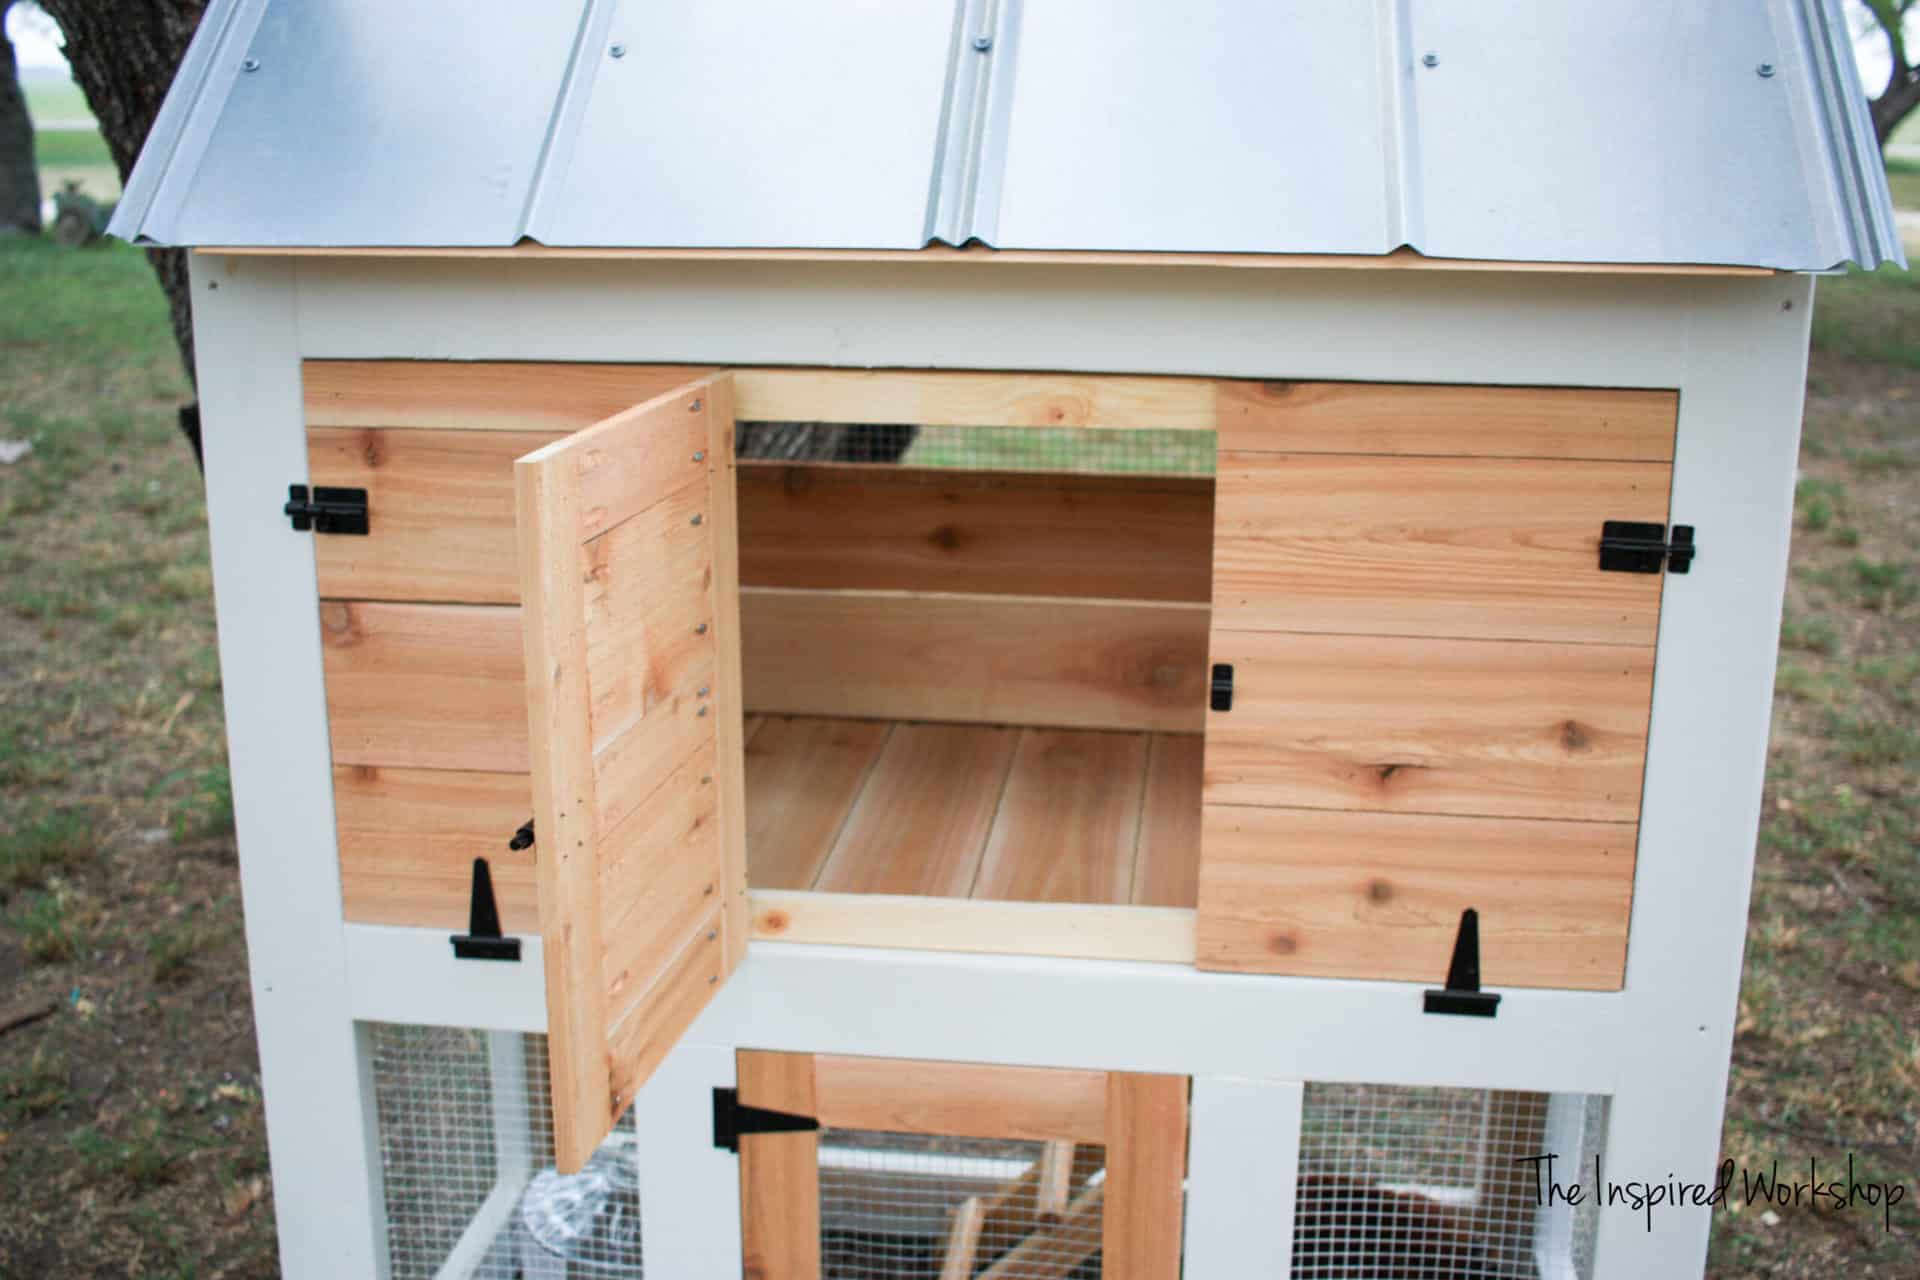
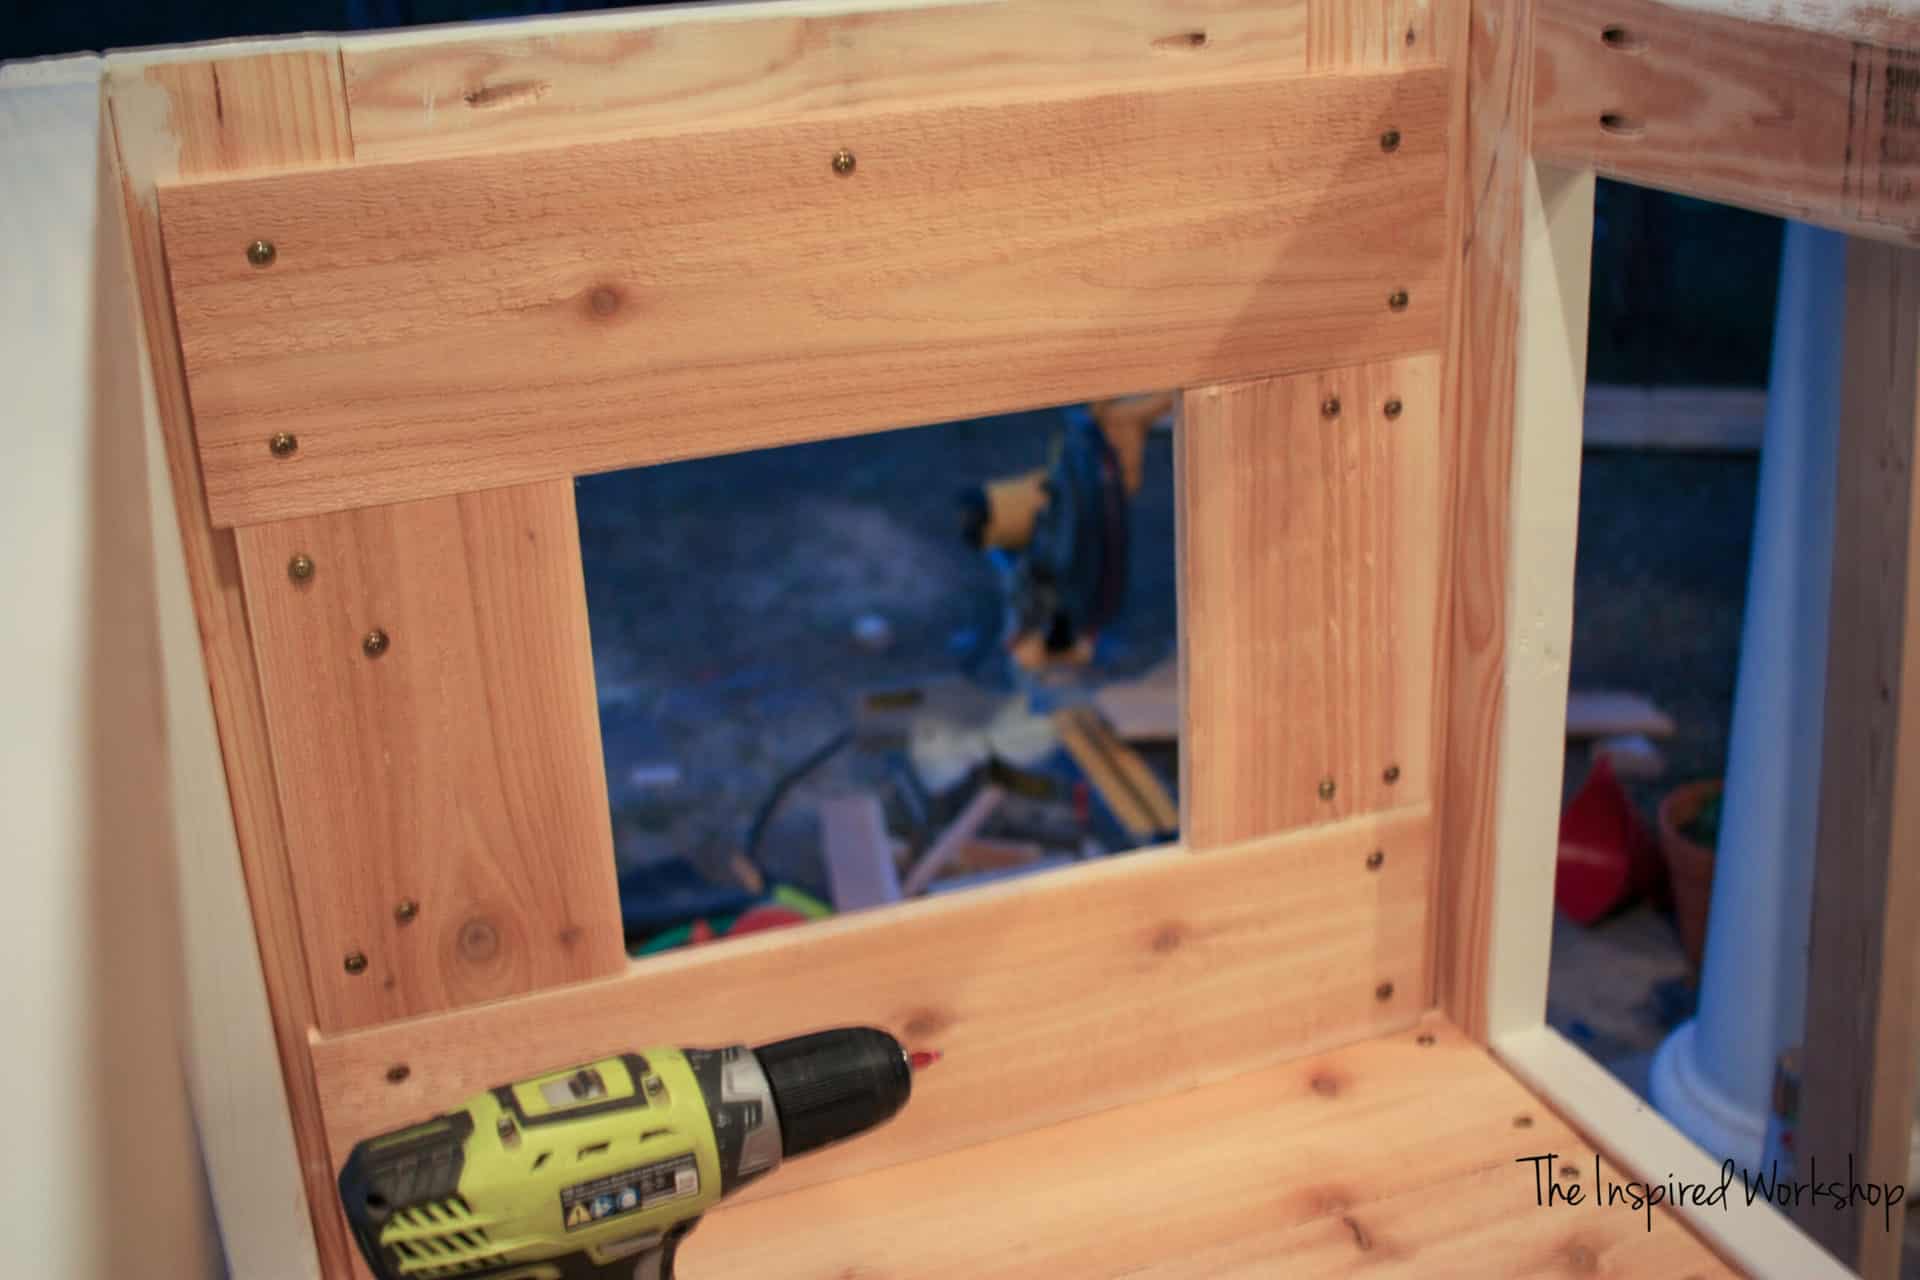
Next, make the frame for the large door. I used 1x4s and a jigsaw to cut out sections to make the door large enough for my upper body to fit inside the small door. Mark your boards like so, 13″ inward on each side which will leave 14 3/4″ in the middle that needs cut out.
Leaving an inch intact on top and bottom, cut out the section.
Next, drill the pocket holes in the 1x4s @ 11 1/2″ at a depth of 3/4″ and using glue along with 1 1/4″ screws.
Add the 13″ boards, to the sides, glue, and brad nail.
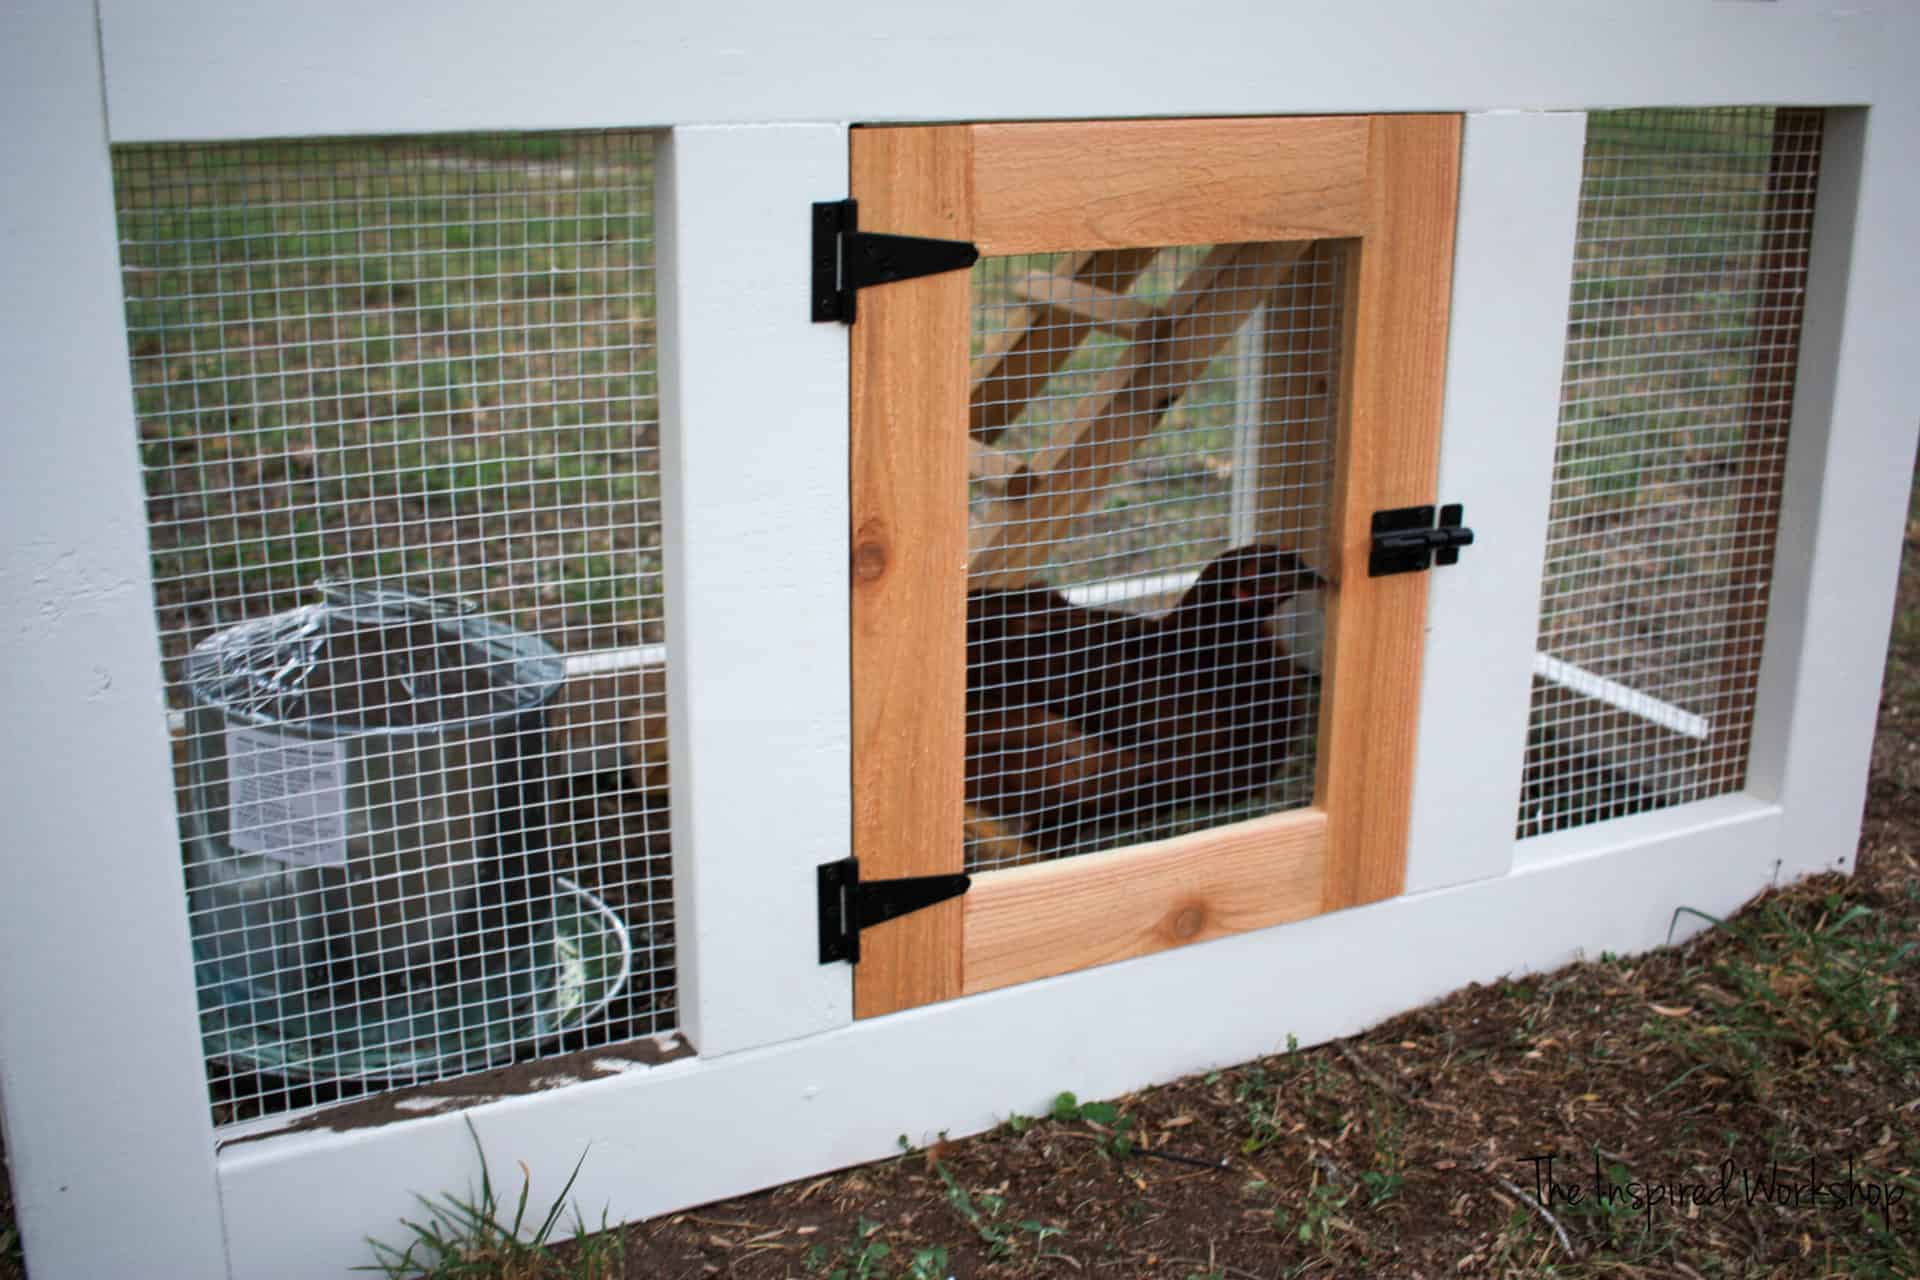
Add the small door that you built earlier to the middle section with 3″ t-hinges! Here are the hinges and latches we used!
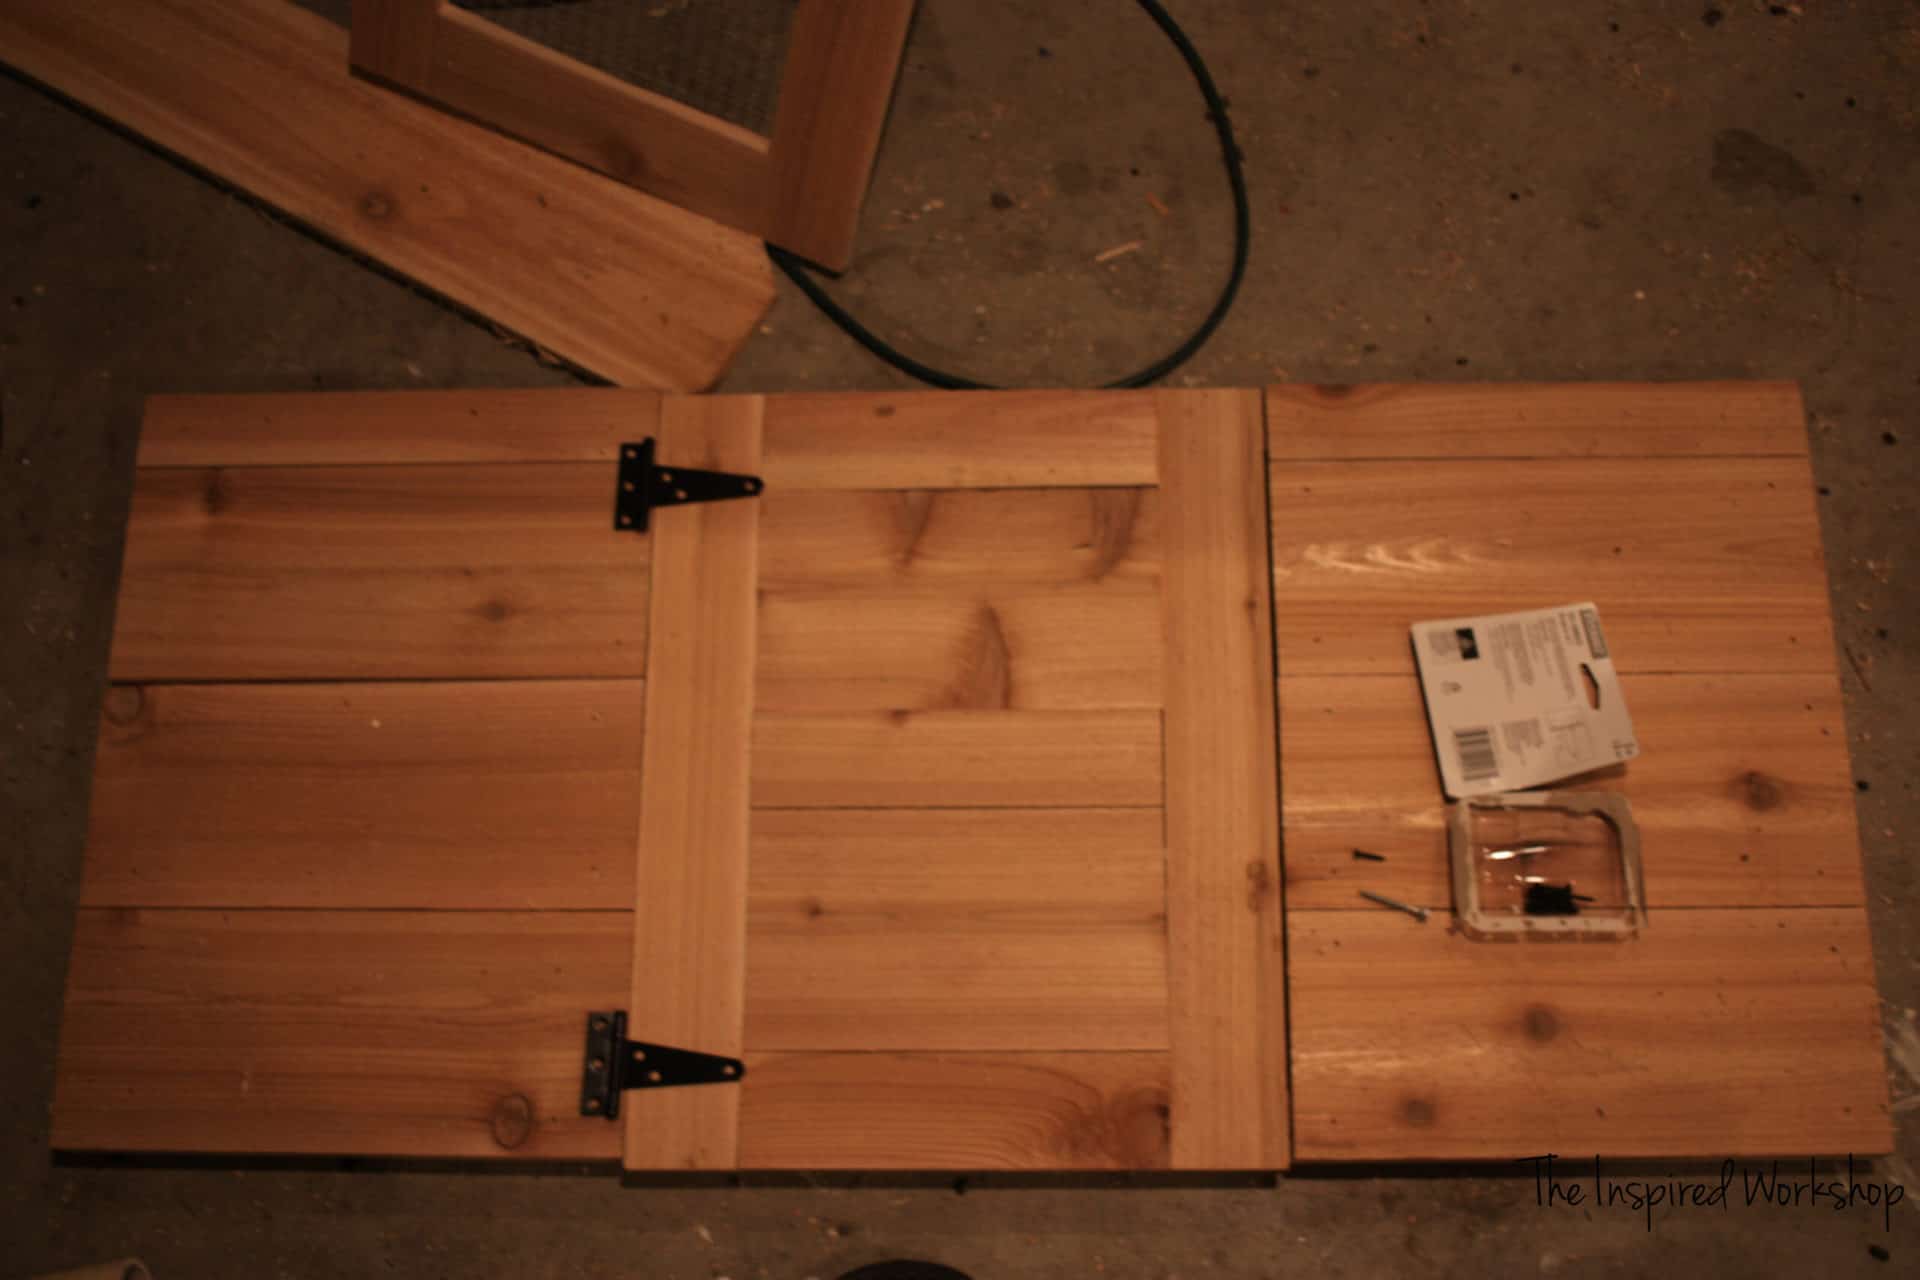
Then you can use hinges to attach the big door to the coop, and the bottom door! Woohoo! Not much left to do!!! 🎉
Step 11
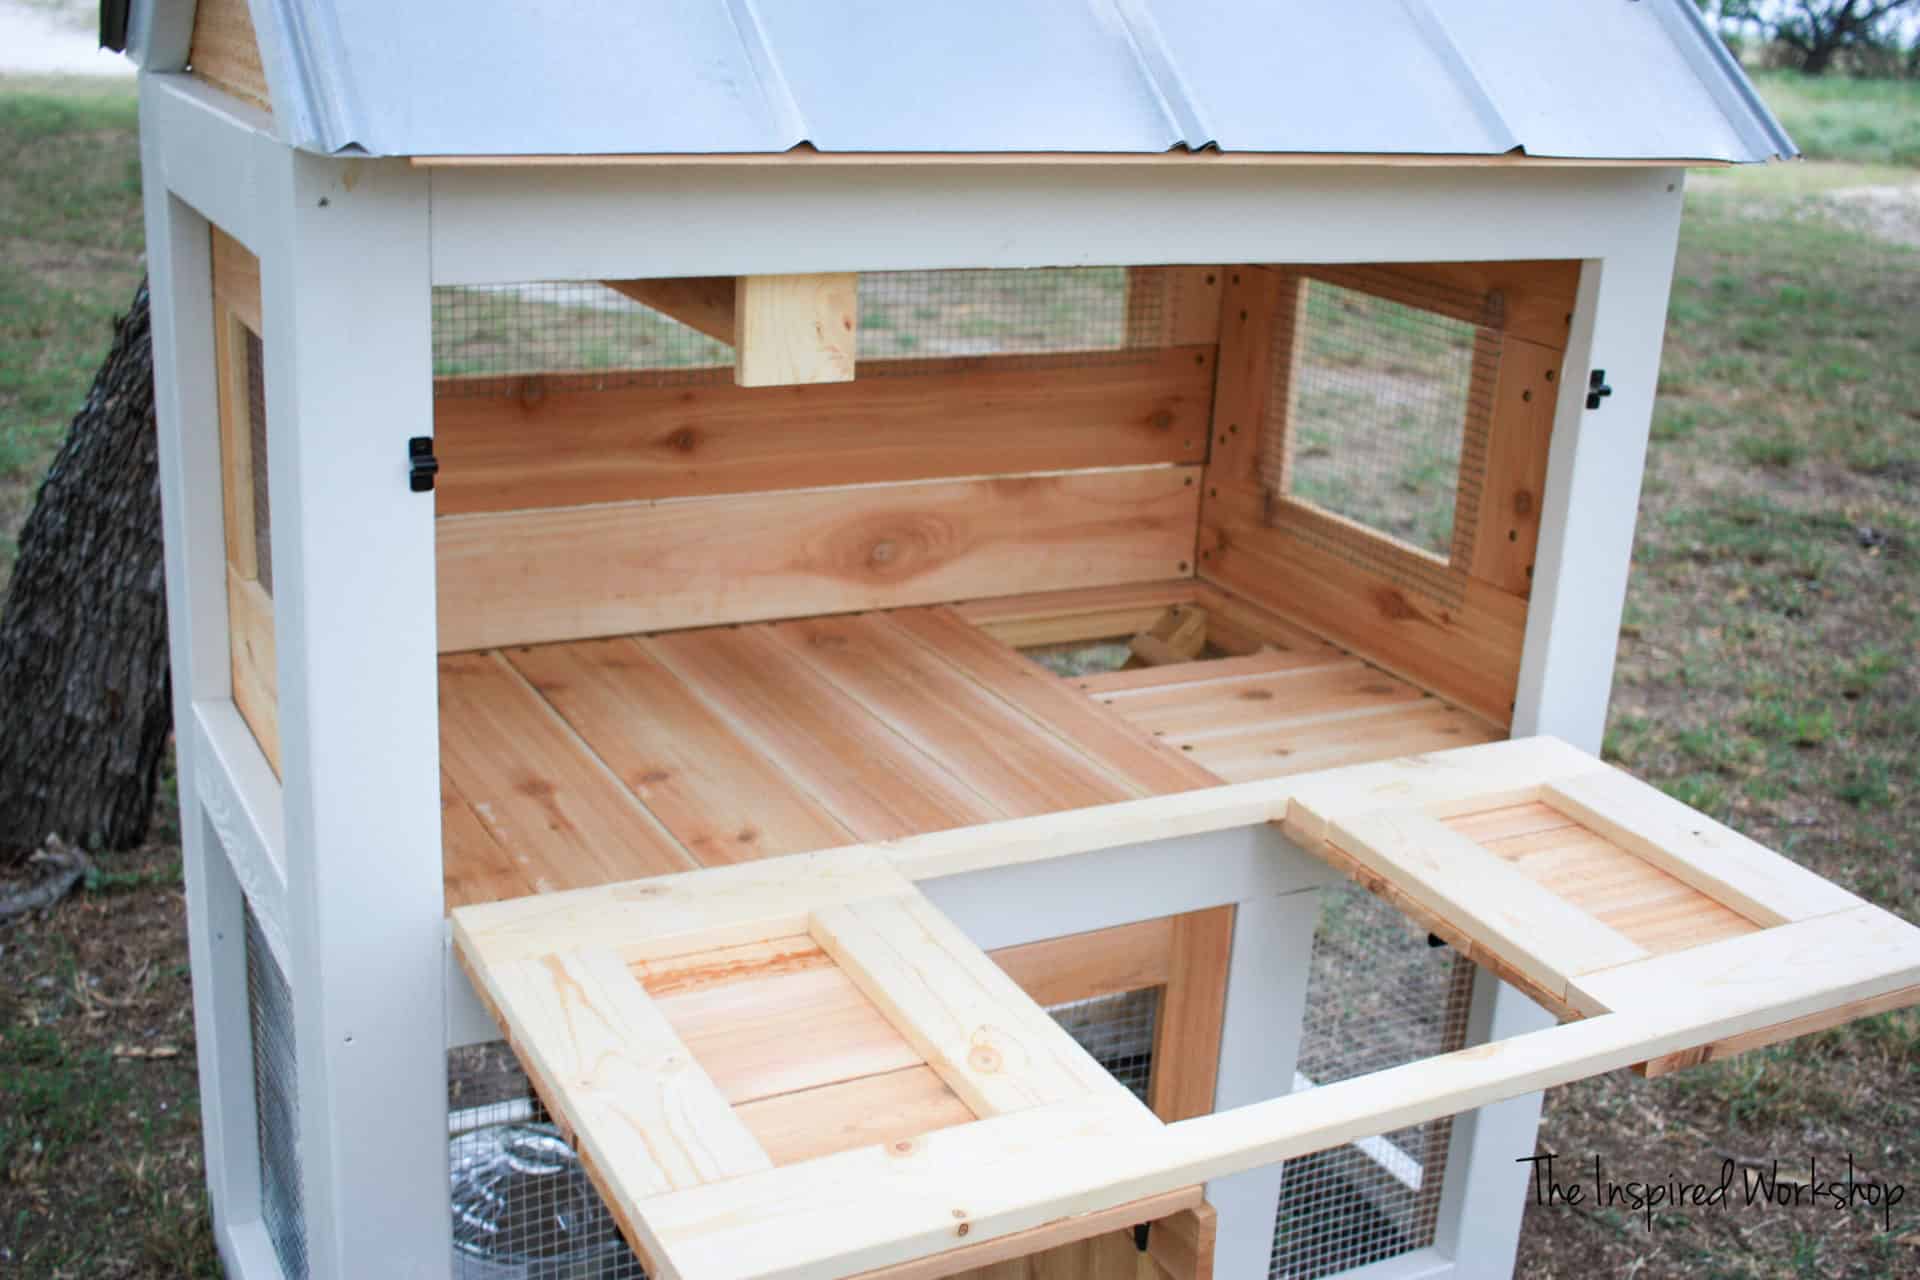
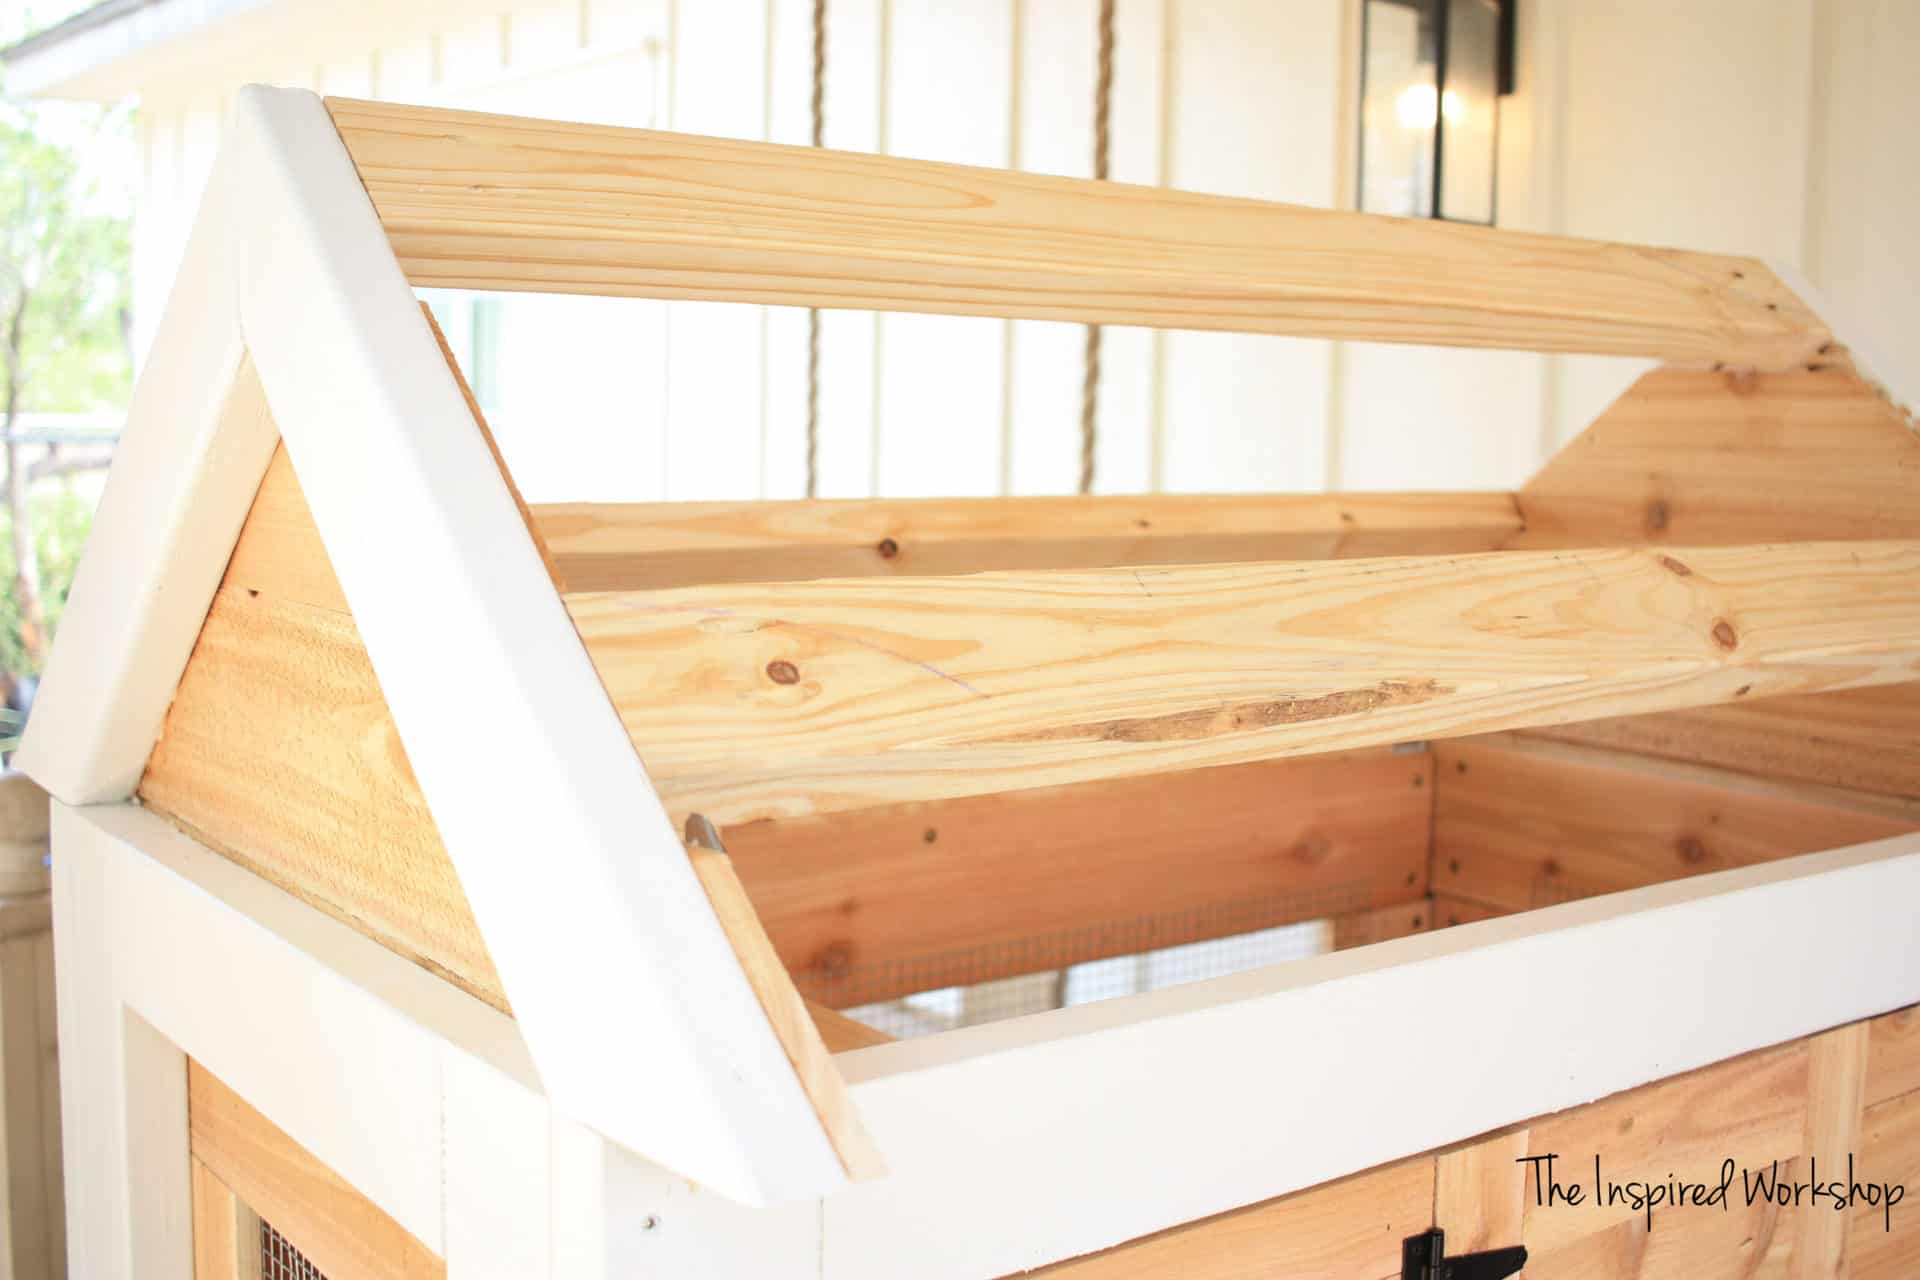
Build the roof rafters for the small chicken coop!
Oy, this was the trickiest part, and if you look closely I got my miters off slightly, they were cut at 48.5 degrees off square instead of 50, and yes it does matter, and yes it does show…and yes it does drive me crazy, but oh well! Lol!
Your roof rafters will be cut at 40 degrees off square on the top and 50 degrees off square on the ends that attach to the frame. I chose to do the roof this way to make it way easier on myself as opposed to notching out the ‘rafters’ as you typically would! This is a miniature coop though, and the roof isn’t going anywhere!
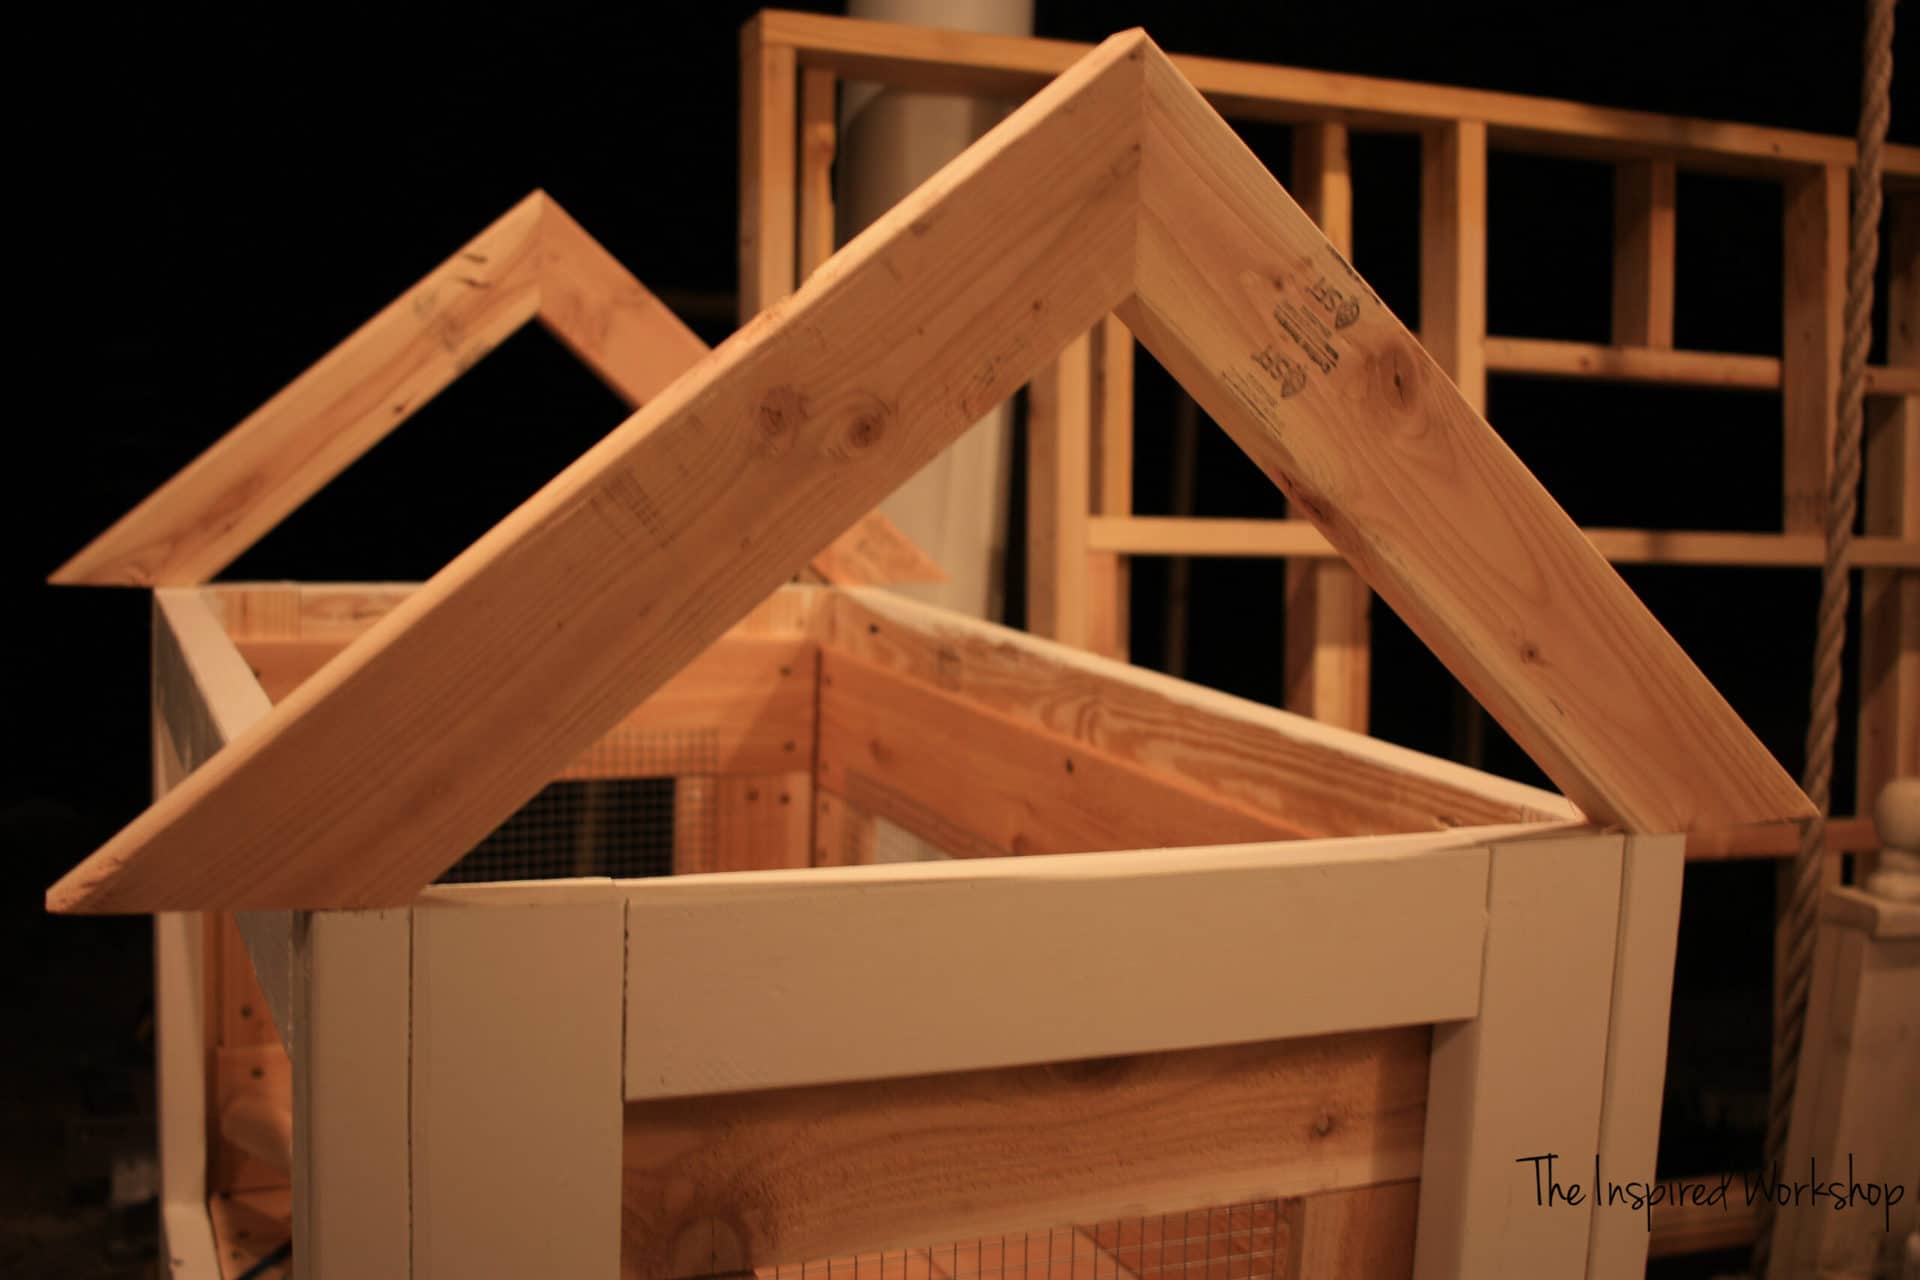
I pocket holed the roof rafters together, with pocket holes drilled at 1 1/2″ and used 2 1/2″ screws with glue to build them. Don’t attach them to the chicken coop at this time!
Step 12
Fill in the peaks of the rafters with cedar pickets!
Okay, now this next part was a wee bit of, “Crap, why did I do that!”, over and over again!! Hahaha!!
Once I built the rafters, I attached them to the small chicken coop with Simpson Strong-tie straps, all excited that I was moving along so rapidly…then I had to detach them and add cedar boards to the inside of the peaks.😬 So, my pics may seem a little out of order but I will save you from making the same mistakes! Lol!
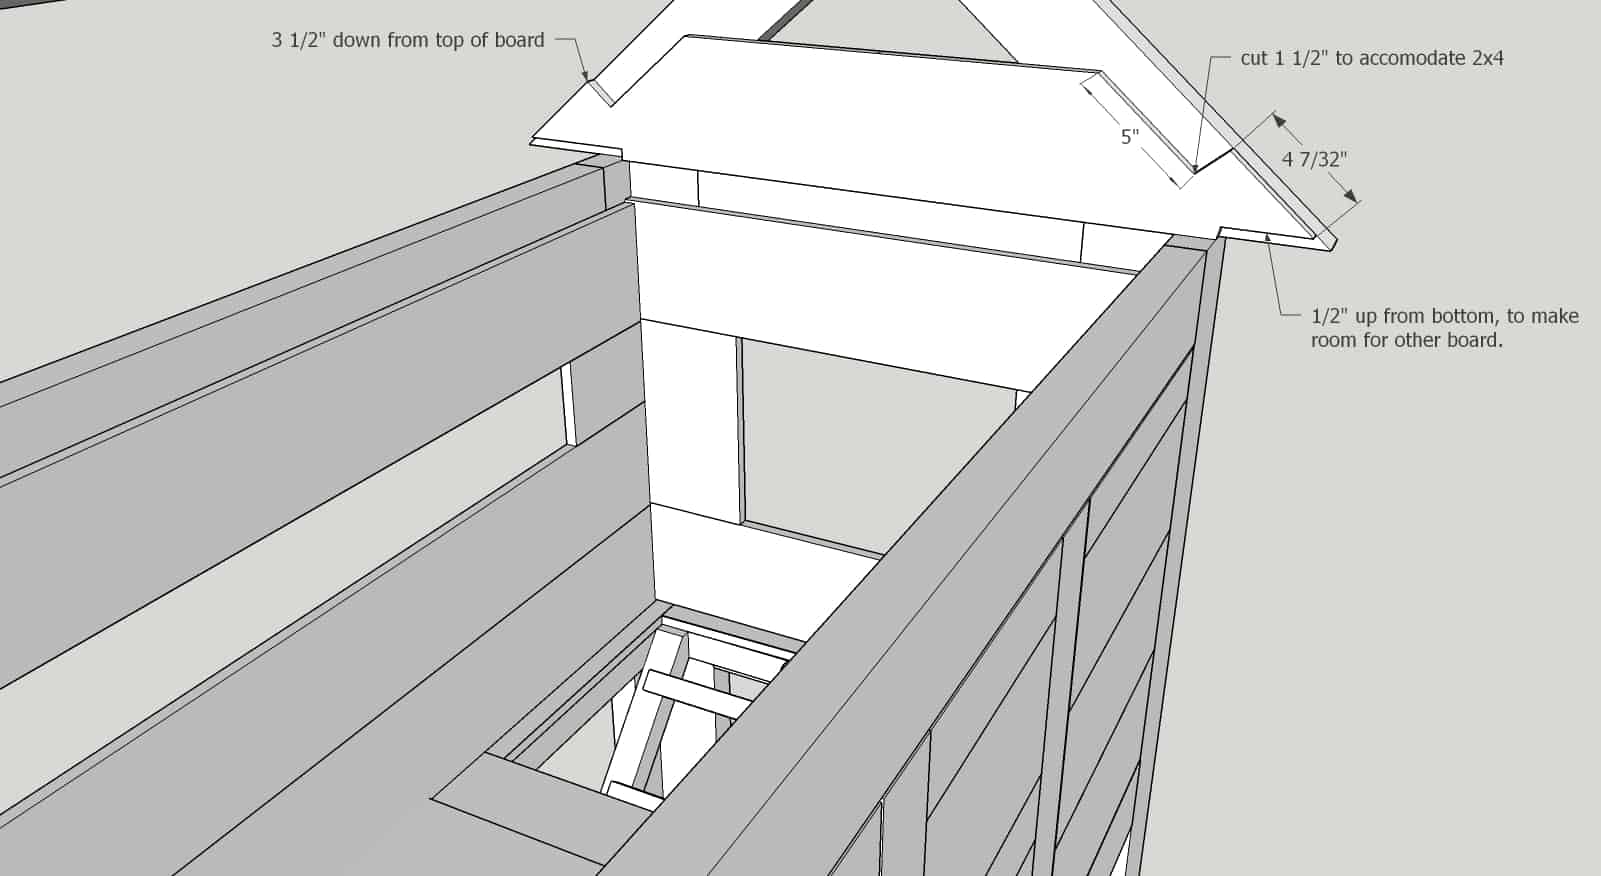
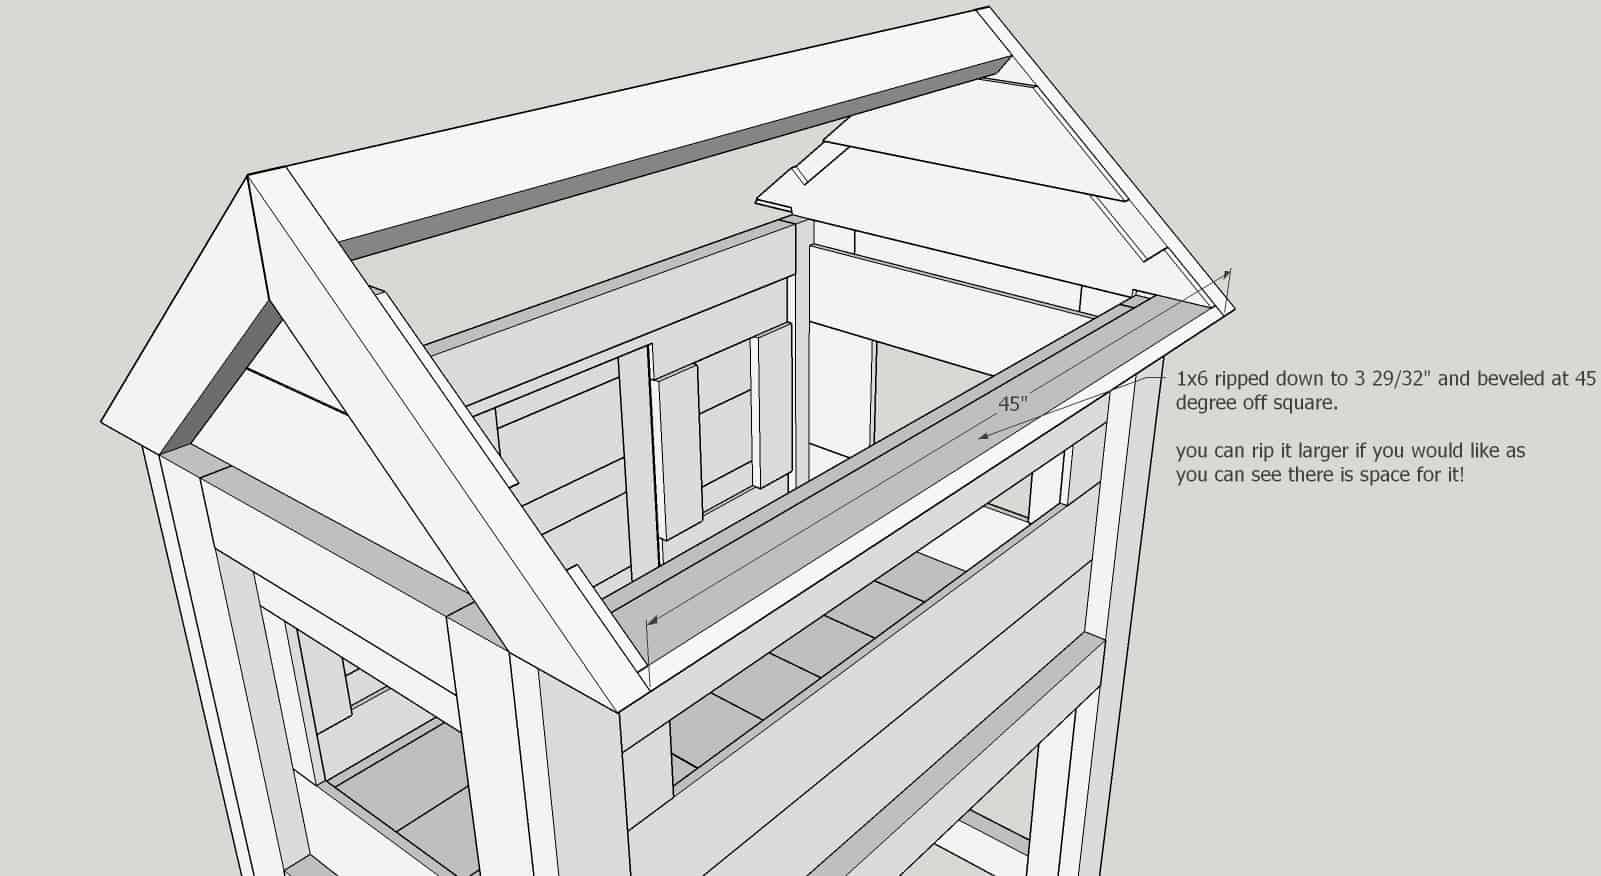
I cut the first cedar picket at around 28 3/4″ and mitered both ends at 50 degrees off square, ends not parallel. Then I had to notch out the board to allow the 2×4 stretcher boards to fit. If I would have foreseen the fact that the cedar board would block my other cedar board later, I would have notched it out as well. I show how to notch it in the Sketchup plans so I’ll share the pic here.
First pic, how I did it…
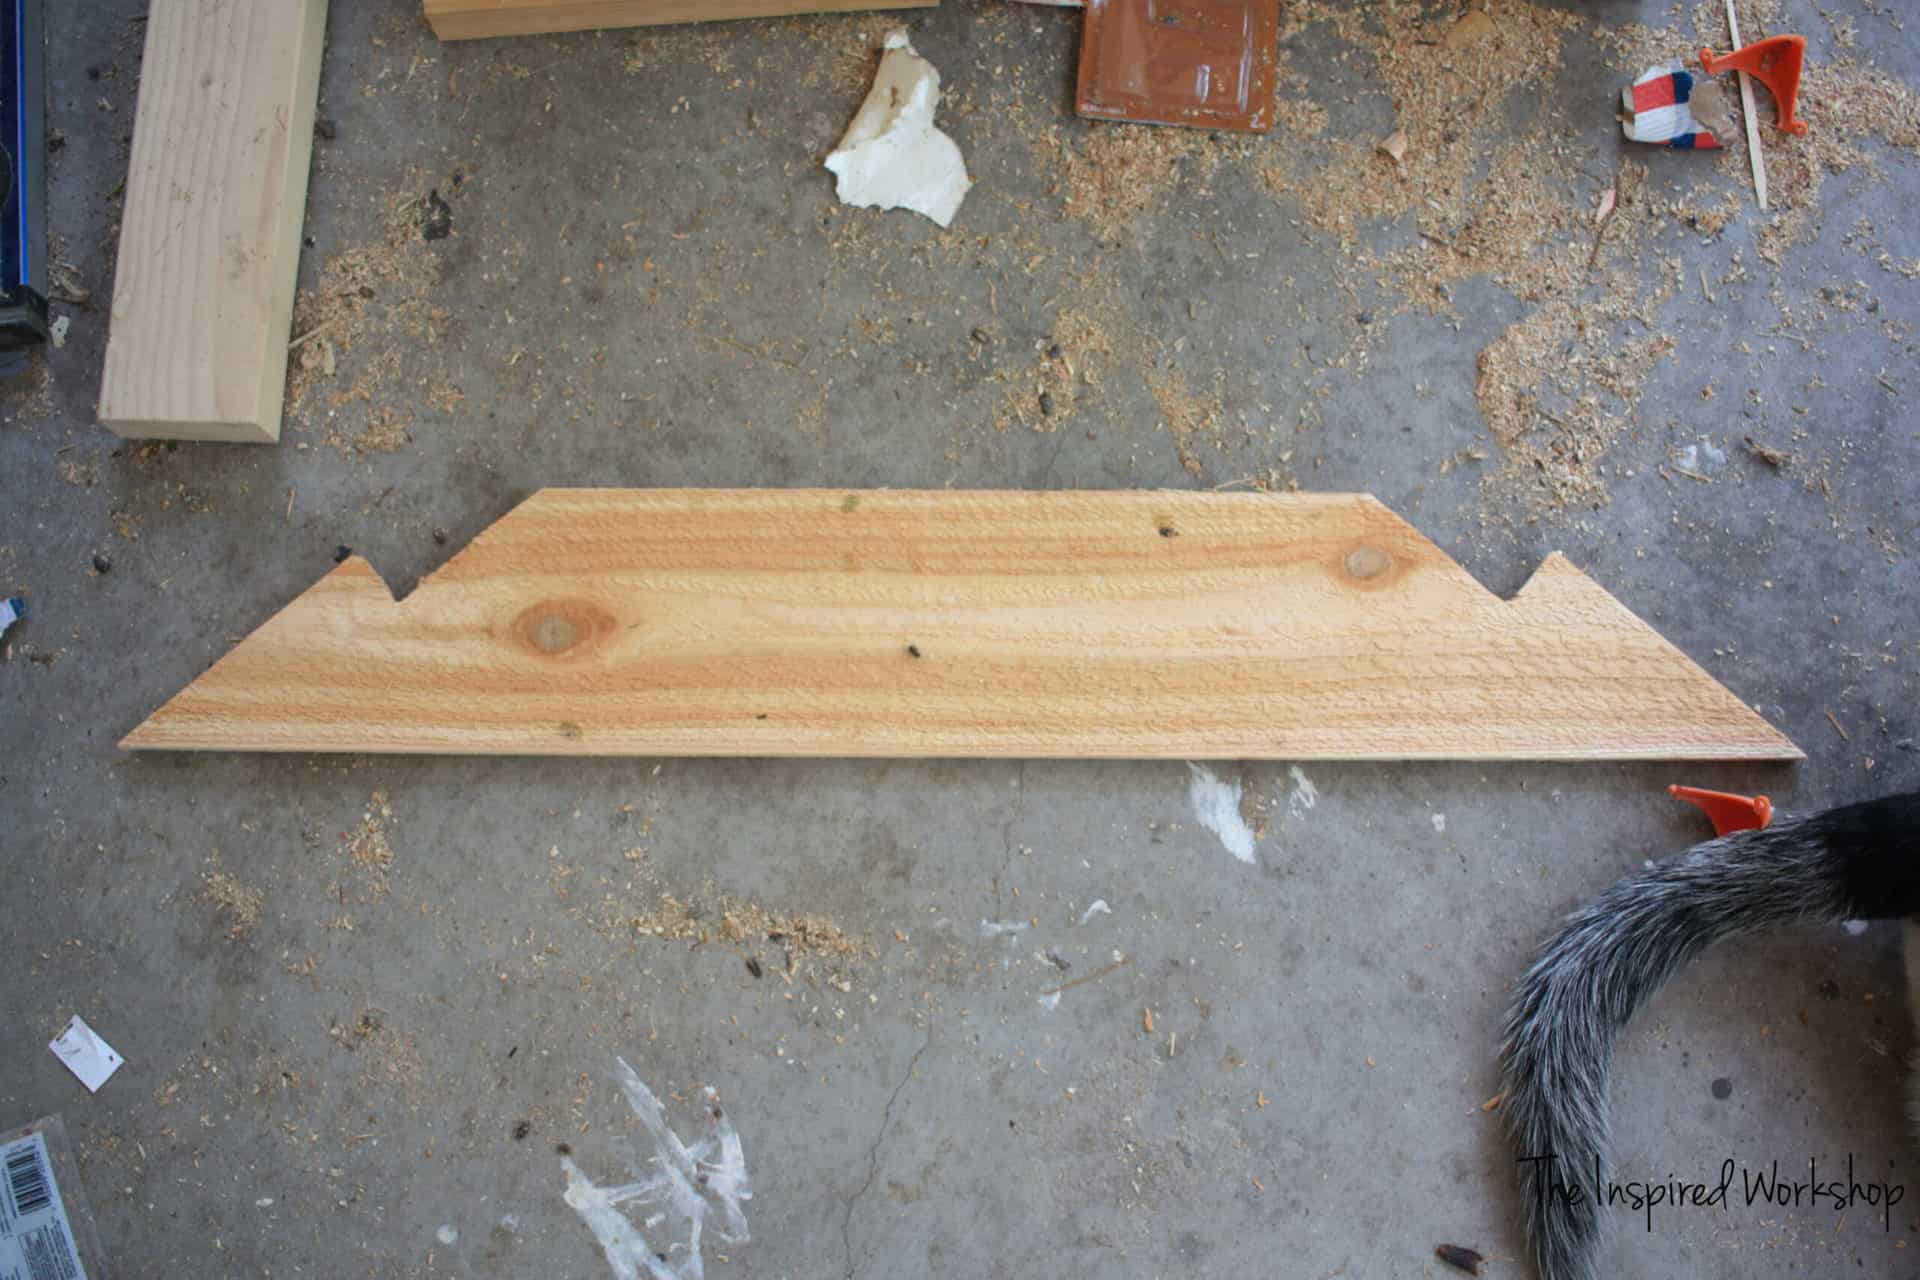
Second pic, how I wish I would have done it…
After this board is attached, NOW you can attach the SST brackets with 1 1/2″ hex head screws. LOL!
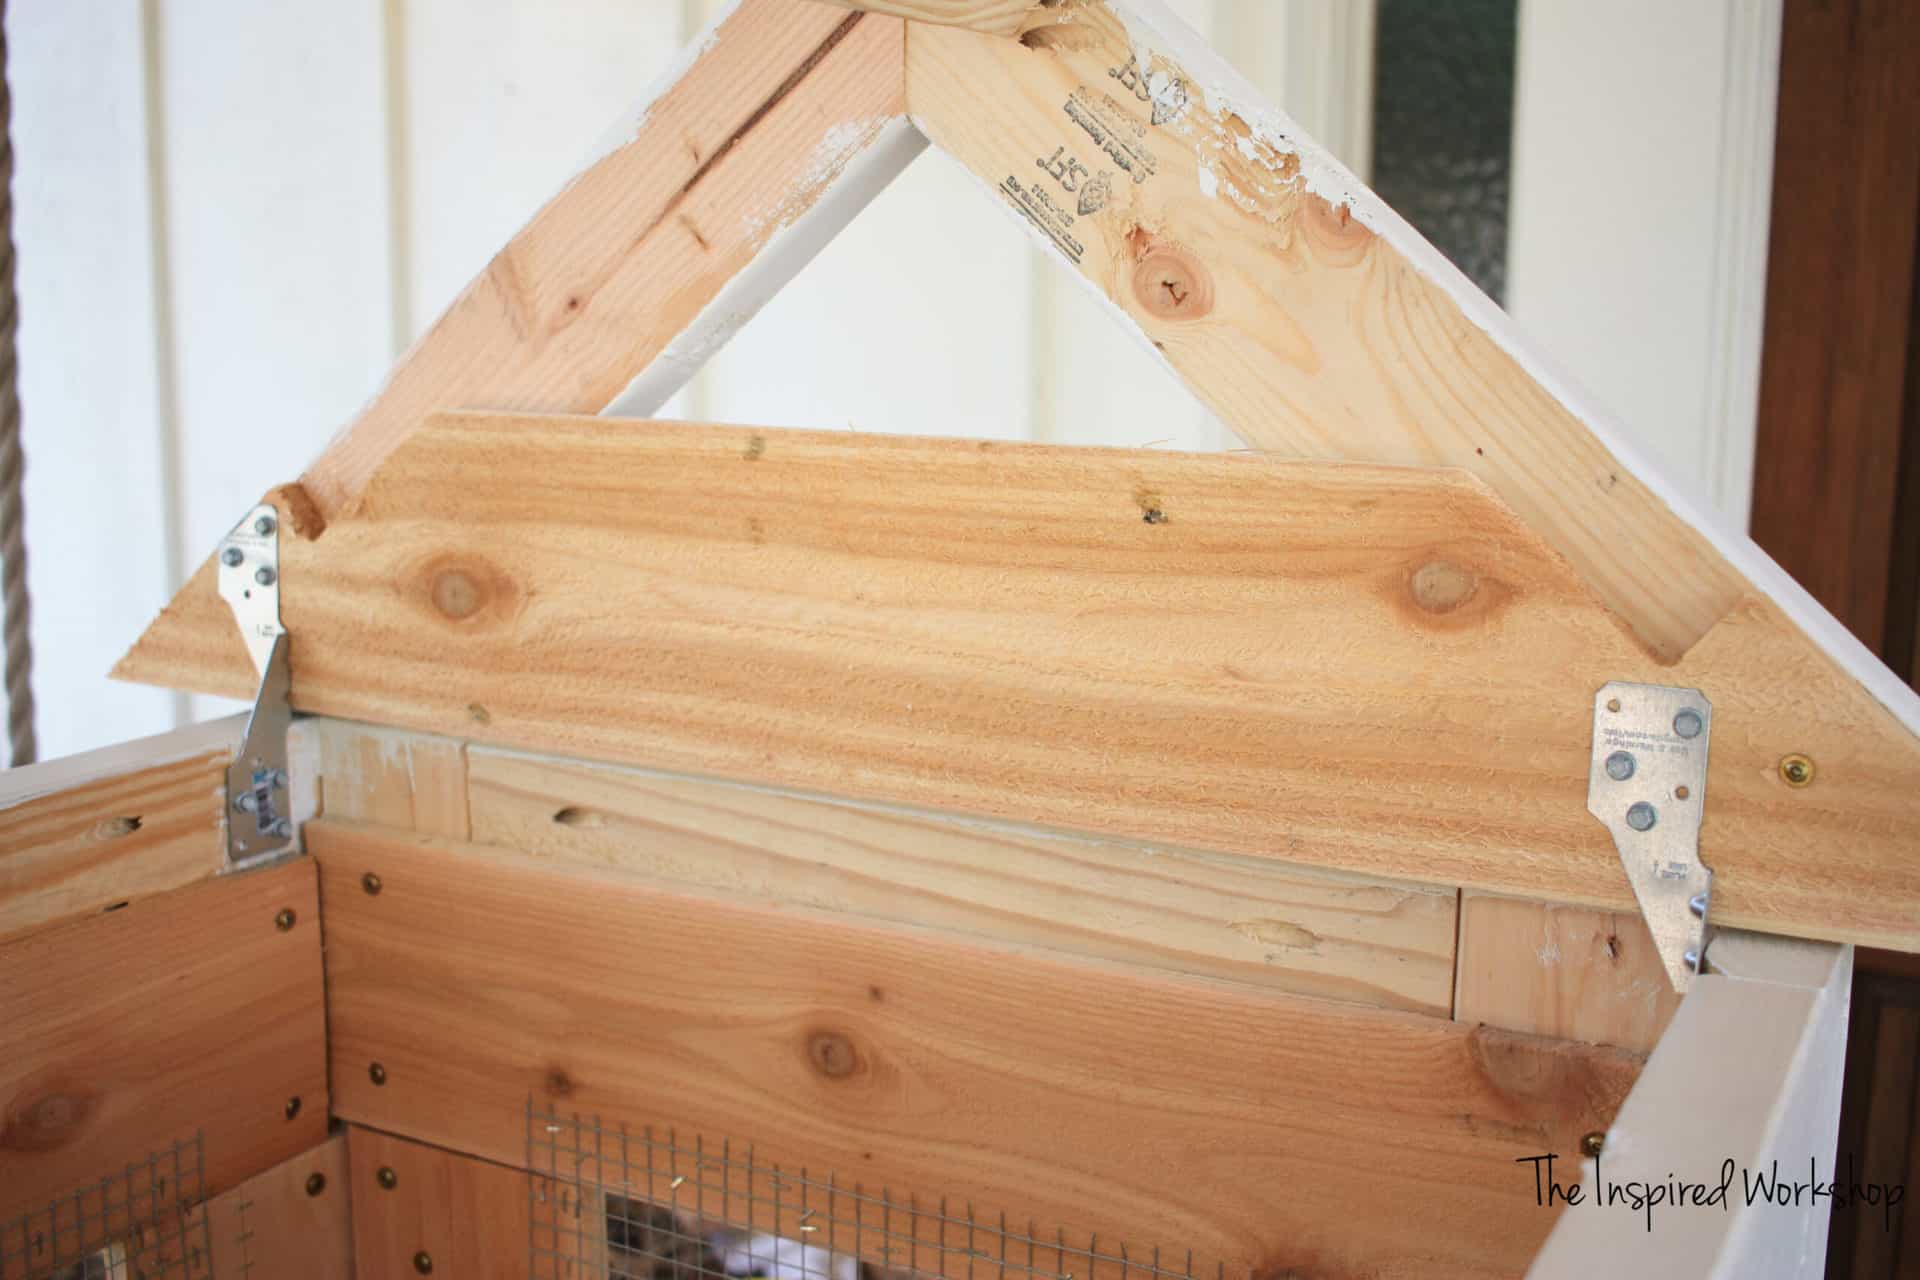
Add another cedar picket above that one. You may have to cut the corners as I did, but if the board is cut as shown in the Sketchup pic, there will not be a need!
Step 13
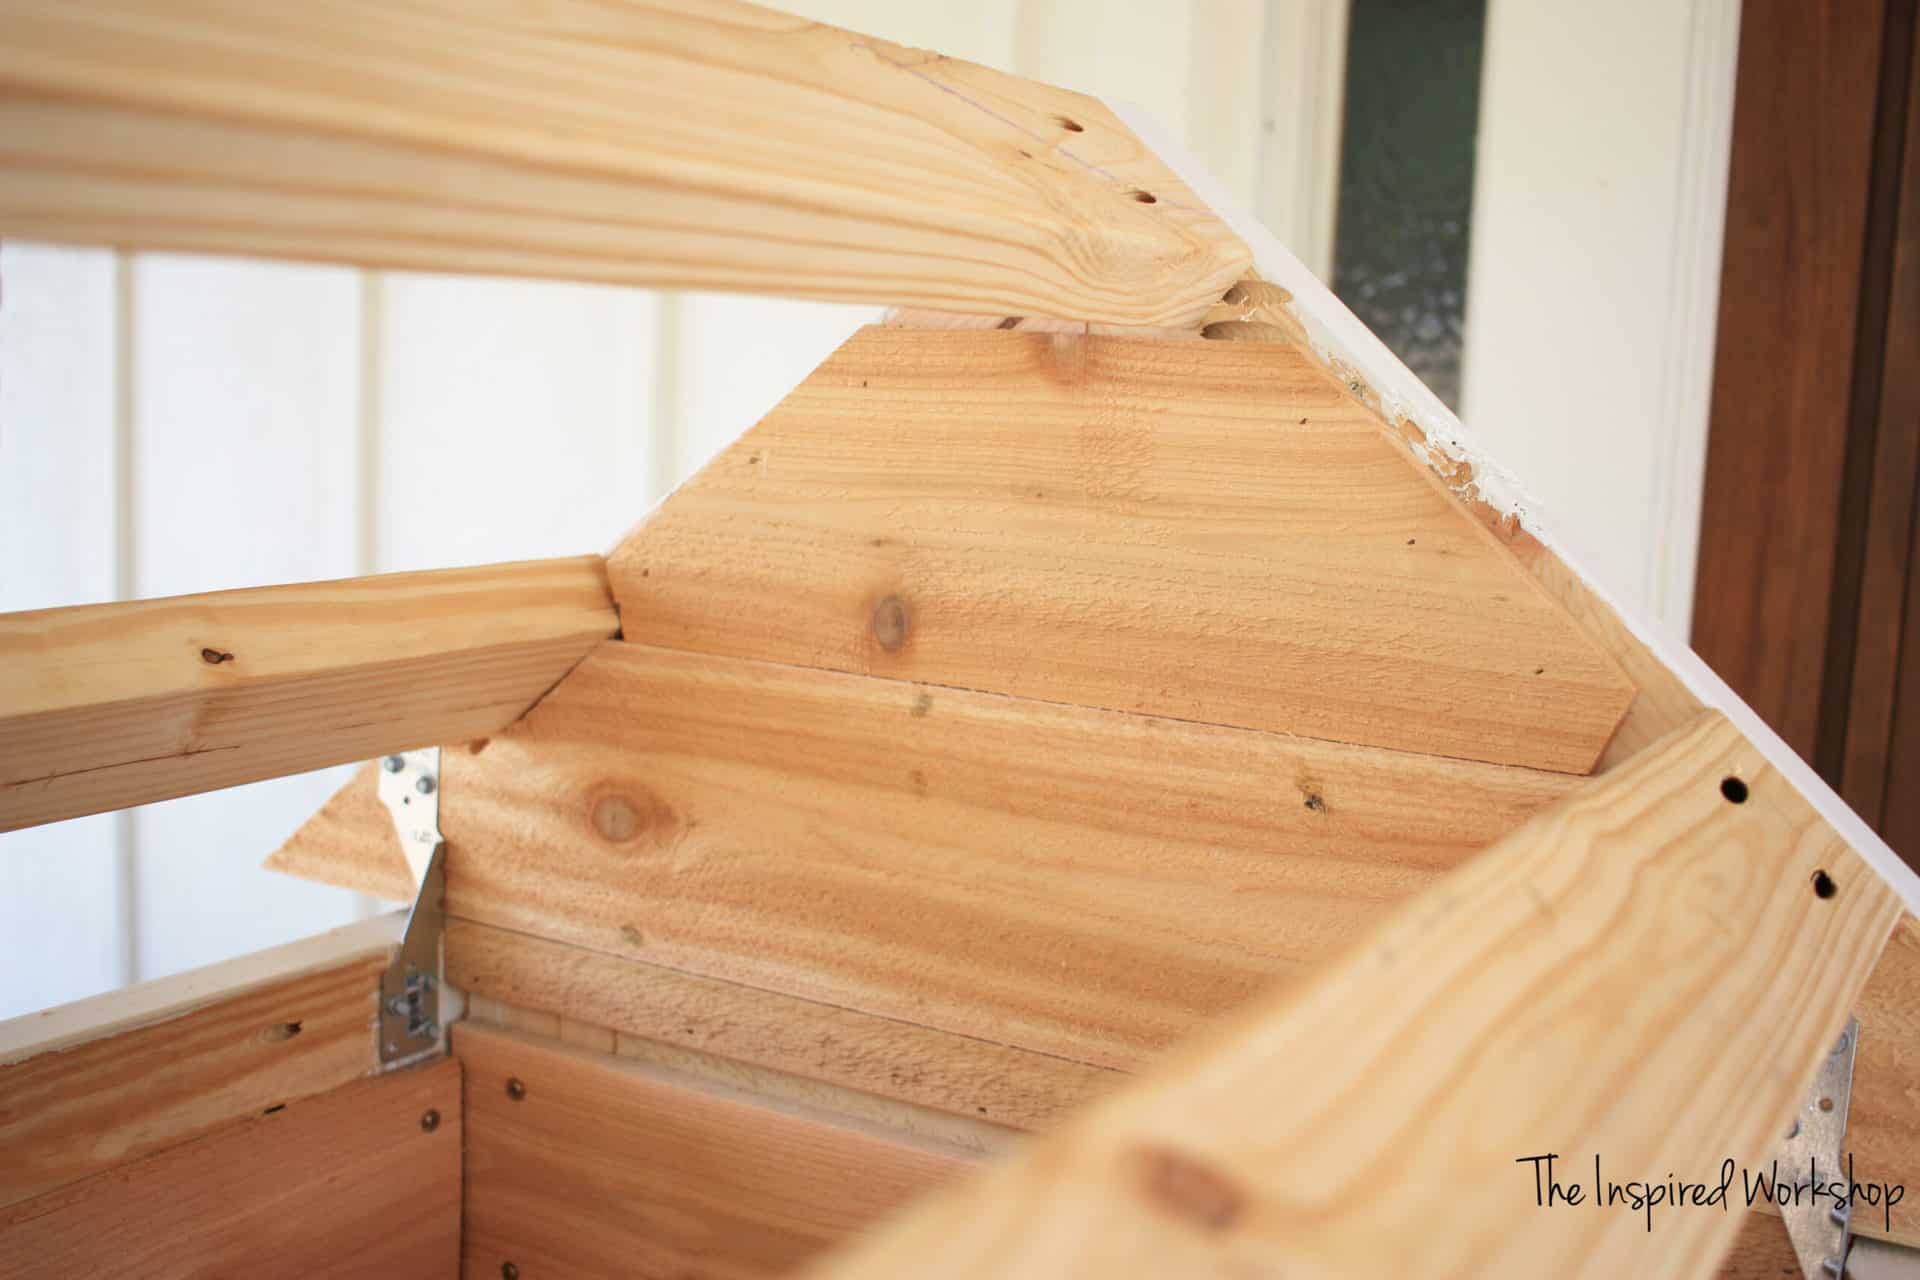
Add the stretcher boards you see above in the photo. They are 2x4s at 45″…one is at the top and one on each side. Pocket hole them with pocket holes drilled at 1 1/2″ and use wood glue along with 2 1/2″ screws to attach! See the photo above!
Alright, the last thing to do before attaching the roofing, add a fence picket ripped down to 3 29/32″ or you can rip it a little larger, beveling it to 45 degrees on one edge. I wish my table saw would bevel at 50, but it won’t so I went with 45 and it worked alright! I pocket holed it into place with pocket holes drilled at 1/2″ depth, and used 1″ screws along with wood glue to attach it!
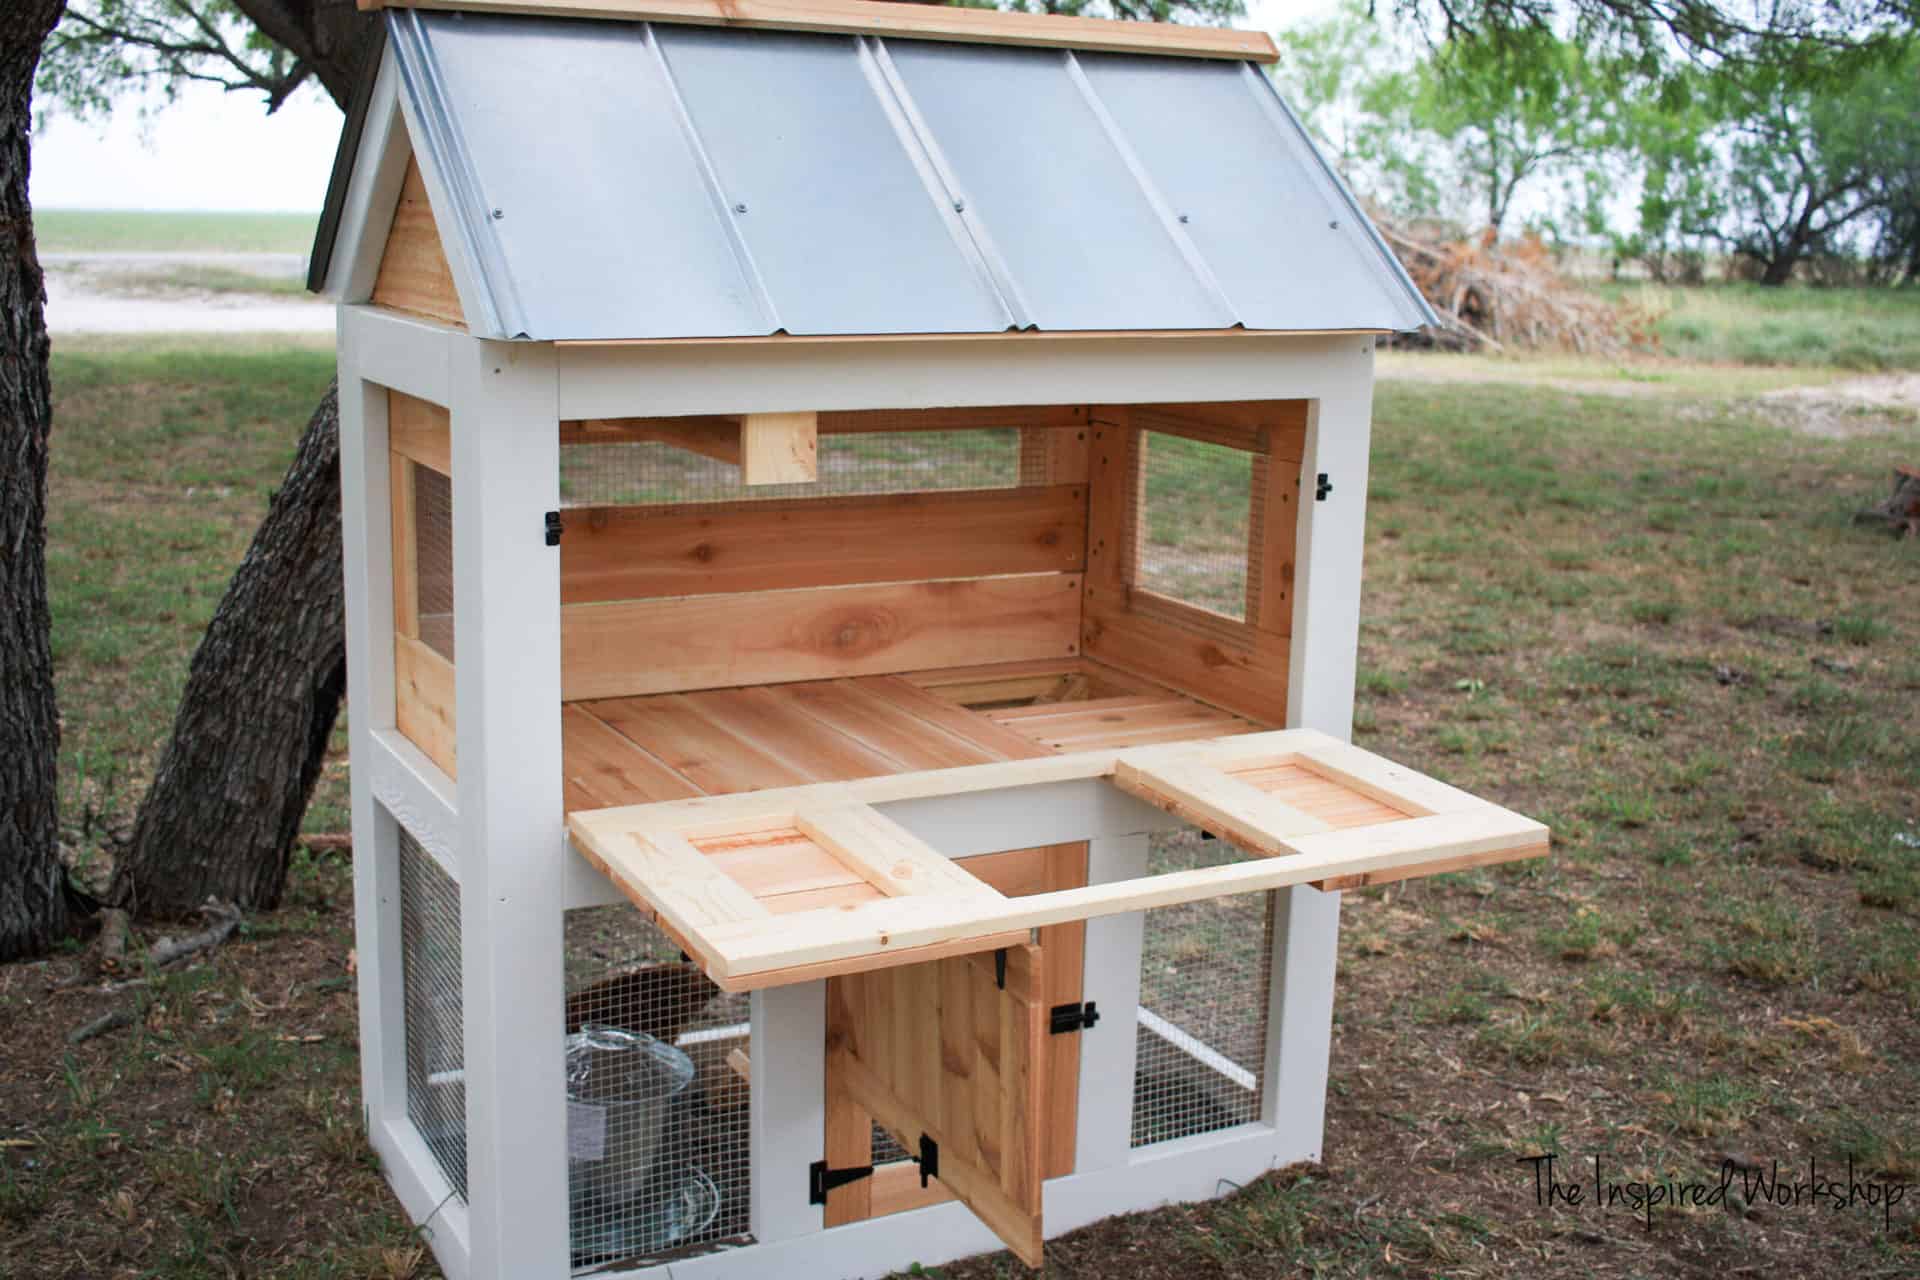
Step 14
Attach the steel roofing panels! I bought 1 – 8 ft panel that worked perfectly for this, but if you would like to add nesting boxes to the outside, you can purchase 10ft to have the extra to cover it! Make sure and grab a bag of screws to attach the panels, they are special screws that have a gasket on them to seal the hole!
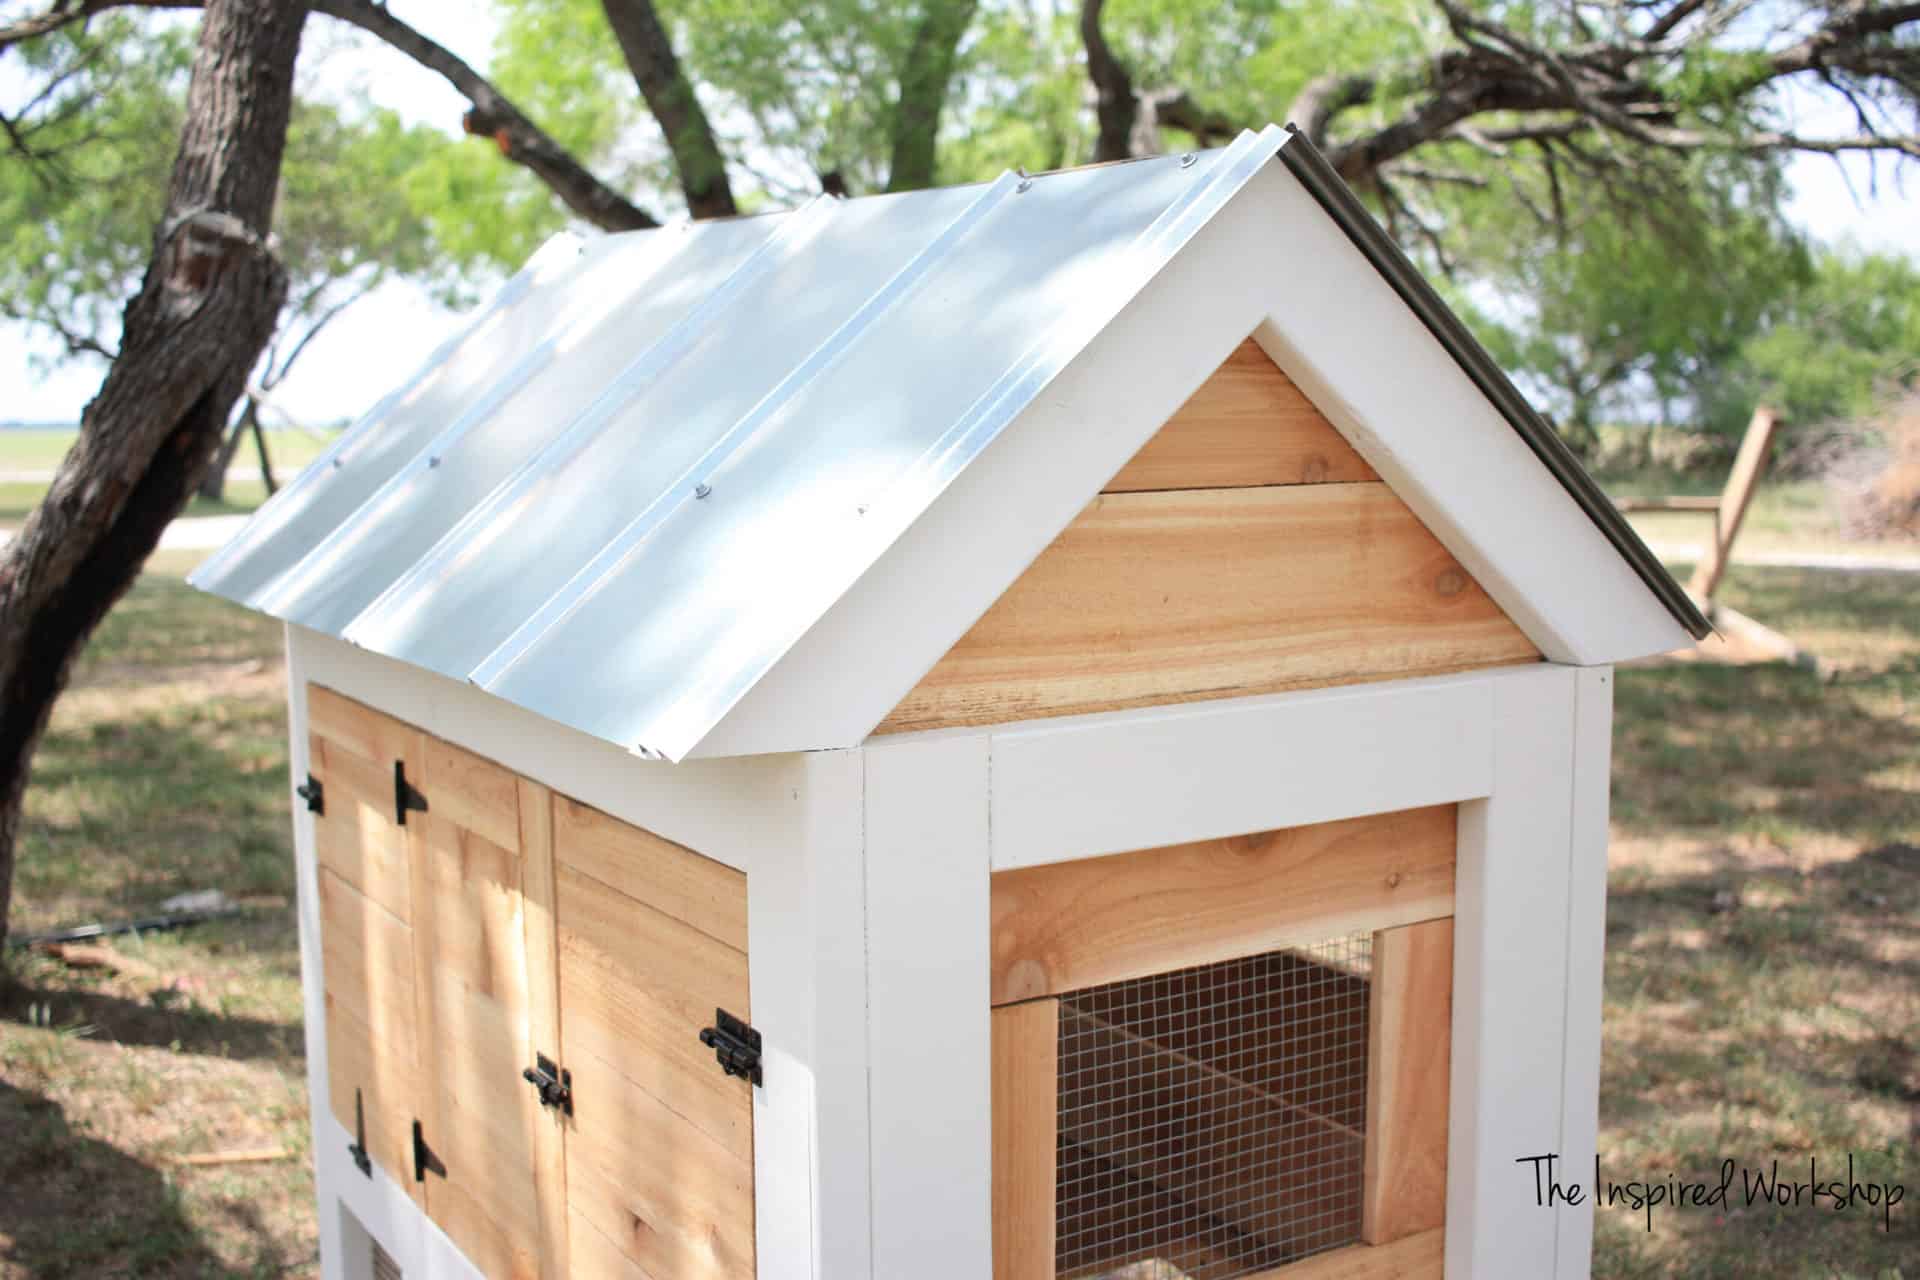
I added the two 1″ strips of cedar to help keep water out!
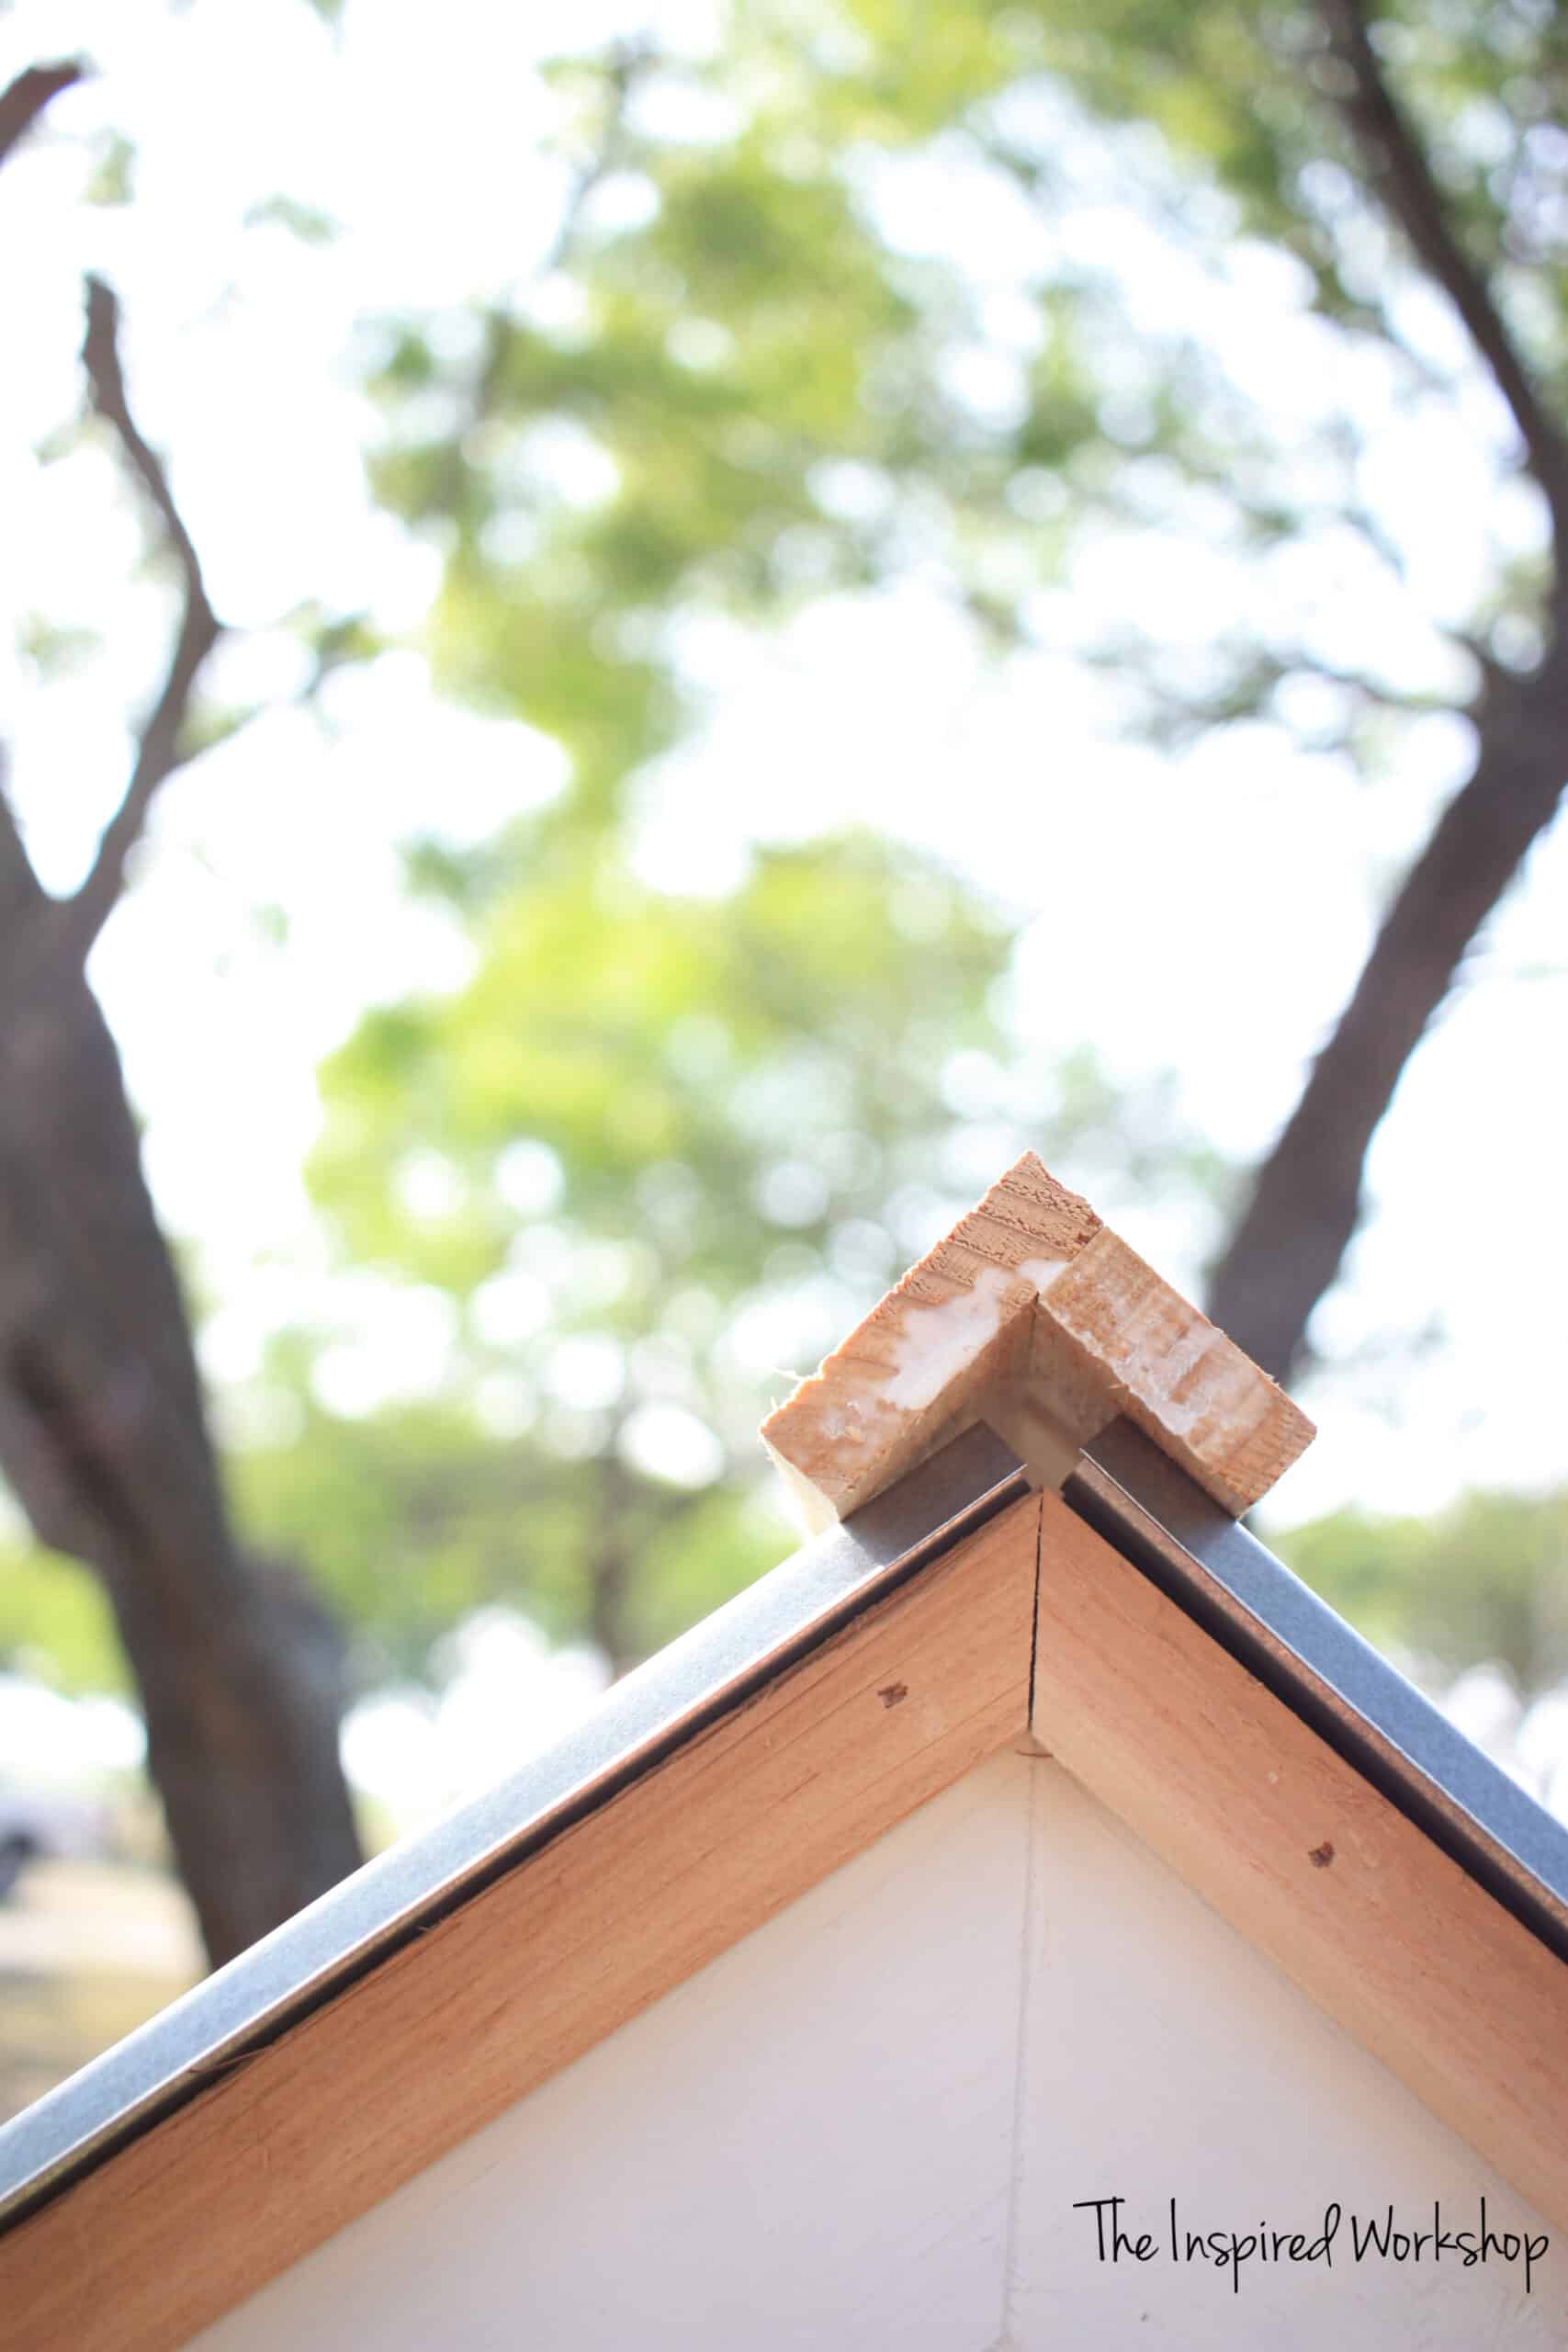
Ignore the trim boards you see below the roof…I took them off! Lol! Only look at the roof, and see how I just overlapped the boards, glued and brad nailed them into each other. Make sure and measure your roof, you want them to be the same length as the actual steel roof.
Then I added the little triangles to the ends to finish it off! And screwed the whole thing down to the roof!
Let me tell you, my hubby said, “That ain’t gonna keep the rain outta there!” Yes, that’s exactly how he said it! 😂😜 Well, we just had our first heavy rain and thunderstorms…guess what, BONE DRY inside the small chicken coop even after 2 hours of good hard rain!! 😂 Cara – 1 Teddy – 0 😜
And BAM, the small chicken coop is DONE! Yay!
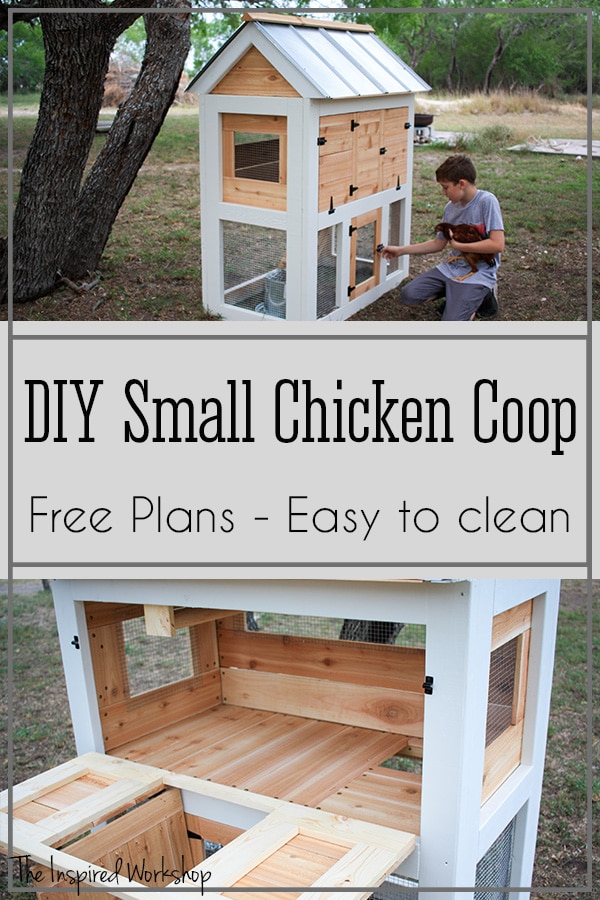
I was beyond excited at this point, and Richard seems to really LOVE his new home! He has already lived here long enough that we let him out to free-range and at 7:45 p.m. every night, he jumps up inside and gets on his roost to go to bed! Lol! He’s so cute!
I CAN NOT wait to share my big chicken coop plans with you all, and my LADIES! 😍 I better go get to work on it! 😊

Want to save this adorable small chicken coop for later? PIN IT!


Hi! I was able to download the pdf files for large coop and run but not the smaller one. I also checked my email but only the large coop plans were sent. Can you help me with this? Thanks!!
Hey Lori!
I sent the plans for the large chicken coop, run, nesting boxes, shutters, and doors along with the small chicken coop plans to you in an email so you will have them all in one place! Hope that helps!
Let me know if you have any other questions! Thanks for stopping by, have a good one!
Cara
Hey there – I was wondering what size dowel rod you used for them to perch on at night? Love your plans! ☺️
Hey Amanda! Thank you so much! I used the long wood dowels that are used as closet rods for hanging clothes, they were far cheaper for an 8′ rod, and they are 1 1/4″, I believe! Hope that helps! Thanks for stopping by! Have a good one!
Cara
How many chickens could comfortably fit in this?
Hey Leeza!
I have 26 chickens living in this coop right now, but they free range all day and only come into the coop at night! If they were stuck in the coop all day, I wouldn’t put more than 15-20 in here, square footage wise it should easily hold 20 but I would want to keep it closer to 15 to make sure they aren’t too stressed! Hope that helps!
Thanks for stopping by! Have a good one!
Cara
Did you post the information for the larger coop yet?
Hey Katie! I sure did! Here’s the link: https://theinspiredworkshop.com/diy-plans-for-chicken-coop/
Thanks for stopping by! Let me know if you have any other questions! Have a good one!
Cara, this link leads me back to the small coop plans. Are you able to send an updated link?
Hey Mallerie! I have no idea how that link did that! Lol! Here’s the actual link to the chicken coop plans! Oy! I’m so sorry! https://theinspiredworkshop.com/diy-plans-for-chicken-coop I updated it in the comment below as well! Have a good one!
Sure did! Here’s the link! https://theinspiredworkshop.com/diy-plans-for-chicken-coop/
Have a good one!