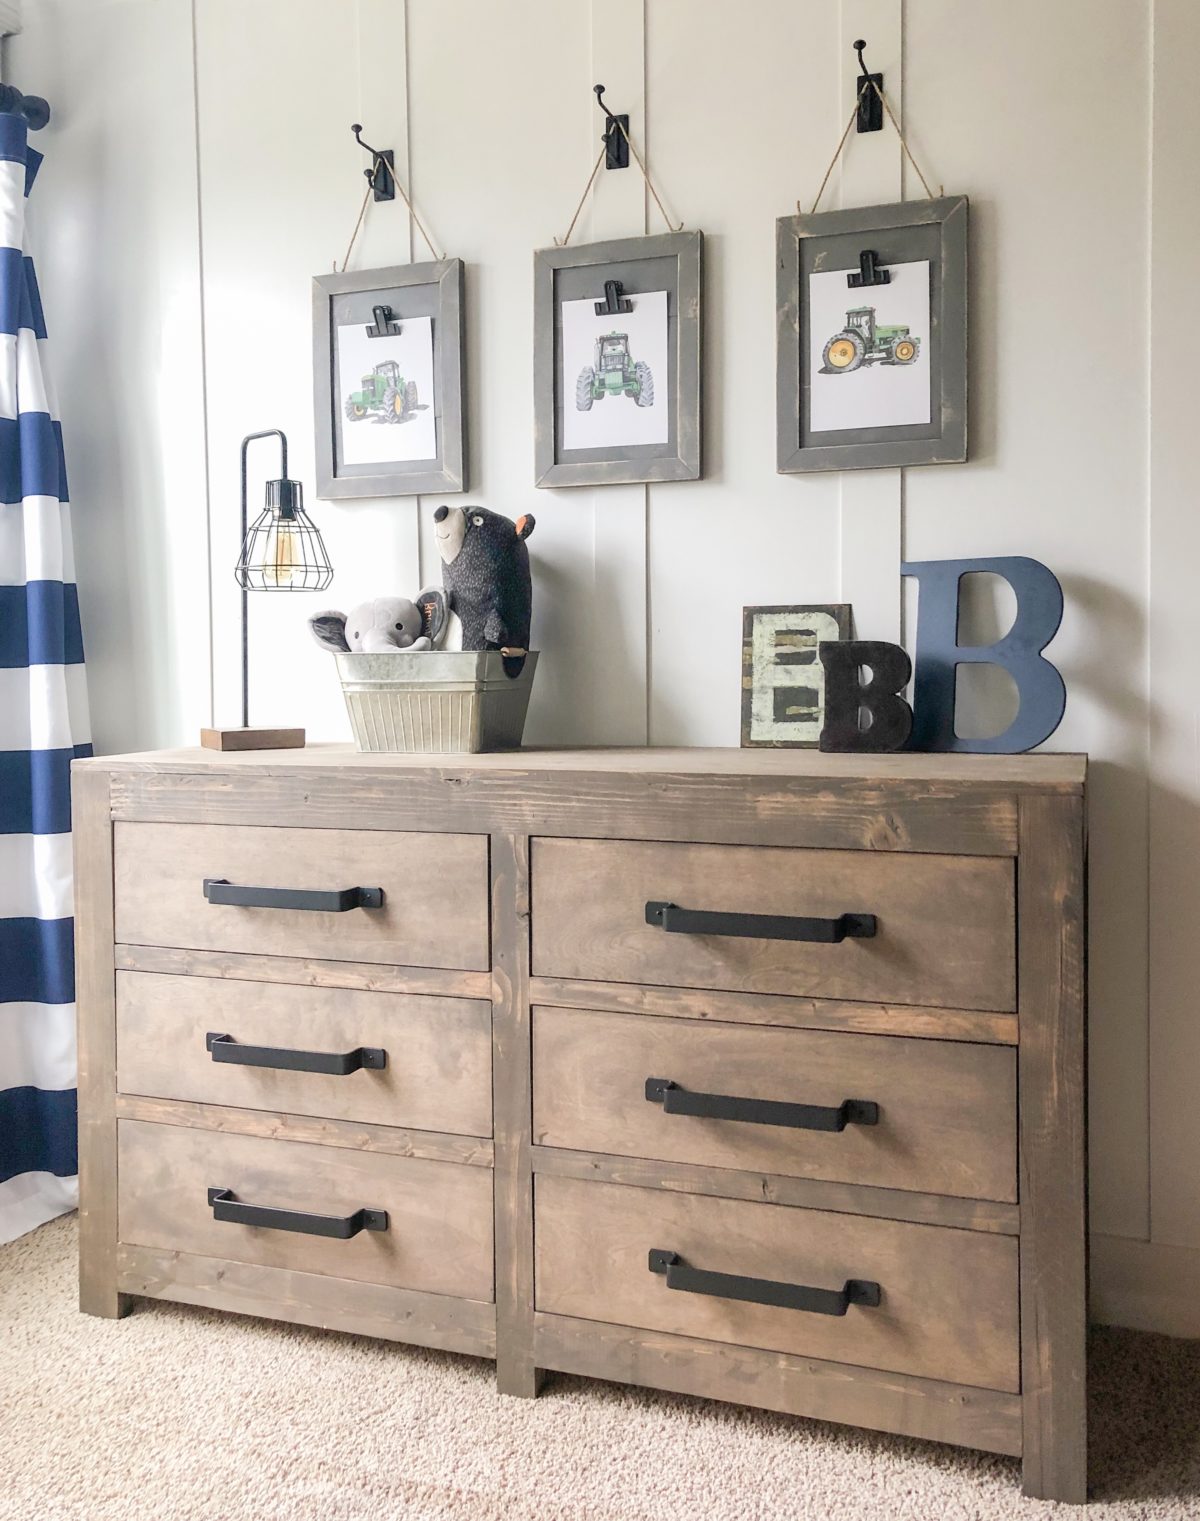
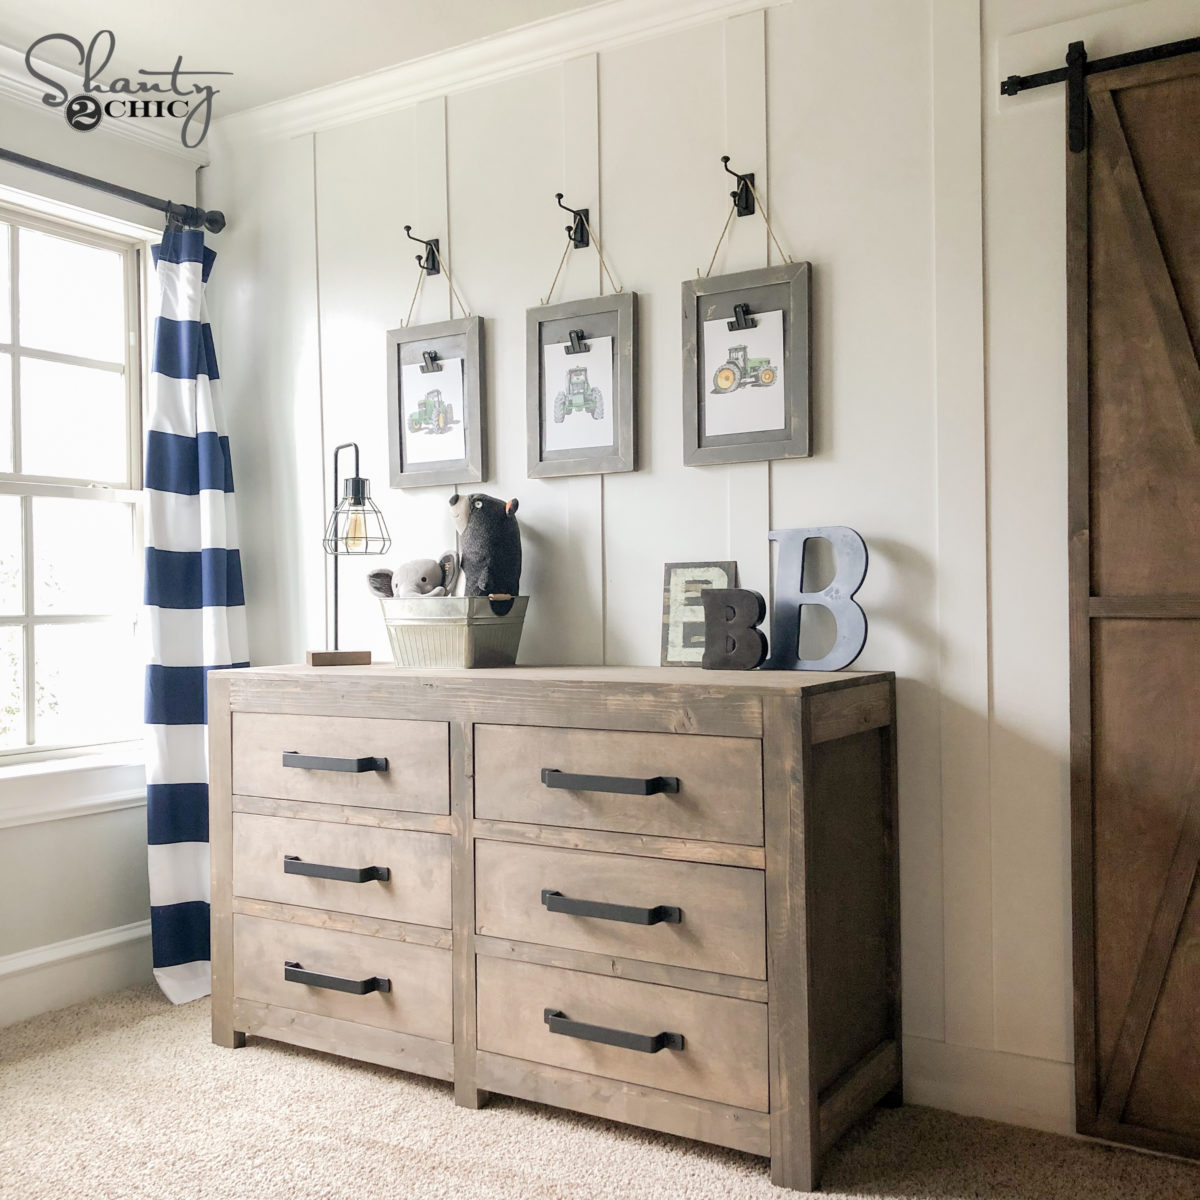
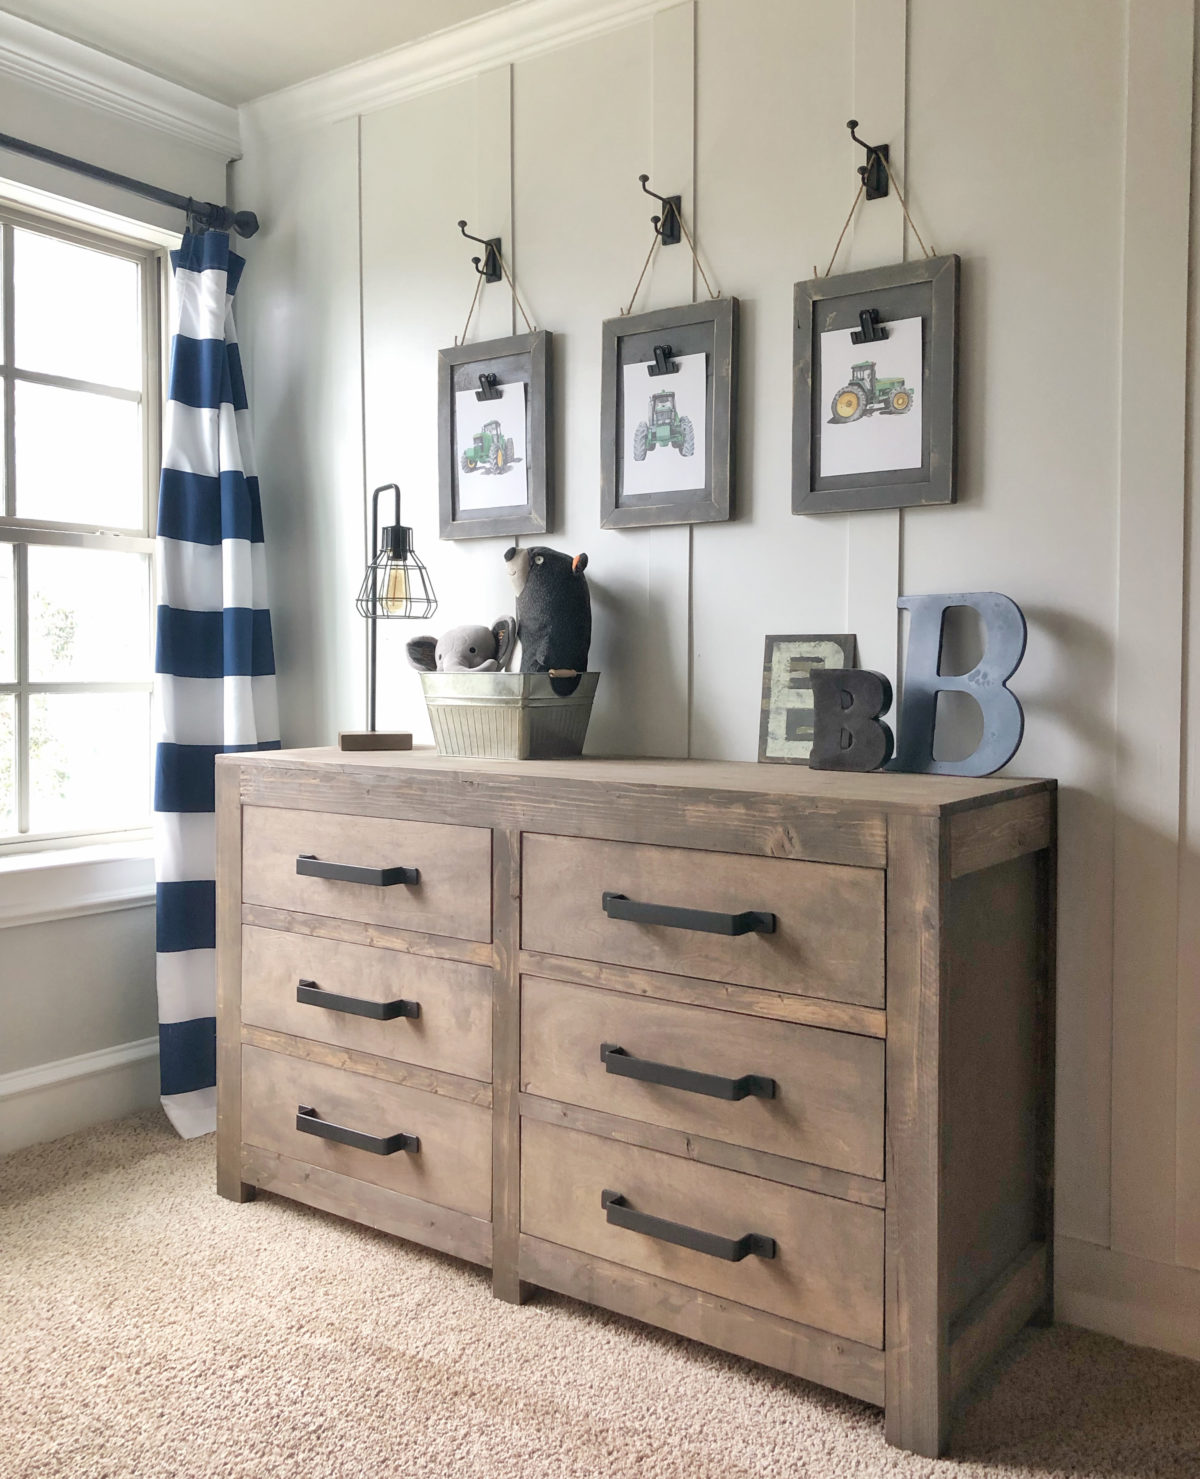
Hey guys! Happy Wednesday! To say I am excited about today’s project would be a vast understatement. I recently built a wall in my boys’ shared room to give them their own spaces and it has been a true game changer for me. Since the closet remains in one half of their room, I decided to build a dresser for the other half to help keep his clothes, socks and stuff in his space. I am THRILLED with how this turned out! Wait until you see my DIY Modern Farmhouse 6 Drawer Dresser!
I will walk you through the entire build below!
I’ve added a link to the free printable plans at the bottom of this post!
DIY Modern Farmhouse 6 Drawer Dresser
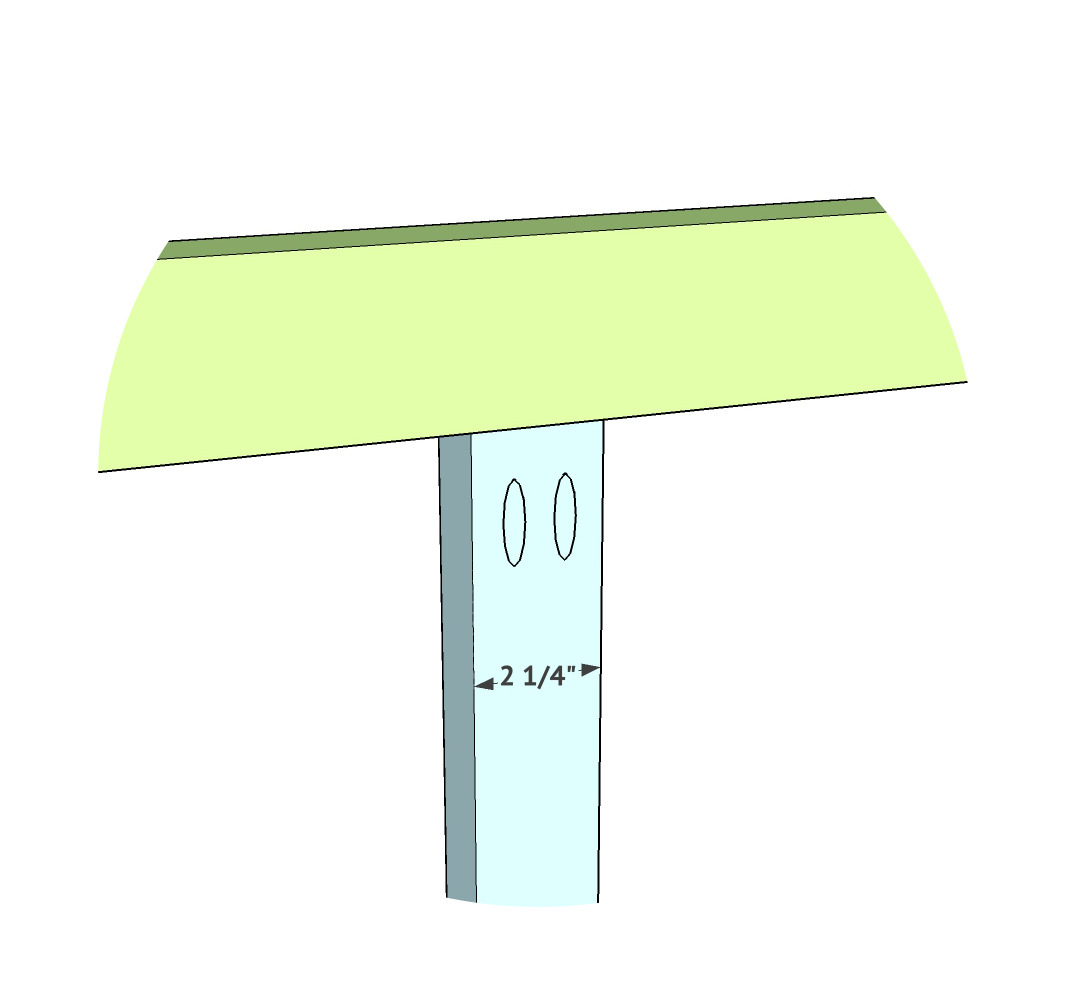
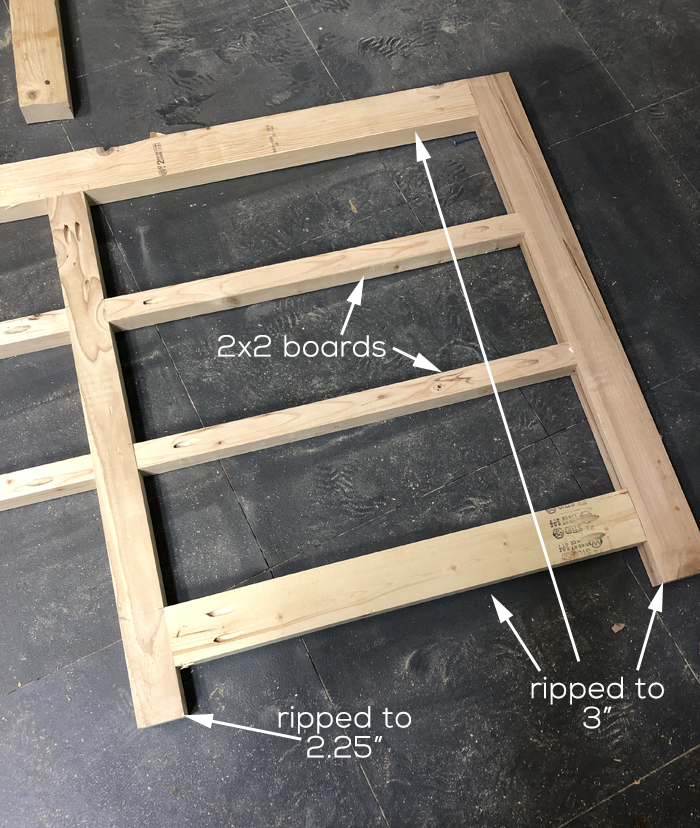
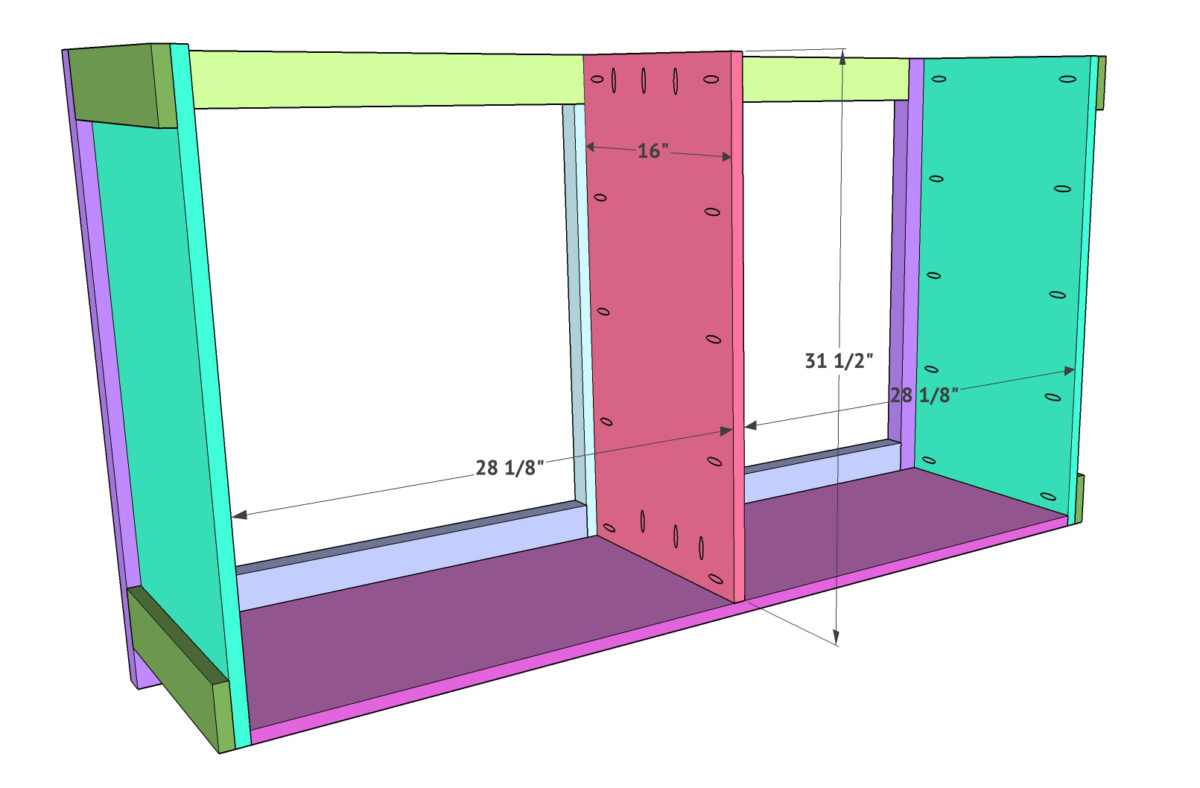
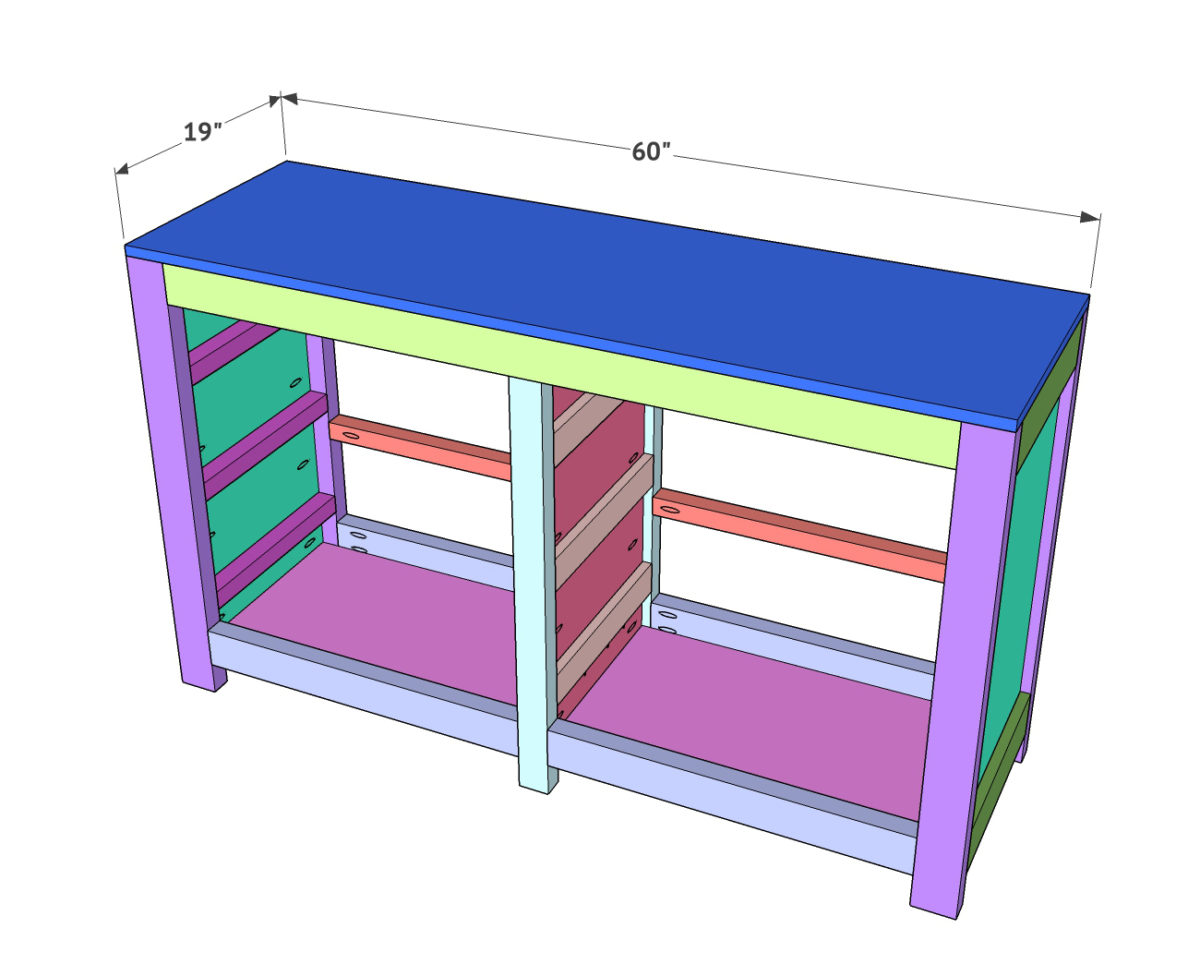
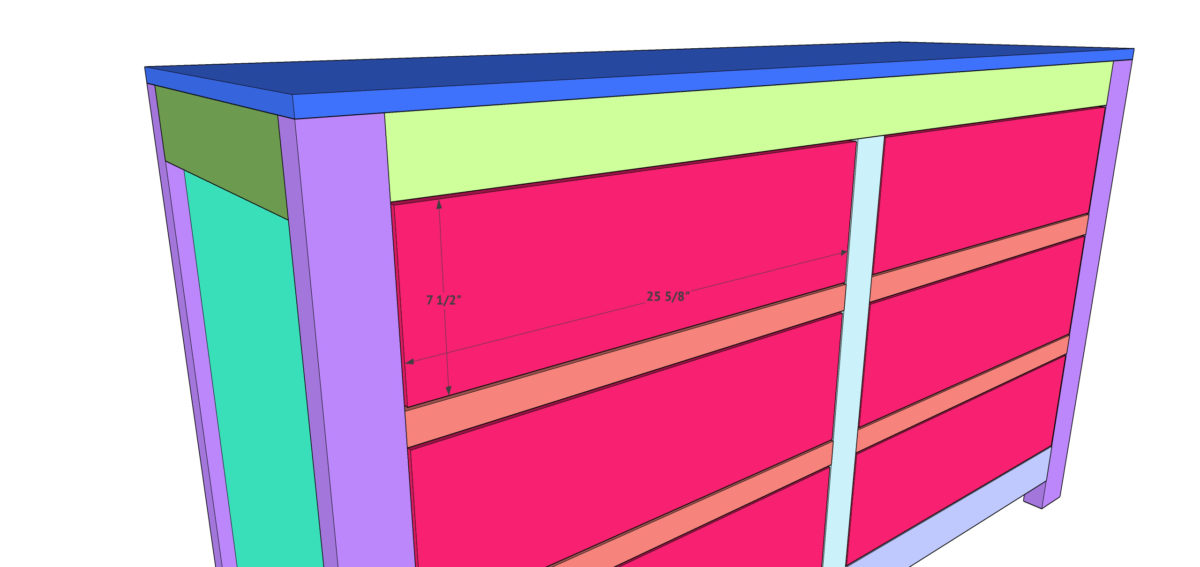
The first step is building your face frames. The front face frame uses 2×4 boards that I ripped to 3” wide for the top and bottom boards as well as the two side legs. The middle leg will be ripped to 2.25” wide which is important for the spacing of the drawers. ** If you choose to not rip boards, it will change this plan entirely and you will need to figure spacing and sizing on drawers. The drawer dividers on this step are 2×2 boards. We like to create our 2×2 boards by ripping down 2×4 boards as well. It’s inexpensive, and it gives you the same straight edge. Attach everything on this step using wood glue and 2.5” Kreg pocket hole screws.
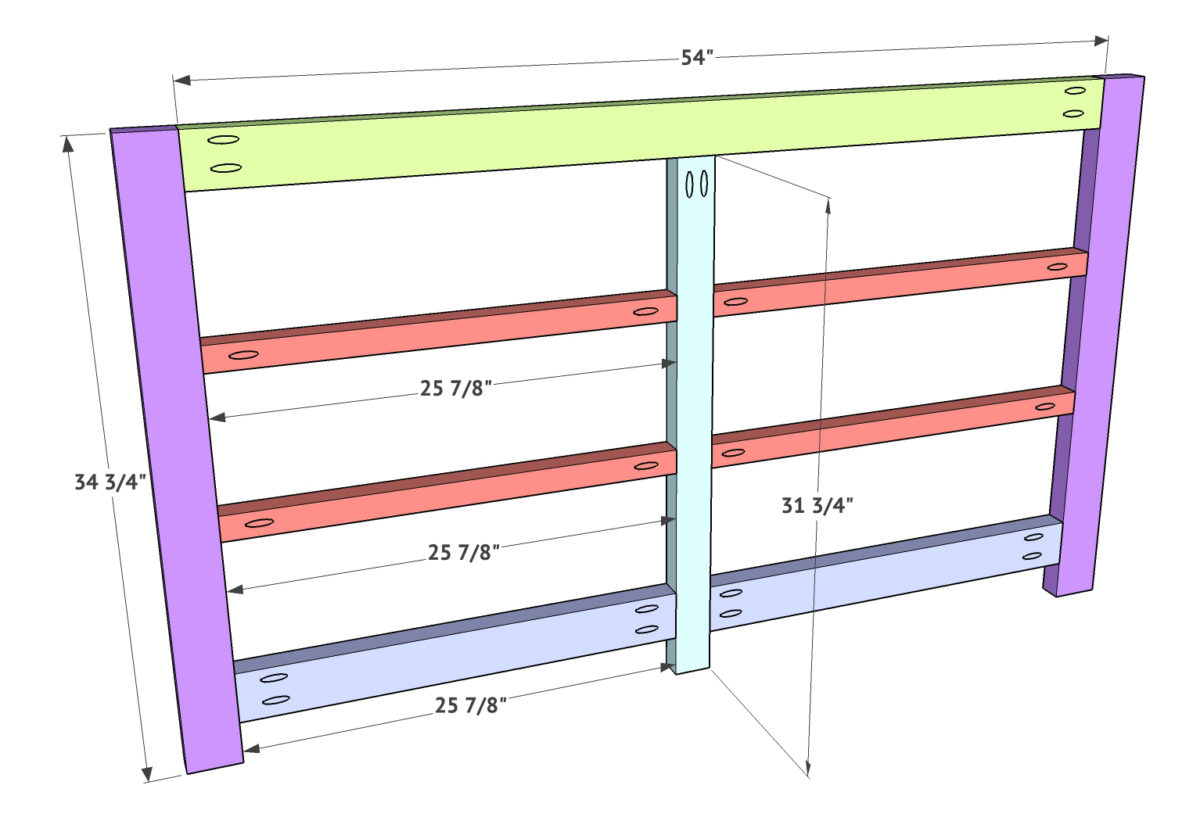
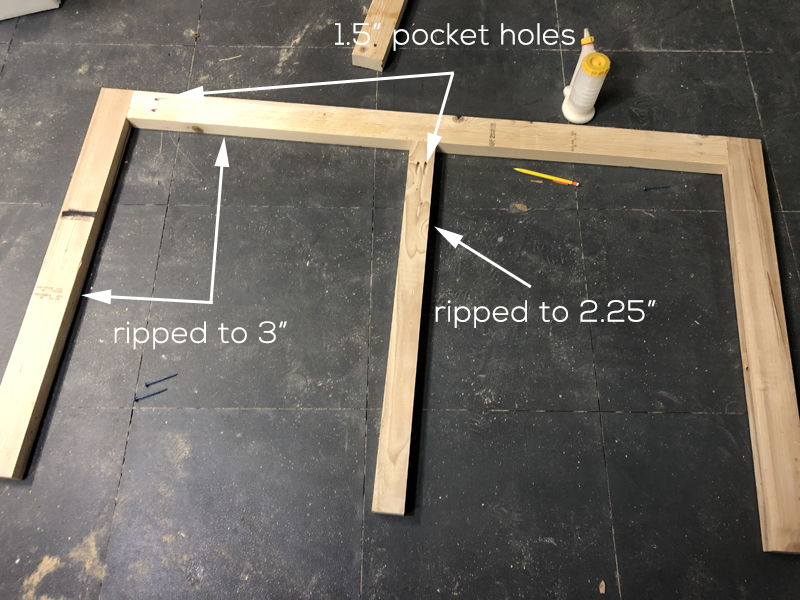
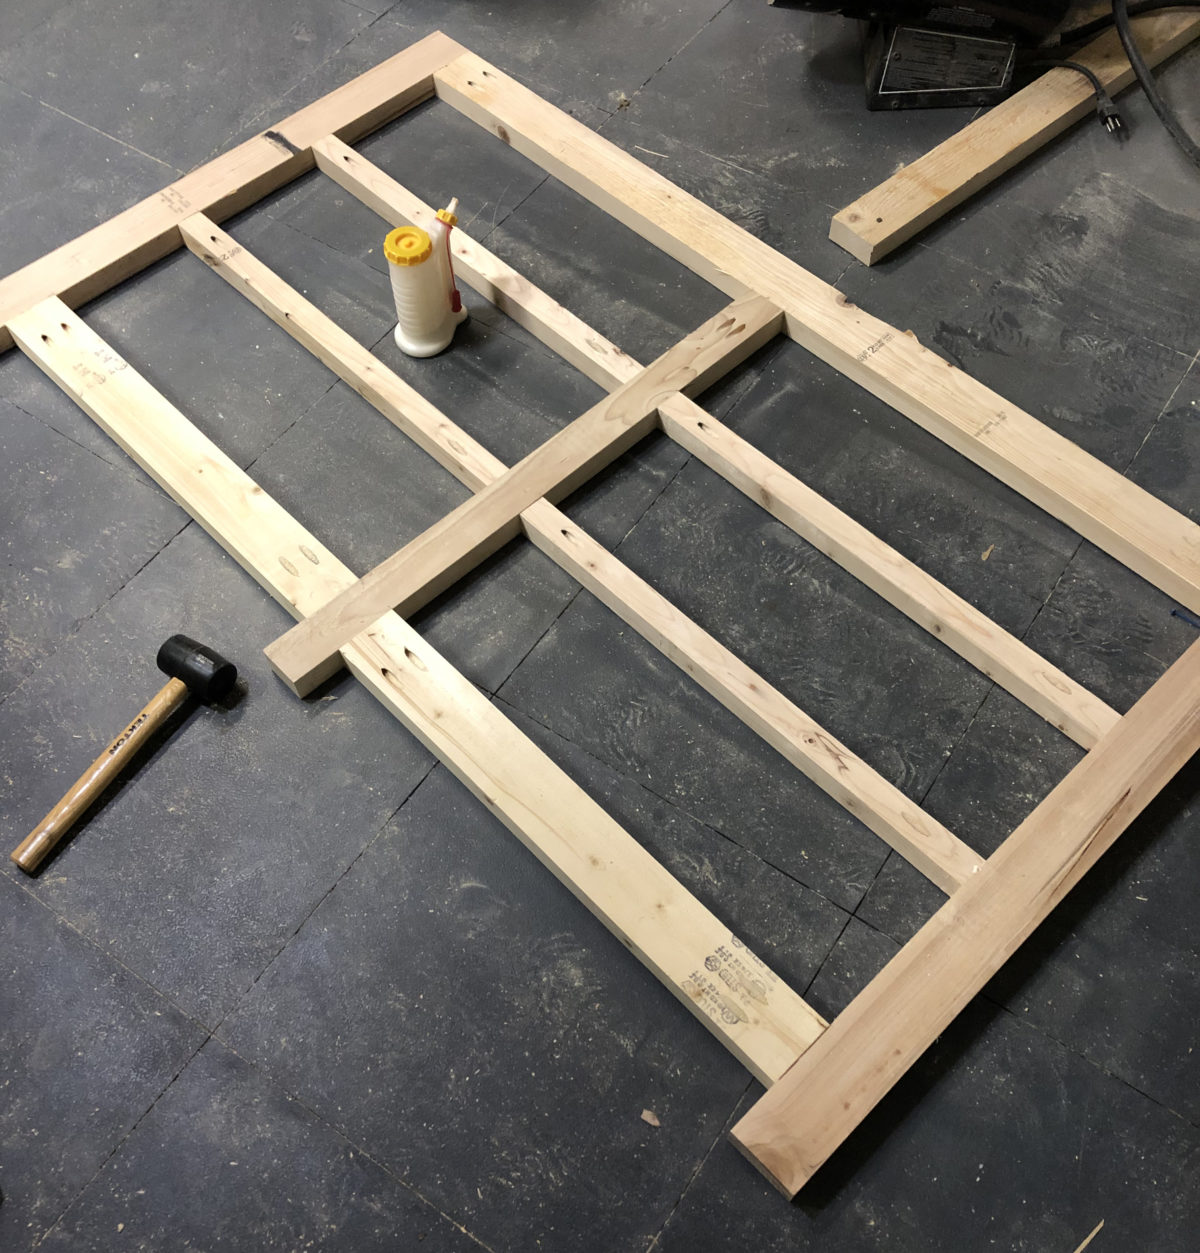
The back face frame is identical to the front, but it has no drawer dividers. Attach all boards the same on this part using wood glue and 2.5” pocket hole screws through 1.5” pocket holes.
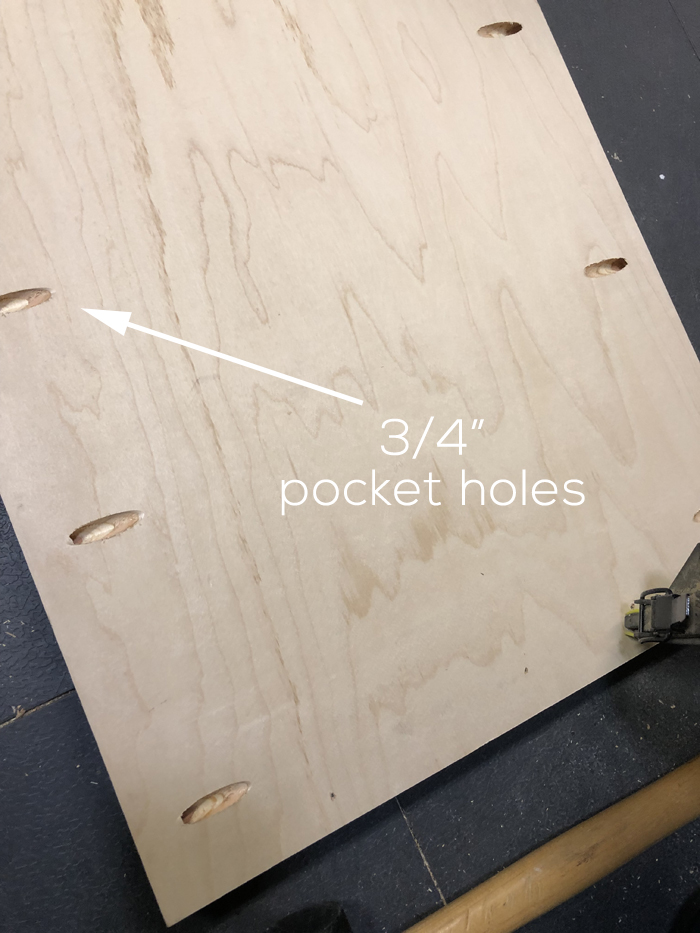
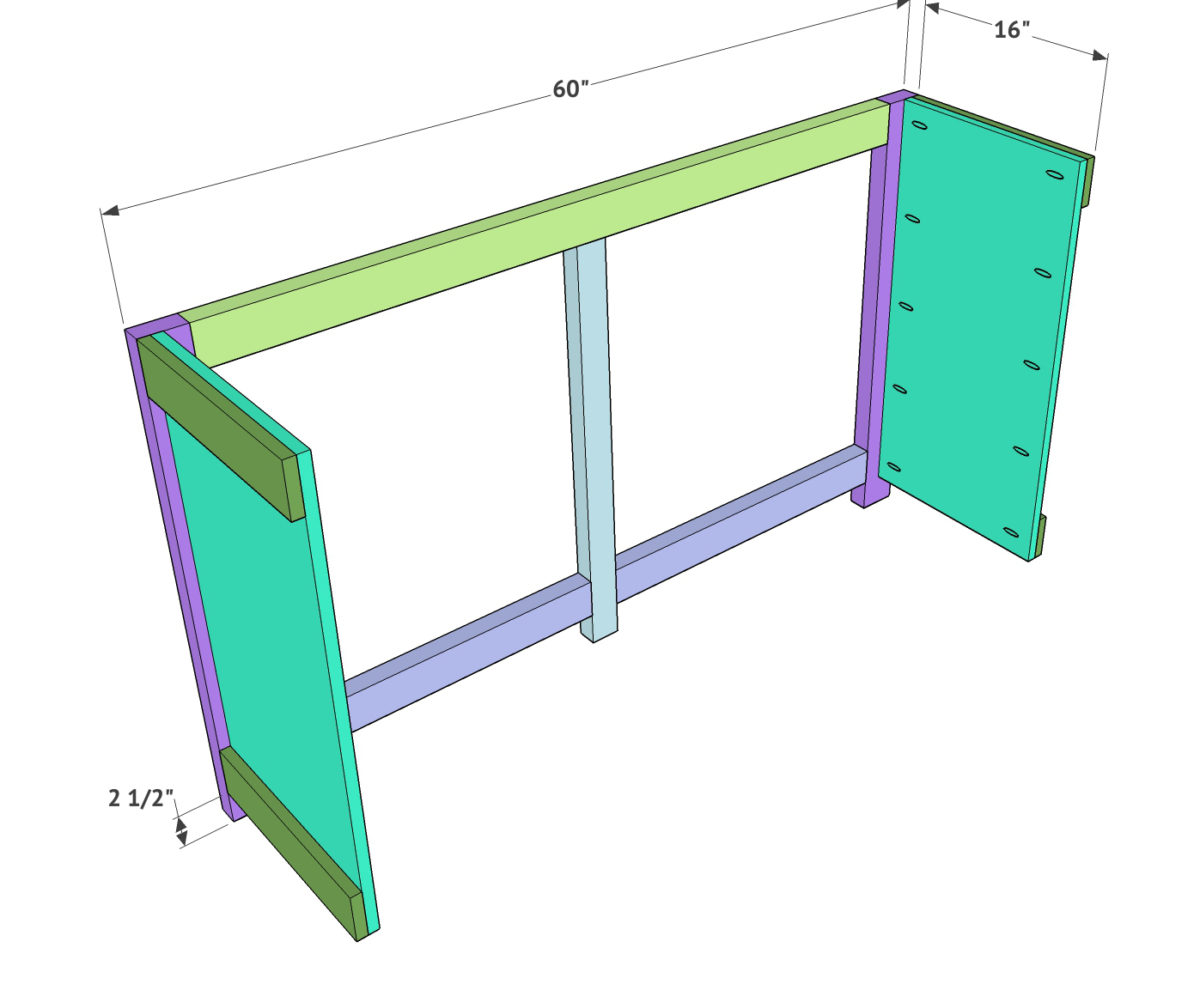
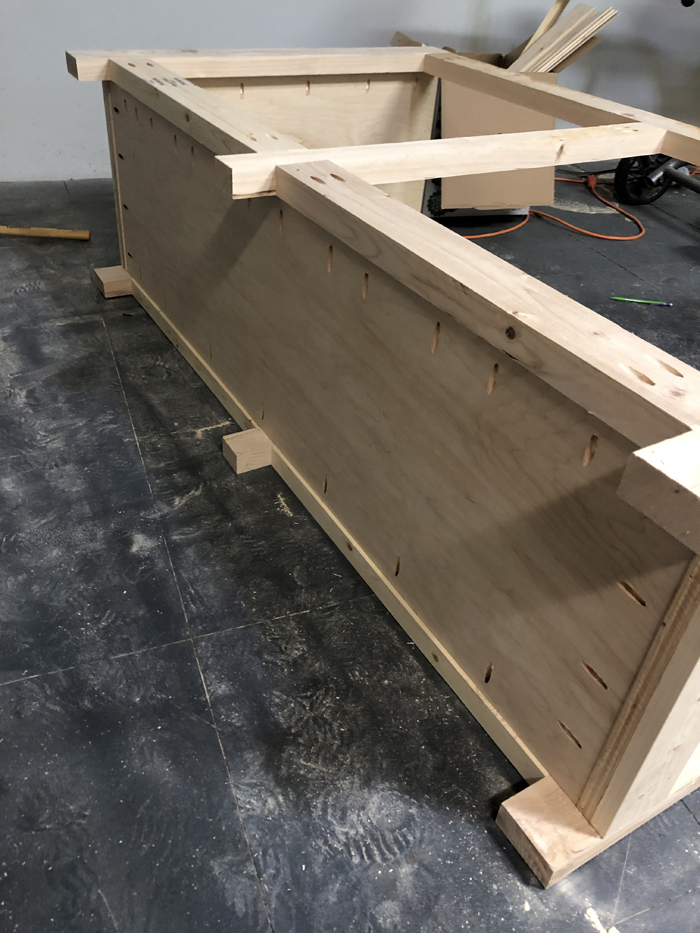
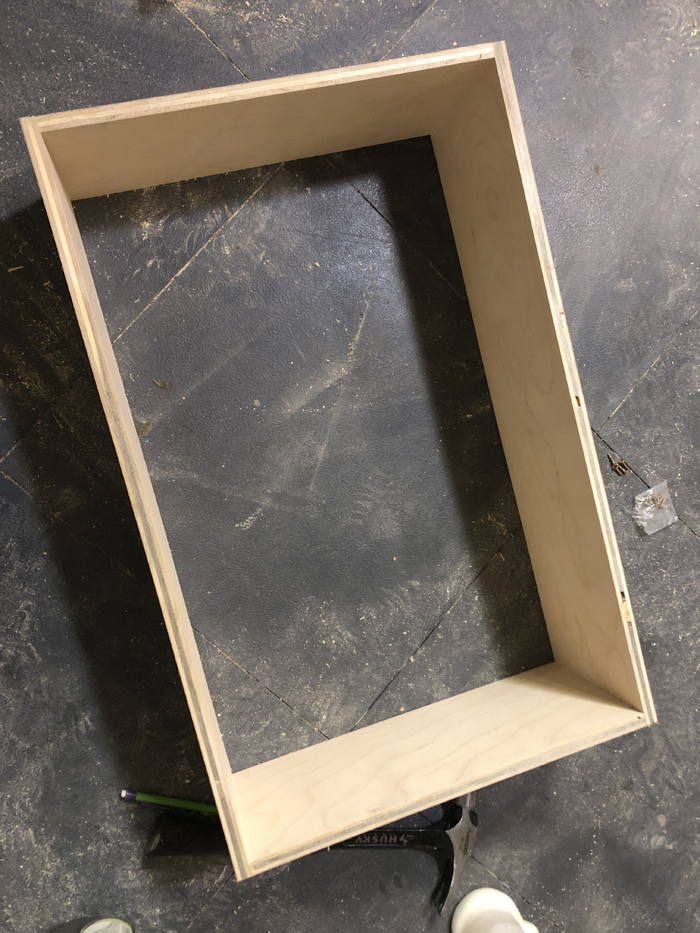
Build the two side frames next. These are 3/4” hardwood plywood. I used birch for mine. The trim pieces are 1×4 boards cut to size. Add 3/4” pocket holes down both long sides of these boards first. Then, attach the trim pieces using wood glue and 1.25” brad nails through the back of the plywood and into the trim pieces.
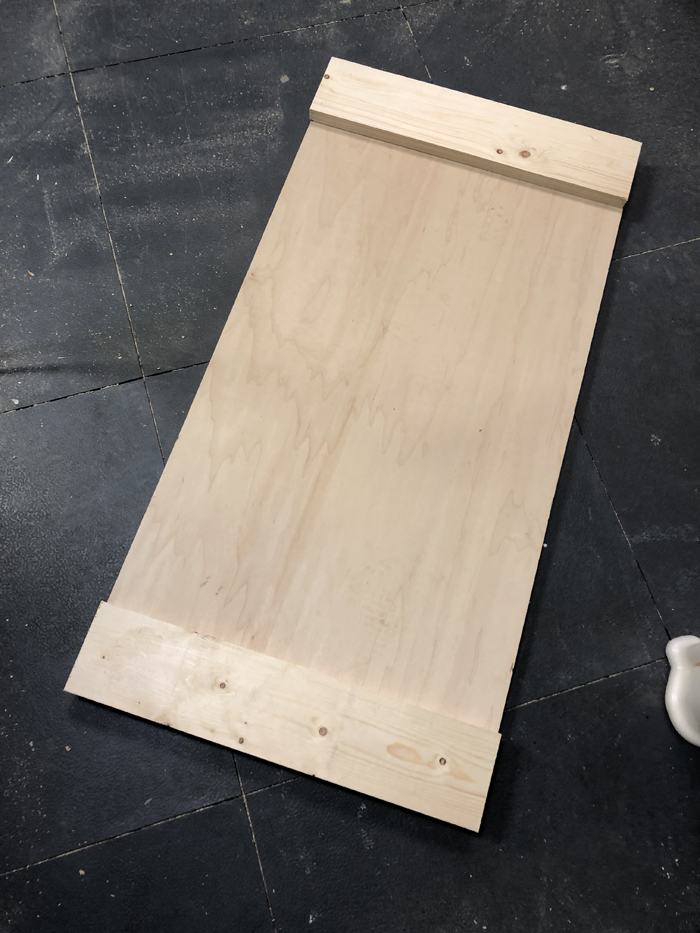
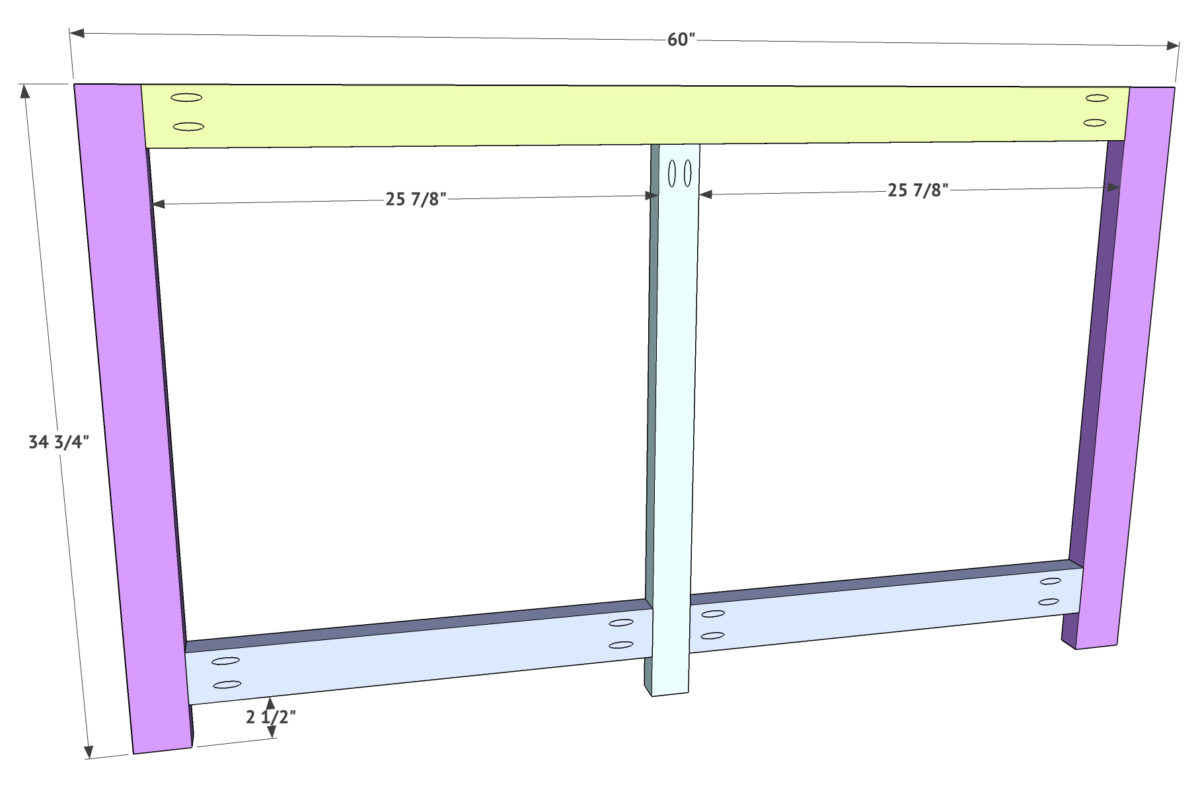
Now attach the two side frames to the back face frame using wood glue and 1.5” Kreg pocket hole screws. You want the top of the side frames to be flush with the top of the back face frame which will leave a 2.5” space below the bottom of the side frames. You also want the outside of the trim boards to be flush with the outside edge of the face frame.


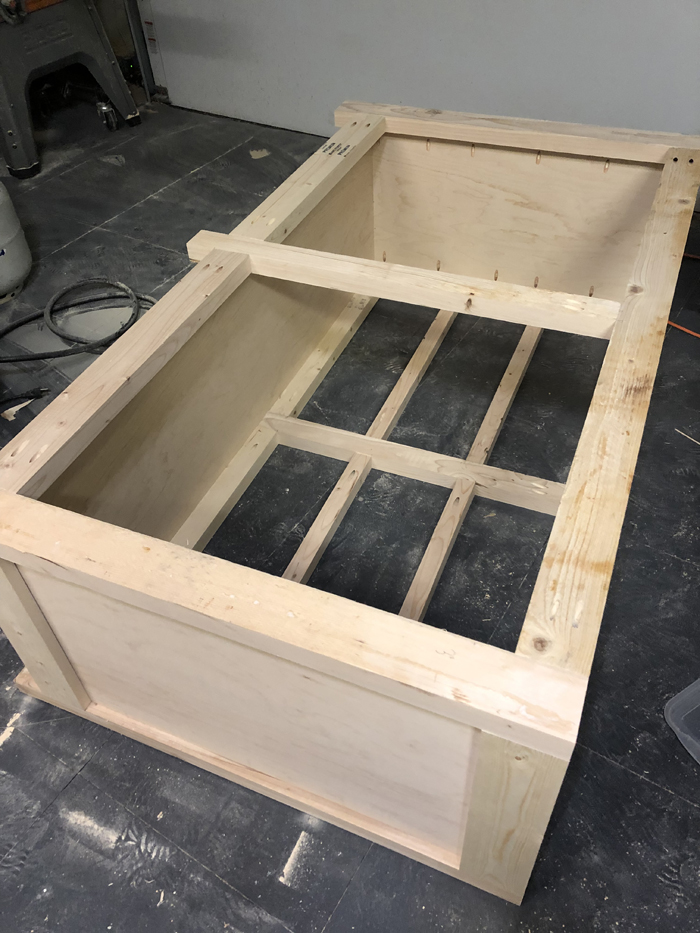
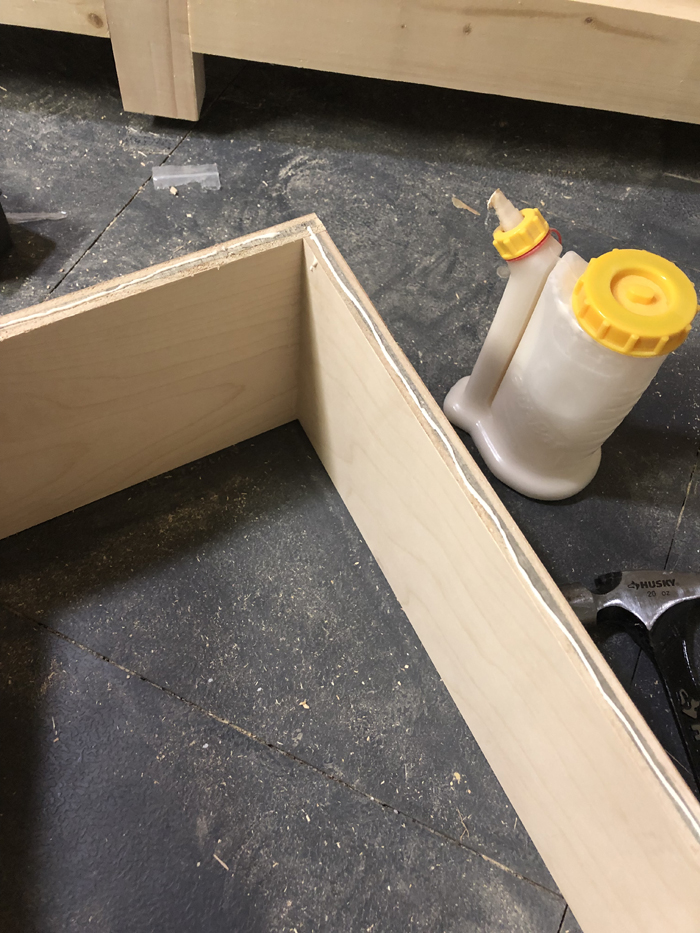
The base of this dresser is also 3/4” hardwood plywood. Add 3/4” pocket holes with the Kreg Jig along all 4 sides of this piece. Then, attach it to the back face frame and side frames using wood glue and 1.5” pocket hole screws.
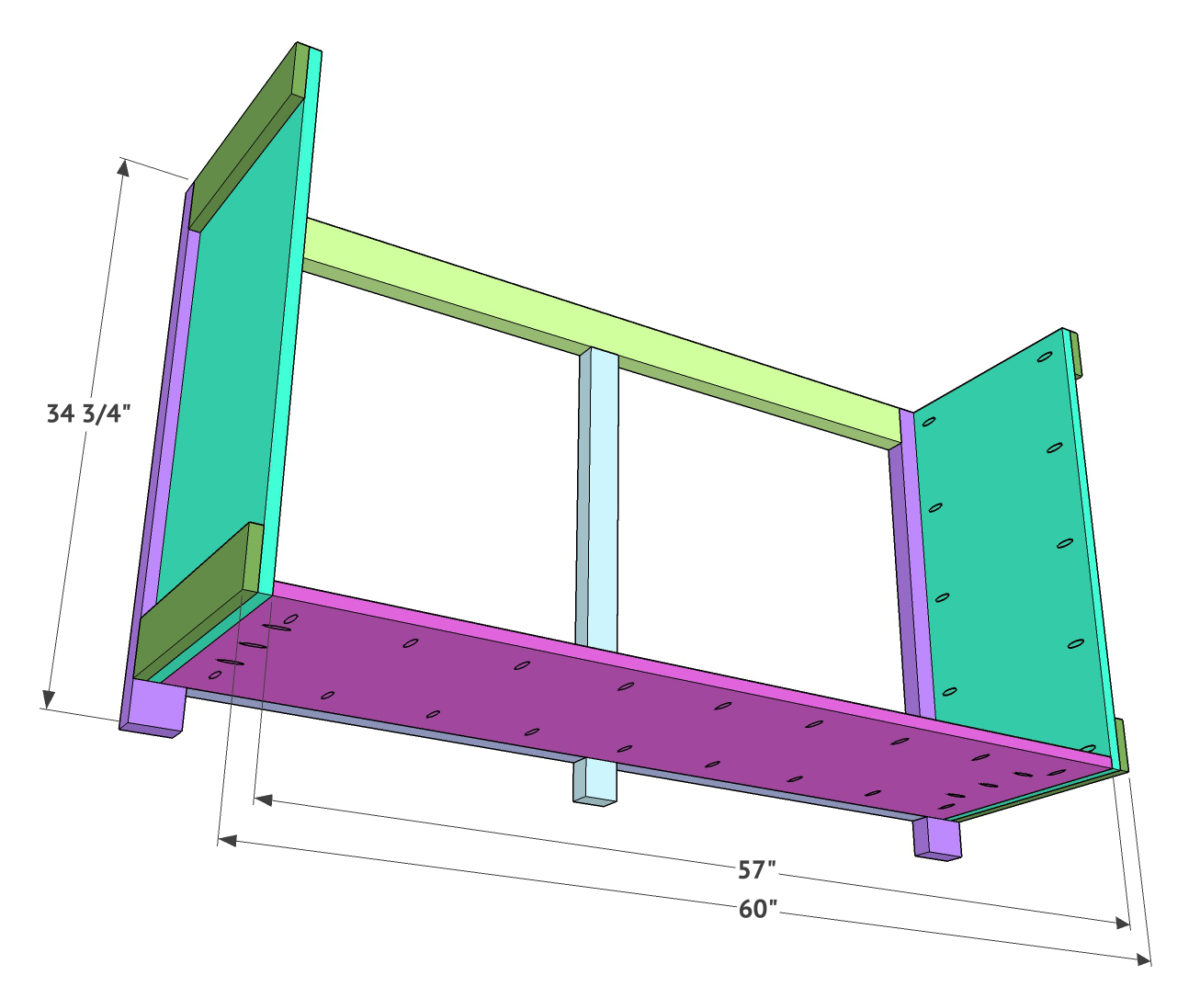
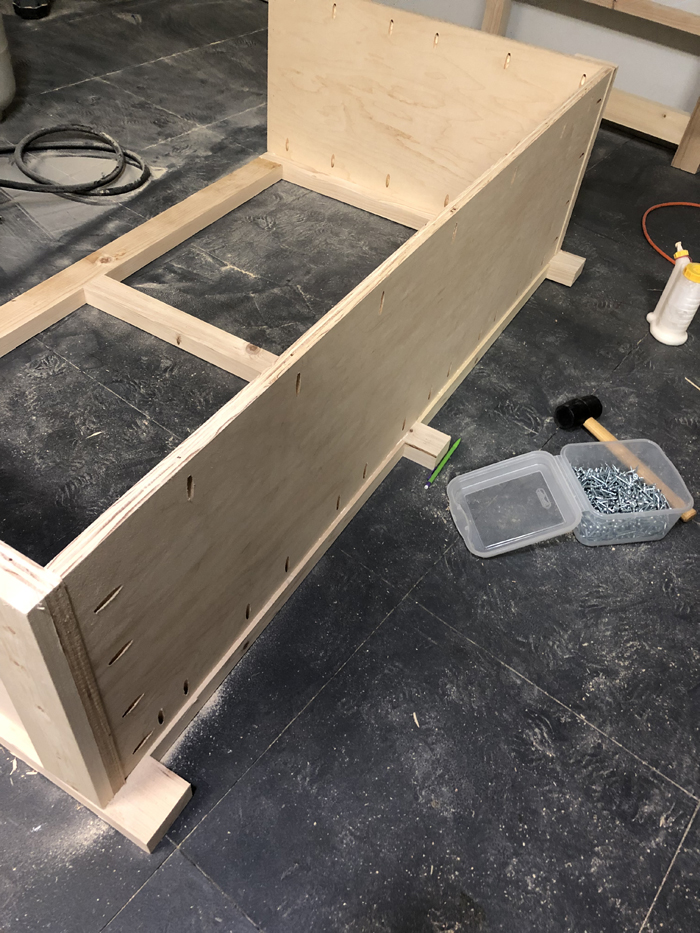
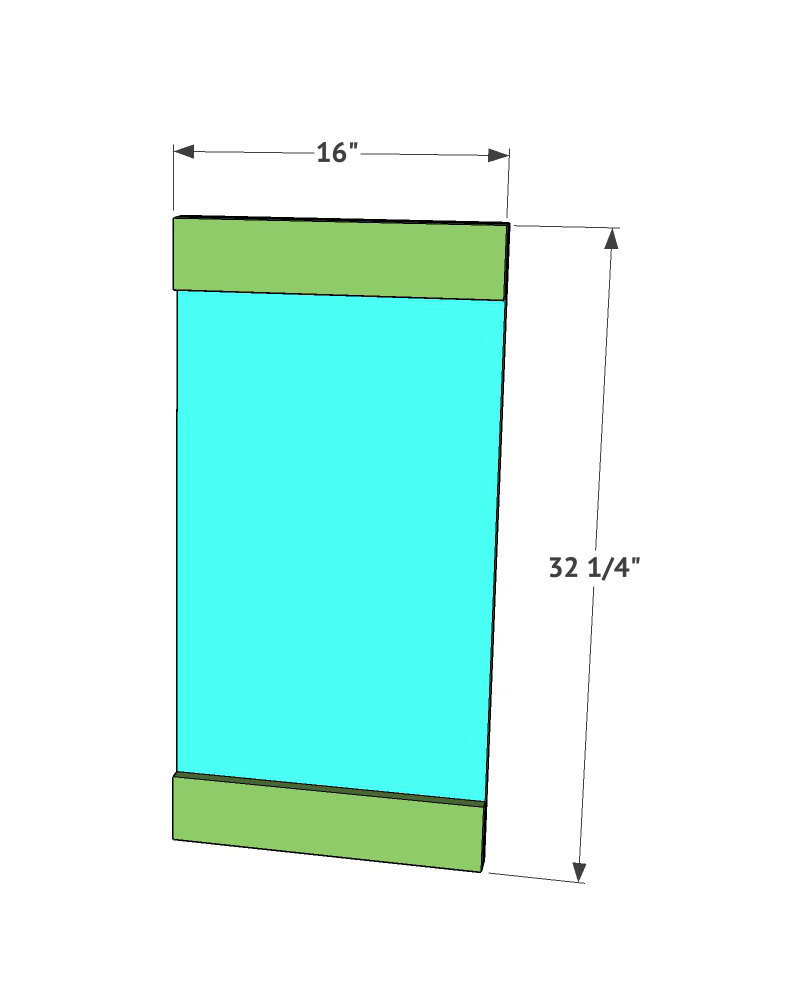
Attach the middle divider next. This is also 3/4” hardwood plywood cut slightly shorter than the side frames. Add pocket holes down both long sides and the bottom of one side of this board. Attach it to the base of the dresser and the middle leg of the face frame using wood glue and 1.25” pocket hole screws for the bottom and 1.5” pocket hole screws for the longer sides. Don’t forget to use wood glue too!
Now you can attach the boards that will support your drawer slides. The outside boards that attach to the outside face frame are 2×2 boards, and the inside boards that attach to the center divider are 1×3 boards. Attach the 2×2 boards using wood glue and 2” nails or screws. Attach the 1×3 boards using wood glue and 1.25” screws or brad nails.
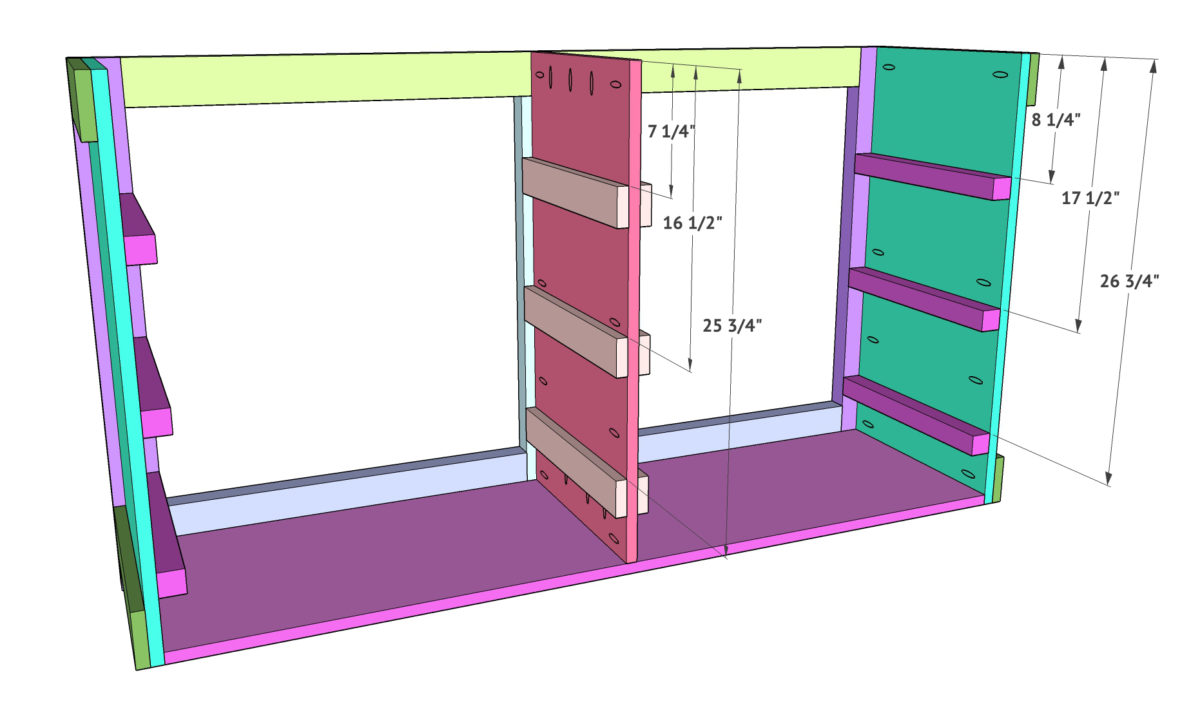
Attach the front face frame next! Use wood glue and 1.5” Kreg pocket hole screws to go through the side frames and center divider and into the face frame. Just like the back face frame, you want the outsides and top flush with the outside edges of the face frame.
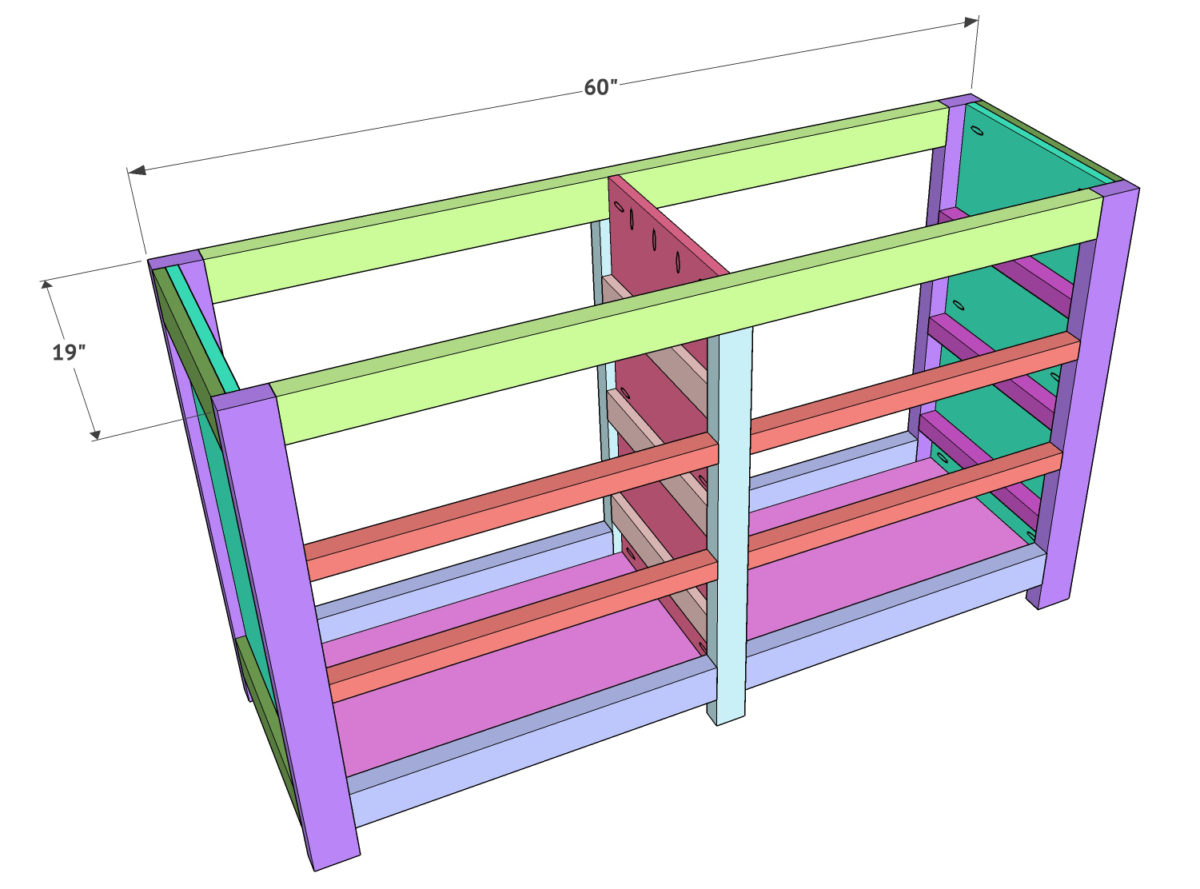
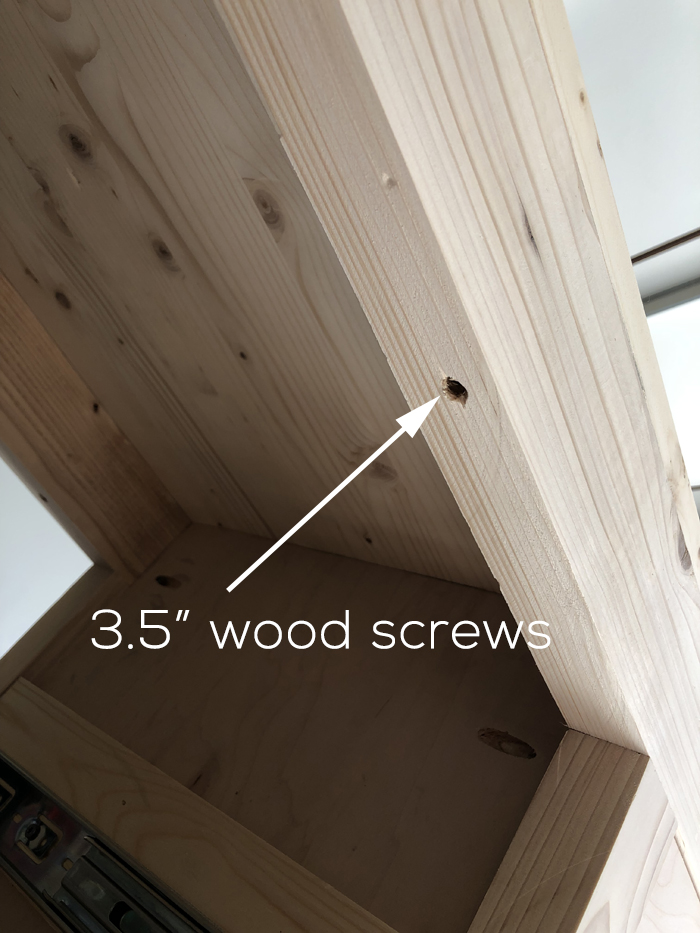
Time for the top! The top of this dresser is a pine project panel. I believe my original size was 24” x 72” and I used my table saw to cut it to size. You can also have the guys at the hardware store cut yours for you. Glue and clamp the panel to the top of the dresser and attach using 3.5” wood screws through the face frame top boards and into the panel. You can also nail the panel to the dresser base and fill the holes… Your call!
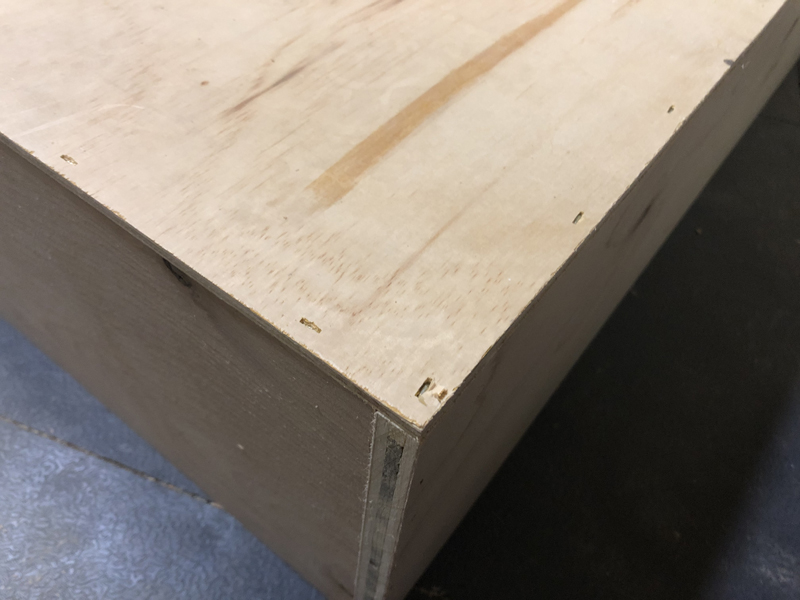
Build the drawers next. Be sure to measure each of your openings to get the best fit! The frame of these drawers are built with 1/2” hardwood plywood. Rip the plywood to 6” wide and then make your cross cuts. Attach the pieces together at the corners using wood glue and 1.25” brad nails.
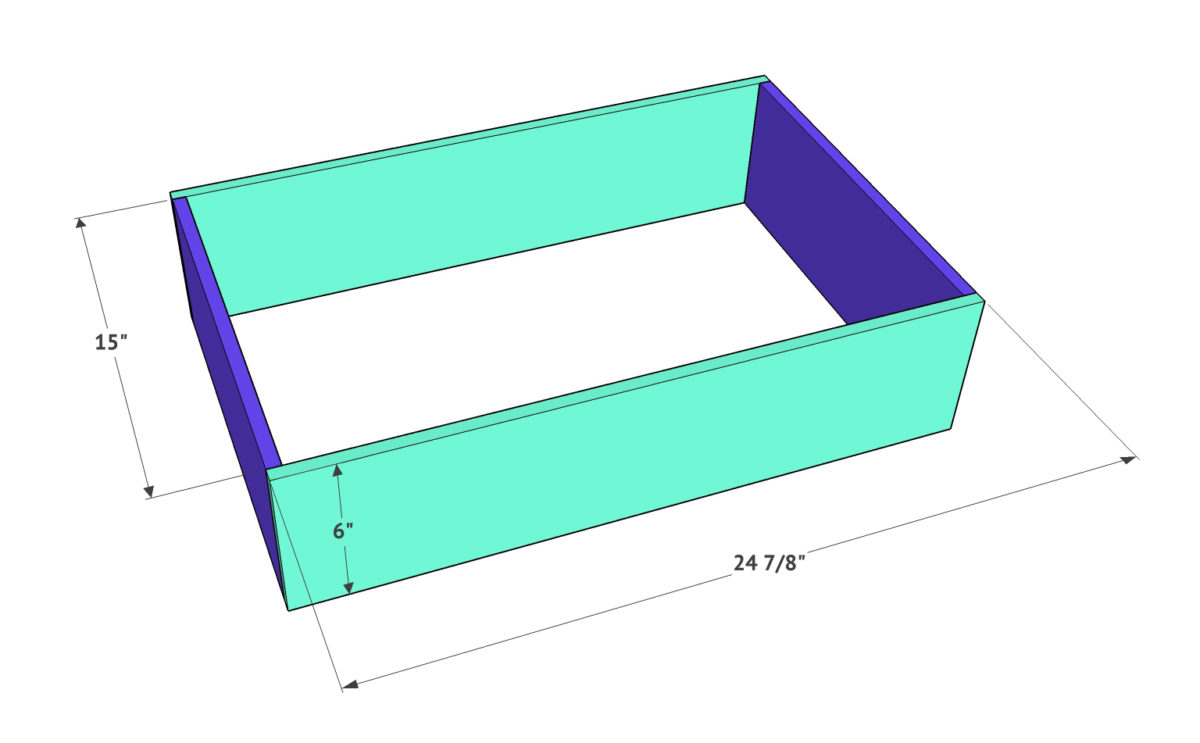
The bottom of the drawers are 1/4” hardwood plywood. Cut each to size, and then attach to the frame using wood glue and 1” staples or 1.25” brad nails. Staples are good on this part to hold that in place because it is a thinner material.

Time to attach the drawers. For this dresser I chose to use a new FAV tool. You all need to buy them right now… You will thank me. You can find it HERE on Amazon or click the picture!
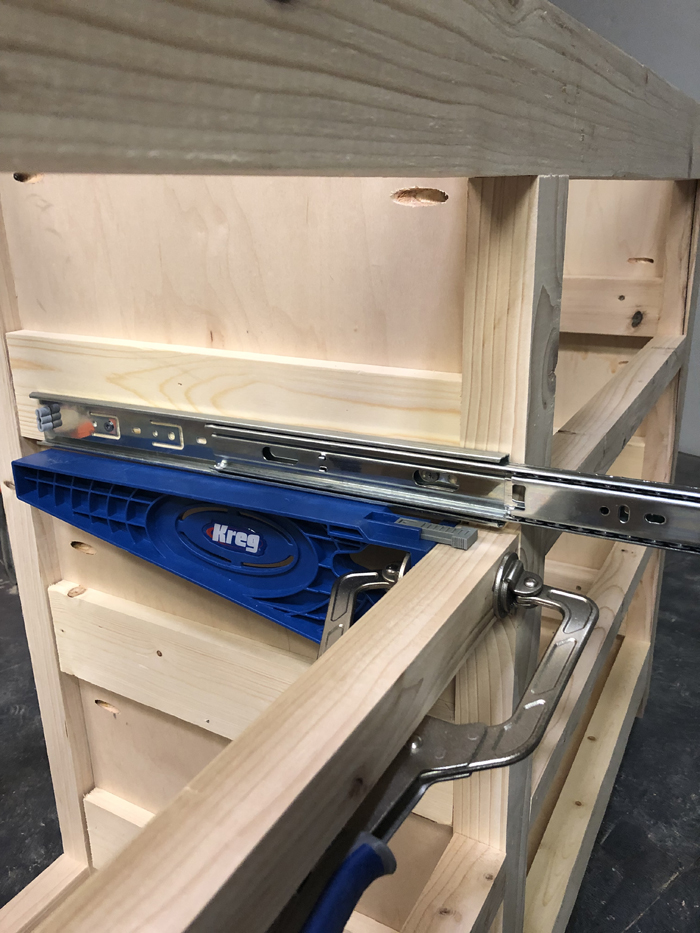
I lined the Kreg drawer slide jigs up on the inside first. I used the face frame to hold them in place and I set the drawer slide on top. I used THESE DRAWER SLIDES for my dresser and I love them so much.
I lined them up 1″ from the front of the face frame and extended the slide to attach the inside piece first.
Then, I flipped the drawer jigs around and attached them facing out where they act as a surface to hold the drawer in place while you attach the extensions. Literally, genius.
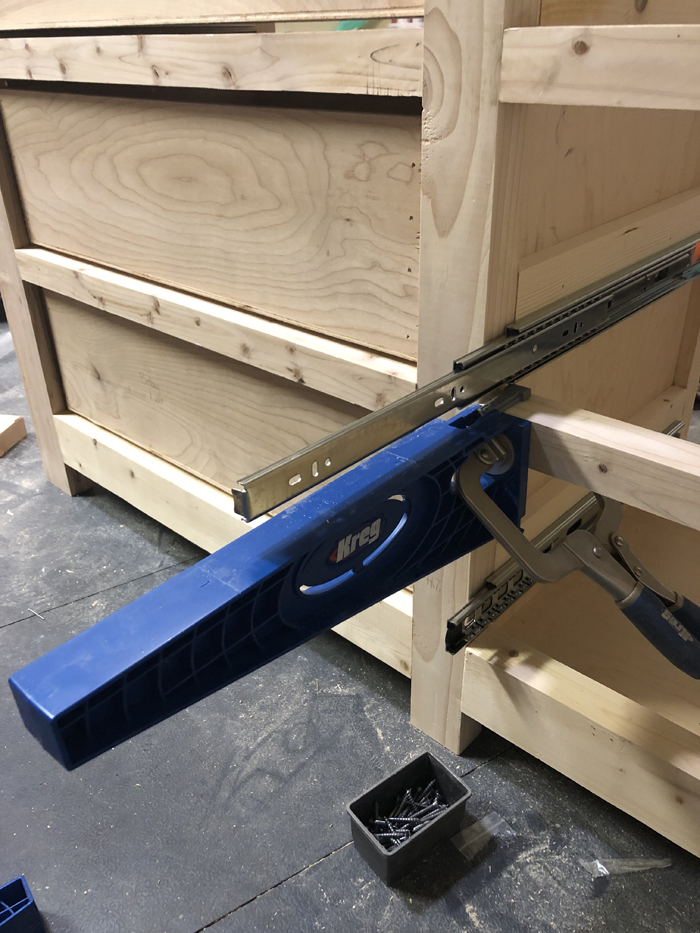
I lined the front end of the drawer slide extension up 1/4″ from the front of my drawer front and attached the extension to drawer. Then, I repeated this 6 times 😉

Finally, cut the drawer fronts. I made these plans so you are able to use 1×8 for this part, but I chose to use hardwood plywood again. I love the way that it stains and how straight the boards are to work with especially when building drawers. Cut each to size and use playing cards or other types of spacers to line each drawer up in place. I like to nail them in place from the front 2 times and then open the drawer and use screws from the inside of the drawer and into each face frame. Don’s forget to use wood glue as well!
Final step is adding your back! This is just 1/4” hardwood plywood cut to size. Attach it to the back of the dresser using wood glue and 1” staples or nails.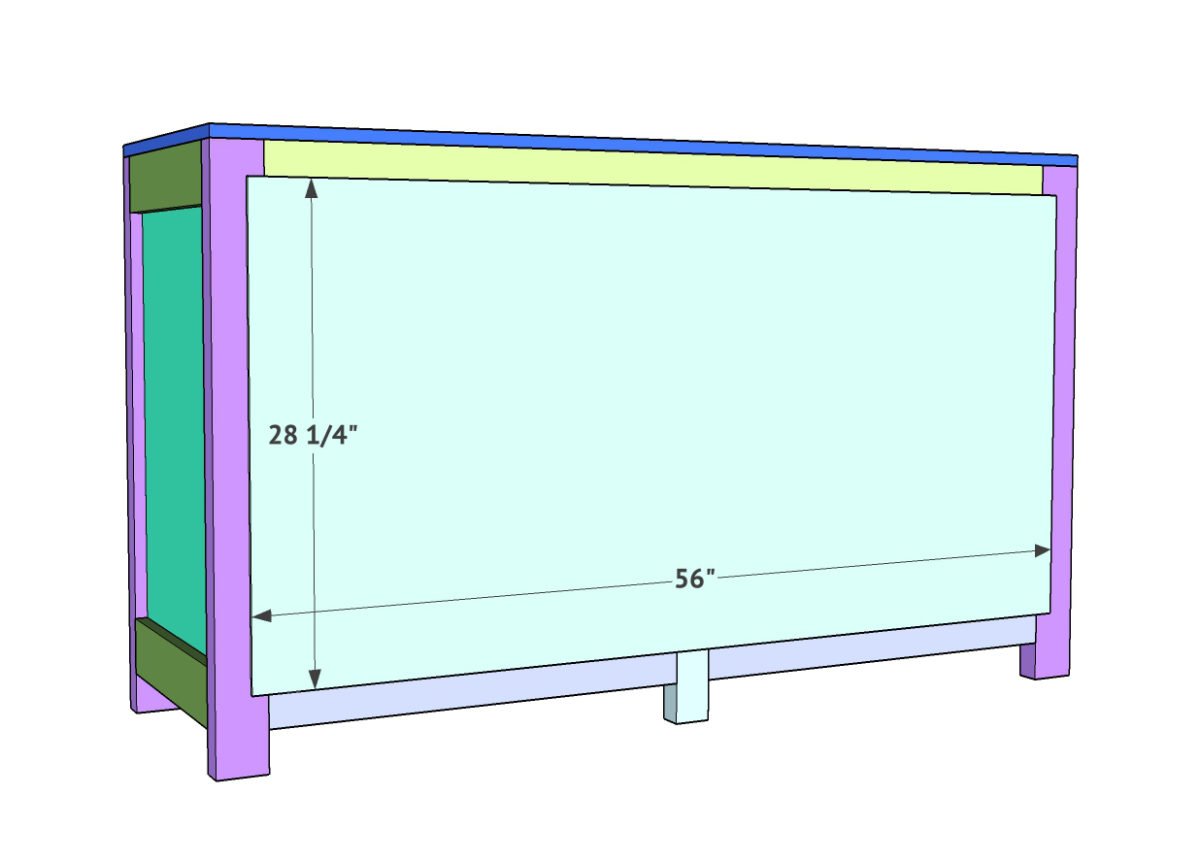
Now… Let’s talk about that hardware! How amazing are the pulls? Here they are! I think they are so affordable for their size and they are super strong and easy to attach. I also think they make this dresser…
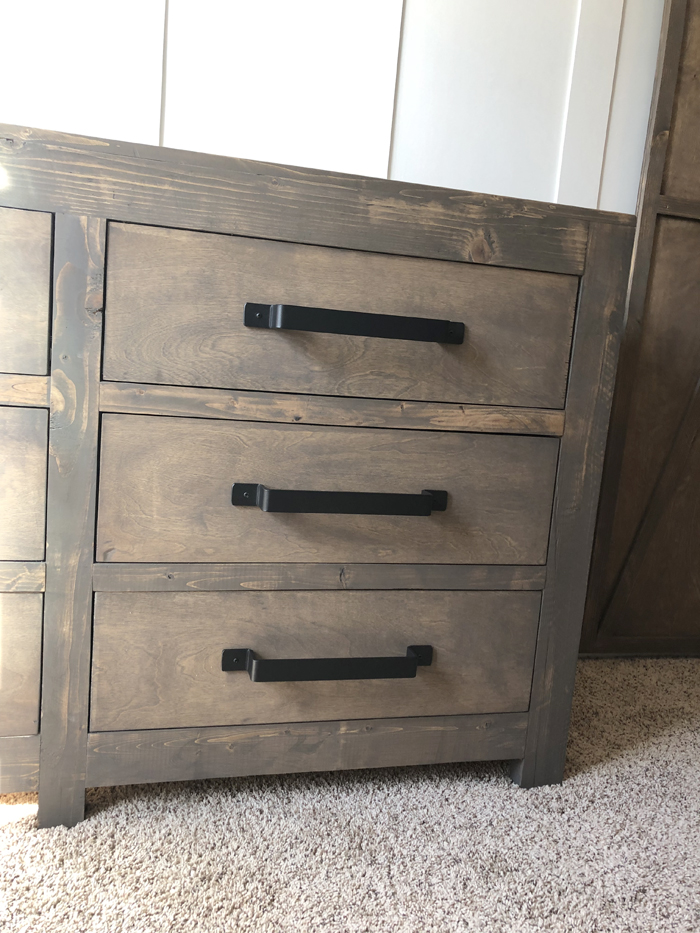
I used Briarsmoke on this piece to match the other pieces I have built in their room. You can find it HERE on Amazon!
And here it is all set up in his room!


FREE PLANS!!!
Be sure to save and print the FREE PLANS BY CLICKING HERE!

How far apart are the 2 center pieces from the top of the top rail to the top of the 2nd rail and then form the bottom of the 2nd rail to the top of the 3rd rail and from the bottom of the 3rd to the too of the 4th
Where did you use the 2x4x1/4″ plywood.
I am building this today. That piece was for the 6th drawer bottom. There isn’t enough on the 4′ x 8′ x 1/4″ to cut the back piece and all 6 drawer bottoms.
What color did you use to paint the wall in that bedroom?
Hello!! I am loving the tractor prints as well. Where can we find them? 🙂
I would love to know about the tractor prints and frames as well!
How thick is the project panel? Also, do you polyurethane the wood?
Where did you find those frames, hooks and tractor print? My son lives and breathes John Deere and would love something like this in his new bedroom.
Thank you!
I can’t wait to build this ! I only have two questions .
1. What are the spaces between the drawer dividers . Drawer fronts are at 7 1/2 soo if I had to guess that measurement Would be 7 5/8 Witch is 1/8 of an inch diffrance .
2. How thick is the project panel ?
HI Im building this now…. Im not seeing the measurement for the spacing between the drawer dividers Im assuming slightly more the 7 1/2? Please help. Thank you.
Was this the correct measurement?
the actual dimensions of 2×2 is 1.5 x 1.5 so….easuring from the top of the 34.75″ board you place the top of each drawer divider at 10.75 “and 20”. This would give you 7.75″ total width for each drawer space.
Do you use polyurethane on all your pieces that you stain? It’s not mentioned, except in the “How to Stain” video. I’m about to stain my first piece and I want to make sure I do it right.
If you do use polyurethane with stain, which one do you recommend?
Thanks in advance!!!
How thick is the project panel? 3/4, 1/2, or 1/4?
Oh, and I literally searched your website the other day to find a dresser with drawers… I am getting ready to do a massive closet makeover. It’s scary in there!
Hi Ladies:
Did you use edge tape on the drawer face? I’ve always dreaded that… Thanks!
I would love to make this or something similar! How much did the materials cost?
Yes would love to know approx cost to build!
Gorgeous work!!!?
Can you please show the barn door on the right as well? Do you have plans for that?
I love those tractor print outs! where did you find them?