Spirited skeletons have rubber-band joints and interchangeable heads
By William Berry
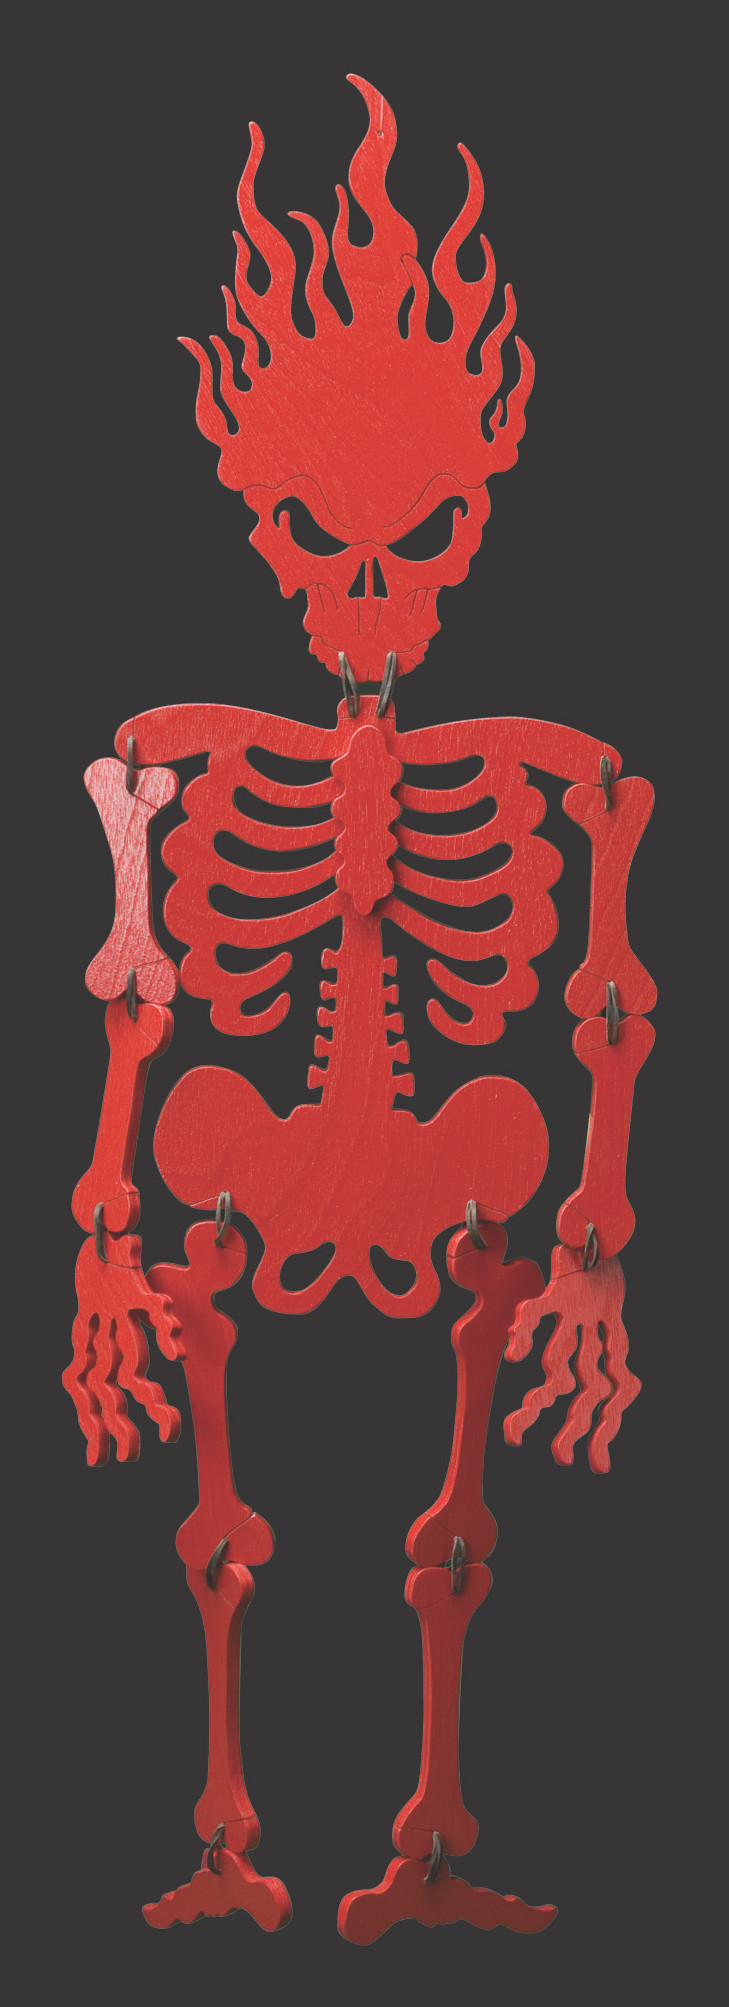 These dangling skeletons make great Halloween decorations for your door or window. Hang them on your front porch to greet trick-or-treaters as they rattle in the wind. Interchangeable skulls add to the fun, and children can get involved by helping to paint them.
I originally used 1/4″-thick Baltic birch plywood for the skeletons. Later, I found that using oak plywood gives the pieces a texture that resembles cracks and imperfections in the bones. Sand the stock lightly with 220-grit sandpaper before cutting the pieces. You can stack cut the patterns, cutting up to four skeletons at a time. Use clear packaging tape to stack two separate bundles of four sheets of wood. One bundle is for the body, the other for the limbs. Cut the skulls individually or stack cut them depending on which combination of skulls you want for your skeletons.
There are various ways to finish your skeletons. Get creative and encourage the children to join in the fun. Use glow-in-the dark paint or cut them from hardwood and apply a clear finish. Rubber bands connect the bones, giving the joints great flexibility so the skeletons can shake and rattle. Reduce or enlarge the patterns and cut a variety of skulls to create your own skeleton crew. Reduce the patterns to 60% to produce a skeleton about 12″ high or enlarge the patterns to create life-size decorations.
Making the Project
 Step 1: Prepare the blanks. Attach the patterns to the stacks using temporary-bond spray adhesive. Apply packaging tape on top of the patterns to reduce burning.
Step 2: Drill the holes. Drill the rubber band anchor points and the blade-entry holes. Use scrap wood to prevent tear-out on the bottom sheet.
Step 3: Cut the frets in the body. Cut the hip and rib openings. All the rib openings can be cut in two passes, using one blade-entry hole on each side. The breastbone will cover the connecting lines running up the sides of the spine.
Step 4: Cut the perimeter of the body. Insert the blade through one of the rubber band anchor points. Cut the slot that leads to the perimeter, then follow along to the next slot. Work your way around the body.
Step 5: Cut the remaining pieces. Use the same technique to cut the skull and remaining bones.
Then run a fine sanding sponge across the edges to remove any burrs. Glue the breastbone onto the body.
Step 6: Paint the pieces. Position all of the parts on a piece of cardboard. Leave at least 1″ between the pieces. Spray paint the pieces, following the manufacturer’s instructions. Spray the pieces at an angle from all directions, allow them to dry, then flip them over and repeat the process. This helps you get good coverage on the inside and outside edges.
Step 7: Assemble the pieces. On a full-size skeleton, use two rubber bands for each joint. Run a piece of sandpaper through the slot to remove any burrs or paint. Stretch each rubber band before you pull it through the slot to the anchor point. Attach the limbs and the head. If you alter the size of the pattern, you may need to experiment with the size of the rubber bands. Thread fishing line through the hole at the top of the skull and tie it in a loop.
Materials:
• Baltic birch plywood or oak plywood, 1/4″ (6mm) thick: 3 each 7 1/2″ x 9″ (19.1cm x 22.9cm)
• Temporary-bond spray adhesive
• Clear packaging tape
• 220-grit sandpaper
• Assorted enamel spray paints
• Small rubber bands (available in the hair care department)
• Sanding sponge
• Nylon fishing line
Tools:
• Blades, #5 reverse-tooth blades
• Pad sander or sander of choice
• Drill with 1/16″-dia. drill bit
Patterns
About the Author
William (Bob) Berry’s scrolling business is based in Saline, MI. Visit his website at: www.taurpiocreations.com.
For more fun scroll saw projects, subscribe to Scroll Saw Woodworking & Crafts magazine. CLICK HERE for more information.