 Layering Technique Lets You Make as Deep—or as Shallow—a Box as You Want
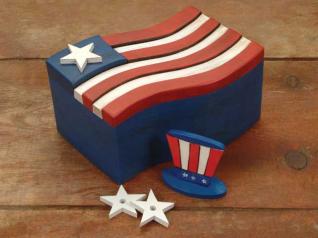
Celebrate our nation’s birthday with this simple patriotic scrolled box. By cutting each layer separately, you can make the box much deeper than if you glue all the pieces together before cutting or cut it out of a solid block of wood. Start by making several copies of the pattern—usually one per layer since the wood I used is too thick to stack cut.
Step 1: Attach the pattern to each layer using repositionable spray adhesive.
Step 2: Cut out the inside of the box. Start by drilling blade entry holes. Keep the entry holes near an edge to extend the life of your blade as much as possible. Cut each layer out separately. Since the inside of the box is so big, the diameter ofthe blade entry hole isn’t critical.
Step 3: Cut out the outside of the box. Stay as close to the line as possible to minimize sanding later.
Step 4: Glue and clamp the layers together. Line the inside layers up as much as possible to minimize sanding and shaping later. 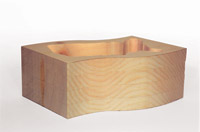
Step 5: Sand the inside of the box to shape using a drum sander. For stubborn areas, use wood filler since the box will be painted.
Step 6: Cut out the bottom of the box and glue and clamp it inplace.
Step 7: Cut out the bottom riser of the box. Cut out the riser from the ¼”-thick wood and sand it so it fits snugly into the bottom of the box. Drill blade entry holes and cut out the letters.
Step 8: Cut out the backer board for the top from the ¼”-thick wood. Make sure you cut it a little oversized.
Step 9: Place the backer board for the lid on the box and drill through it into the box frame at least 3⁄8″with the 3⁄16″-diameter drill bit where indicated on the pattern. Cut two ½”-long pieces of 3⁄16″-diameter dowel and glue them into the box frame.
Step 10: Shape the lid backer to fit the box using the drum sander. The dowel pins should hold it in place for the most part, but it’s still a good idea to clamp it to keep the lid from flying off while sanding.
Step 11: Attach the two pine boards for the stripes togethe rwith double-sided tape and stack cut according to the pattern. Lay them out on the backer board alternating thick then thin stripes
Step 12: Cut the square section for the star out of the ½”-thick oak and the star out of the ¼”-thick oak.
Step 13: Cut the length of the top three stripes to make space for the square section. Glue all the pieces to the lid backer board. 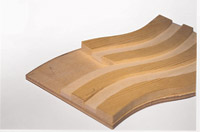
Step 14: Sand the box with progressively finer sand paper up to 220-grit using a palm sander or sanding block
Step 15: Paint the stripes alternating red and white starting with red at the top. Paint the square for the star blue and the star white.
Step 16: Paint the box blue with a spray paint of your choice. Paint a portion of the bottom of the box white with acrylic paint so the letters cut in the bottom riser show through. Do not paint the whole bottom, as the white should not extend past the outside edges of the bottom riser.
Step 17: Paint the bottom riser redusing an acrylic paint of choice. When dry, apply wood glue to the back of the riser and put it in place. Put something heavy on it to hold it in placewhile the glue dries.
Materials:
- 4 each – 3/4″ x 7″ x 7″ pine (Box layers)
- 1/4″ x 7″ x 7″ plywood (Box lid backer board)
- 1/4″ x 7″ x 4″ plywood (Bottom riser)
- 3/8″ x 7″ x 7″ pine (stripes)
- 1/4″ x 7″ x 7″ pine (stripes)
- 1/2″ x 3″ x 2½” oak (star box)
- 1/4″ x 2″ x 2″ oak (star)
- 3/16″-diameter dowel
- Blue spray paint of choice
- Red acrylic paint of choice
- White acrylic paint of choice
- Spray shellac of choice
- Dark shade of Minwax Polyshades (optional for antiquing)
Tools:
- #5 reverse tooth blade (general cutting)
- #3 reverse tooth blade (letter cutting)
- Hand sander or sanding block
- Sandpaper, 100, 150, and 220 grits
- 3/16″-diameter drill bit
- Drum sander (optional)
Attachments
Complete Box pattern