
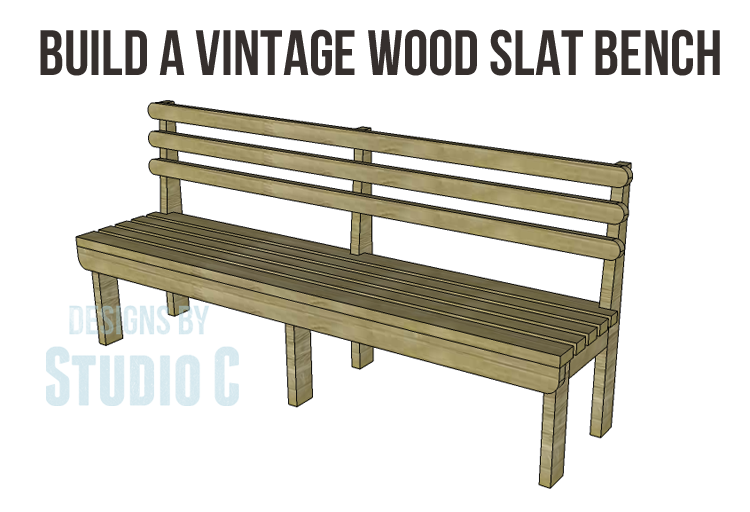
Build a Vintage Wood Slat Bench
Create a Stunning Piece of Seating using the Plans to Build a Vintage Wood Slat Bench
This bench is one of those pieces that can be constructed in a day. So simple, right? It would be the perfect accent to a deck, porch, mud room, or even at a dining room table! The plans to build a Vintage Wood Slat bench are simple to build and would be a very inexpensive project!
Materials:
- 2-1/2″ pocket hole screws (<– affiliate link!)
- 2-1/2″ screws
- Wood glue
- Sandpaper (100, 150, 220 grits)
- Finishing supplies (primer & paint, or stain, sealer)
Lumber:
- 6 – 2×3 at 8′
- 7 – 2×4 at 8′
Cut List:
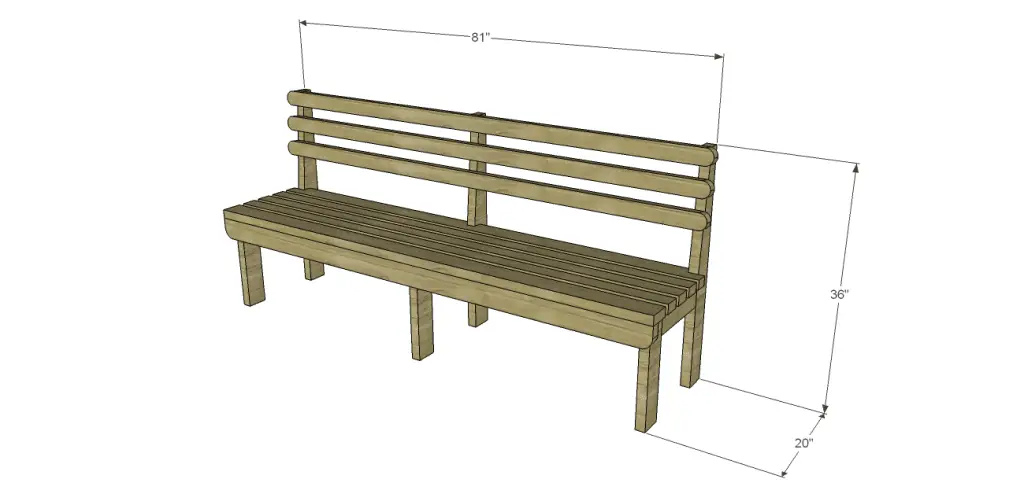
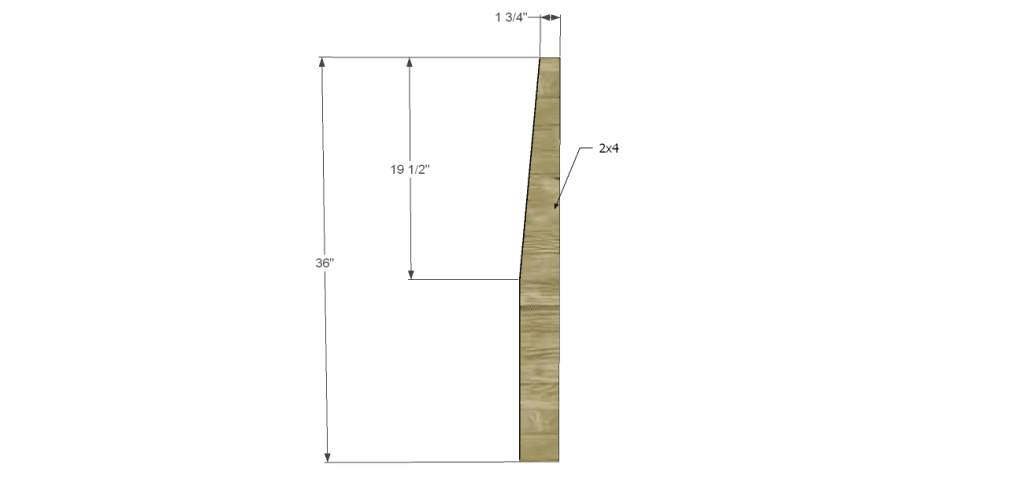
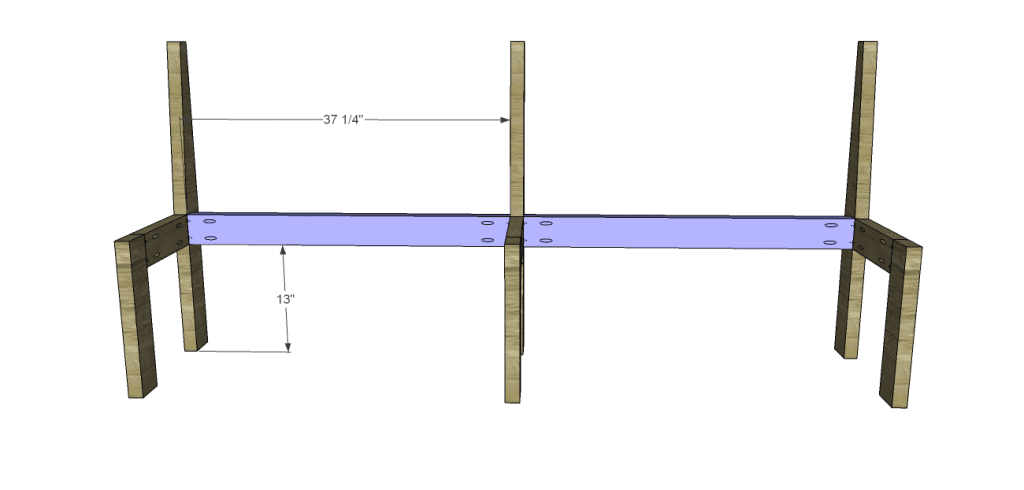
- 3 – 2×4 at 36″ – Back Legs
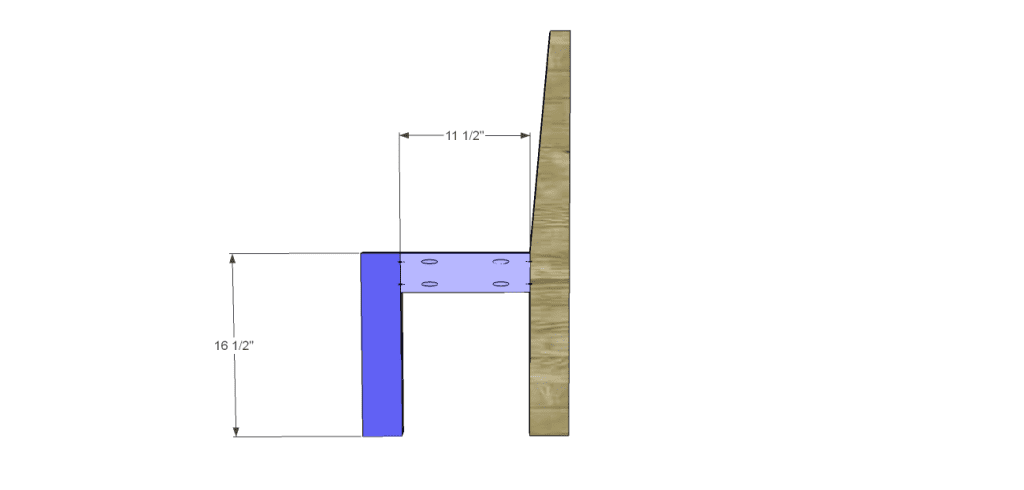
- 3 – 2×4 at 16-1/2″ – Front Legs
- 3 – 2×4 at 11-1/2″ – Leg Stretcher
- 2 – 2×4 at 37-1/4″ – Back Stretchers
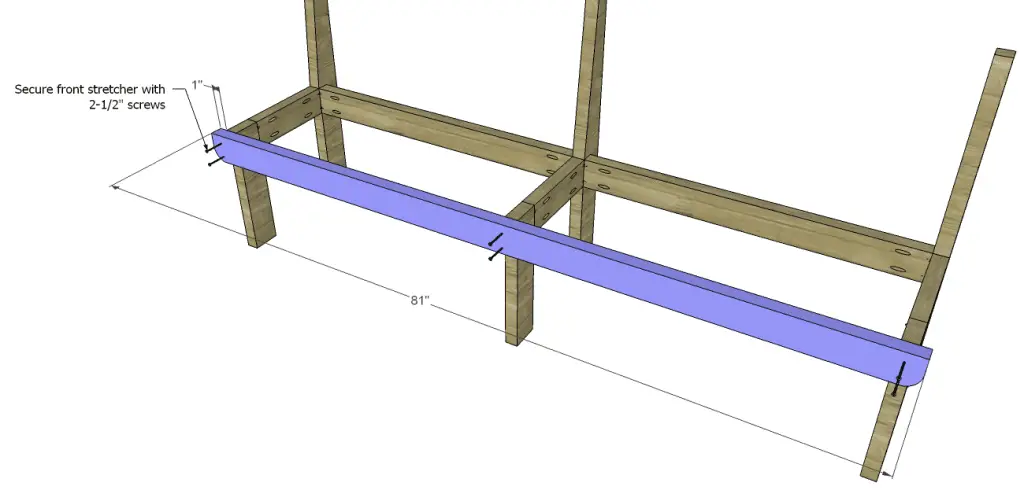
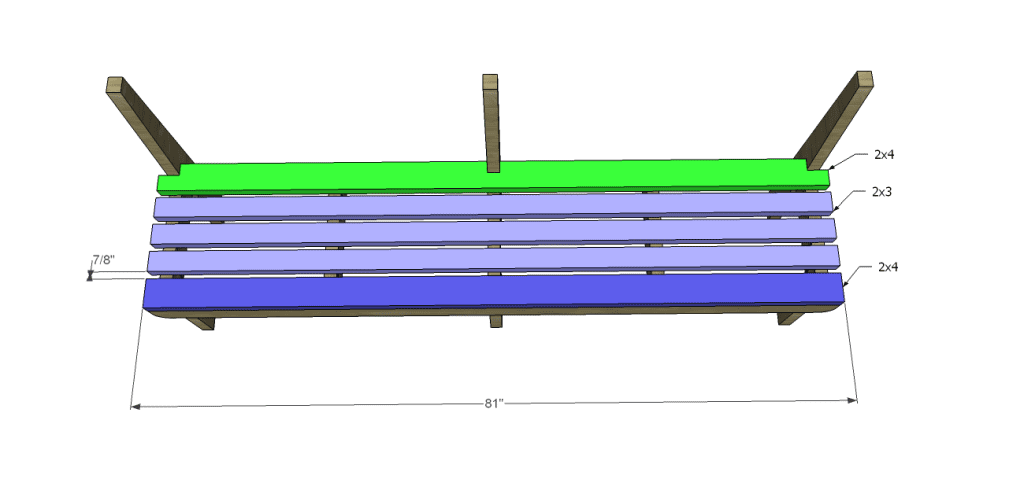
- 1 – 2×4 at 81″ – Front Stretcher
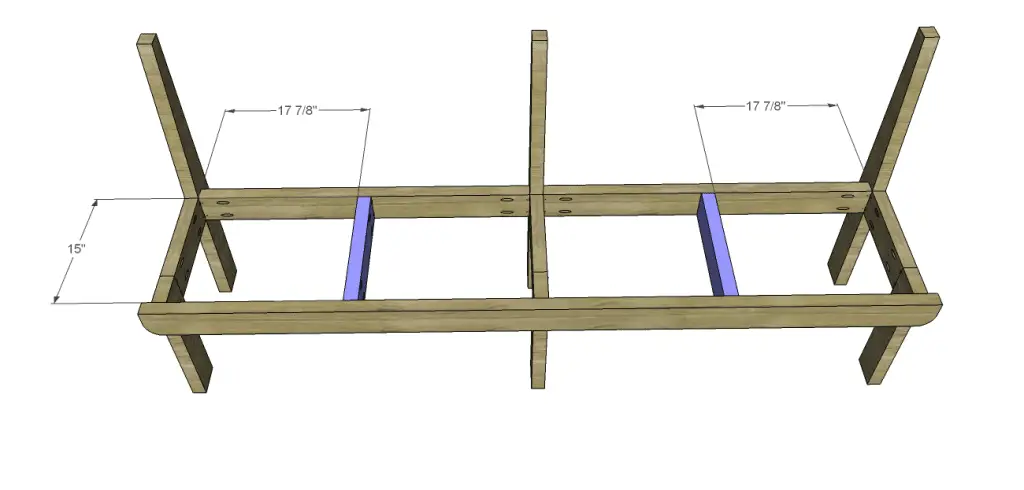
- 2 – 2×4 at 15″ – Seat Supports
- 3 – 2×3 at 81″ – Seat Slats
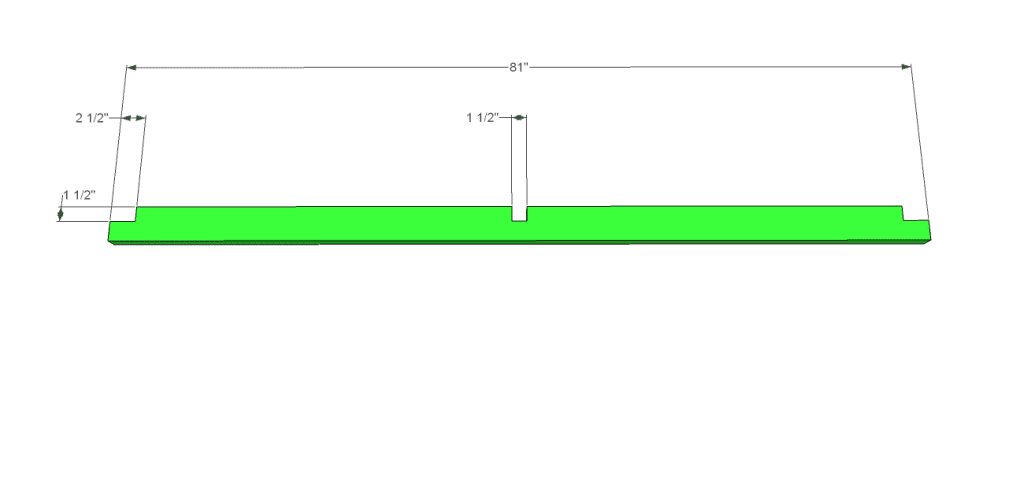
- 2 – 2×4 at 81″ – Seat Slats
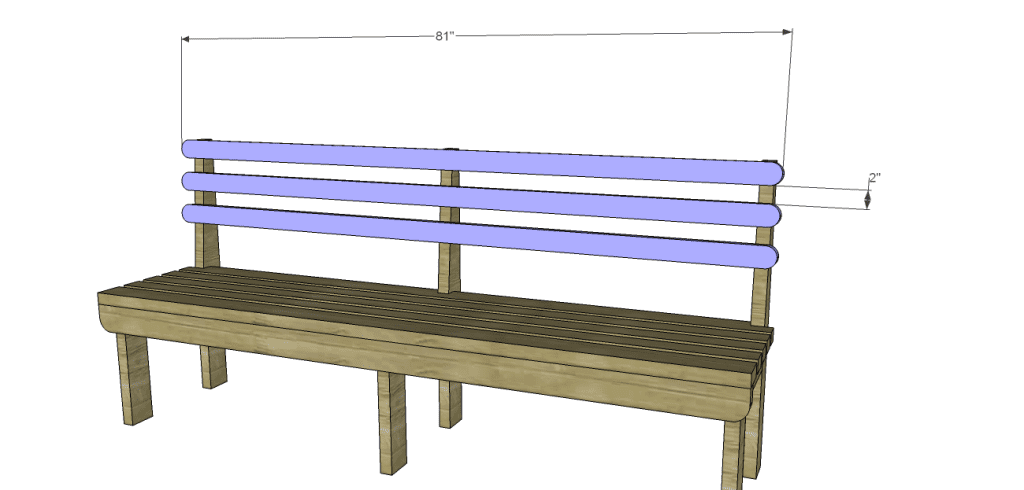
- 3 – 2×3 at 81″ – Back Slats
Step One
Cut the pieces for the back legs. Cut the angle for the upper back using a jigsaw or a tapering jig on the table saw.
Step Two
Cut the pieces for the front legs and the leg stretchers. With the pocket hole jig set for 1-1/2″ material, drill pocket holes in each end of the stretchers. Secure the stretchers to the front legs and back legs using glue and 2-1/2″ pocket hole screws.
Step Three
Cut the pieces for the back stretchers and drill pocket holes in each end. Secure to the back legs as shown using glue and 2-1/2″ pocket hole screws. The back face of the stretchers will be flush with the inside face of the back legs.
Step Four
Cut the piece for the front stretcher. To make the arc in the lower ends, use a soup can or a compass to draw the arc, then cut with a jigsaw. Secure the stretcher to the front legs using glue and countersunk 2-1/2″ screws. The front will overlap the sides by 1″.
Step Five
Cut the pieces for the seat supports and drill pocket holes in each end. Secure to the front and back stretchers using glue and 2-1/2″ pocket hole screws.
Step Six
Cut the pieces for the seat slats. Cut the notches in one of the 2×4 slats as shown in the drawing. This way, the back slat will fit around the legs. The center three slats are 2×3, and the front slat is a 2×4. Space the slats 7/8″ apart, then secure in place using glue and countersunk 2-1/2″ screws.
 Step Seven
Cut the pieces for the back slats. The rounded edges are optional. Secure the back slats to the upper portion of the back legs (along the angle) using glue and countersunk 2-1/2″ screws. The back slats will be spaced approximately 2″ apart.
Finish as desired.
The bench would look awesome with a weathered grey finish, then sealed with a coat of spar urethane! I think I might add the plans to build a Vintage Wood Slat bench to my “to build” list! Looking for an additional bench to build? The plans to build a curved seat bench would be perfect!
Have any questions about the plans? Let me know at cher {at} designsbystudioc {dot} com!
Originally posted 2014-05-02 08:00:20.
This was the perfect design to go with an outdoor dining set, so of course I had to make the bench. Used Eco red shield to frame, combined with the 2x3s. Finished with Penofin’s translucent red cedar penetrating oil, it reminds me of an old radio flyer wagon. Made two matching low back single bench seats, too. Love it! Thanks so much for the design.
Oh my gosh, your bench is beautiful!! Do you mind if I show it off? You did a fabulous job and I am so glad you liked the plans!! THANK YOU!!
Thank you so much!! Feel free to show it off. Just don’t look too closely at all the imperfections. 😉 if you haven’t tried the Eco red shield products yet, definitely check them out (Homey D carries them, typically $1 more than a standard 2×4 would be). They come in a cherry red color – 2x4x8 and plywood 4×8. Are fire resistant, water, mold and termite resistant as well. And produce such fun results.
[…] Bench free building plan.This vintage looking wooden slat bench could work indoors or out depending on the type of wood you build it with. Here are the free […]
[…] If anyone tackles this bench before I get a chance to do so, please let me know how the templates work out. I am planning on including templates for future plans. Here’s are other fabulous DIY furniture plans for a bench to build… […]