


Neat Little Project: Make a Sturdy Wood Serving Tray
New to woodworking? This DIY wood tray project will get you closer to being an old hand

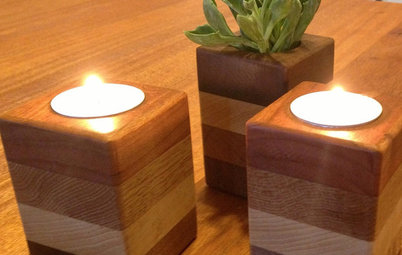
Serving trays typically evoke thoughts of luxurious mornings spent with breakfast in bed, as shown in the first image below. But their utility extends beyond this decadence; they can be means of carrying supplies outside for grilling, toting popcorn and snacks for movie night, or simply hauling fixings for dinner.
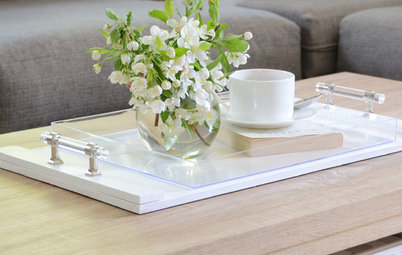
There are plenty of trays available in retail outlets, but if you want one to suit your exact needs, you'll need to build it yourself. This tray measures 24 inches long and 12¾ inches deep, but you can easily modify it using the same construction techniques. It features decorative curved ends with handle openings that are easier to make than you might think.
There are plenty of trays available in retail outlets, but if you want one to suit your exact needs, you'll need to build it yourself. This tray measures 24 inches long and 12¾ inches deep, but you can easily modify it using the same construction techniques. It features decorative curved ends with handle openings that are easier to make than you might think.
Make the Handles
Start off with the handles in Figure 1. Cut them to length (12¾ inches) first, then mark the position of the handle openings as shown in Figure 1. The key is to accurately mark the center points for the holes on the end. Use a 1-inch Forstner or spade bit to drill these holes first, then cut the remainder of the openings using a jigsaw.
For the top curve, you can either mark it freehand or use a flexible metal ruler as a guide. Mark this one handle and cut the curve using the jigsaw. Use this first handle as a template for marking the curve on the second handle, and cut.
Make the Tray
Use Figure 2 and Figure 3 as guides for positioning the parts during assembly. Cut the rails and bottom to length (22½ inches). Apply glue to the edges of the bottom, line up the ends of the rails with the ends of the bottom and attach the rails to the bottom with 1¼-inch brads. Make sure you do not hammer any brads closer than 1 inch from the ends of the assembly. Clamping this assembly while driving the brads will make it easier, but don't worry if you don't have any clamps; 18-inch clamps would work best here.
Apply glue to one end of the rail-bottom assembly, line up a handle with the end and attach it with 1¼-inch brads. Repeat on the other end. Again, clamping while driving the brads will make it easier; 36-inch clamps would work best here.
Veneer, which is used as trim on the bottom edge, can come with an adhesive on the back that allows you to set it in place and then use an iron to activate the adhesive. Other veneers have a self-adhesive strip with a backing that peels off and allows you to press it into place. And yet others can simply be glued on.
Use a utility knife or heavy-duty scissors to cut four pieces of veneer to match the sides and ends of the assembly. You can simply roll it out along the sides and mark where it needs to be cut, rather than trying to measure it off the roll. It's best to cut it a little long, then trim it after you attach it. Start with the long sides, attach using one of the methods described above (depending on your veneer type) and trim to fit. Follow up with the ends. Sand the corners to smooth out where the pieces meet.
Stain and Protect Your Tray
Allow the glue to dry and sand all the wood smooth. Make sure you sand any rough edges on the handle opening in particular. Follow the manufacturer's directions for applying the stain. Remember that oil-based products require a longer time to dry and must be applied in a very well-ventilated space. After the stain has dried, apply a protective coat of polyurethane.
Allow the glue to dry and sand all the wood smooth. Make sure you sand any rough edges on the handle opening in particular. Follow the manufacturer's directions for applying the stain. Remember that oil-based products require a longer time to dry and must be applied in a very well-ventilated space. After the stain has dried, apply a protective coat of polyurethane.


A jigsaw will do the heavy lifting on this project in creating the curve and the opening on the handle. A drill with a 1-inch Forstner or spade bit also will be necessary to create the handle opening; these are specialty drill bits that cut perfectly formed holes larger than a standard drill bit set can. A handsaw, circular saw or chop-miter saw are needed for cutting parts to length.
You'll also need a hammer, a utility knife or heavy-duty scissors, a measuring tape, a straight edge, a pencil, a paintbrush or rags, and rubber gloves. An 18-inch flexible metal ruler will be helpful for marking the curve on the handle, but it isn't necessary.
Lumber and Supplies
You'll need only three boards for this tray: a 1-by-12-by-2, a 1-by-6-by-2 and a 1-by3-by-4. Red oak works best for a stained tray; it's what I used for this project. You can have parts cut down to size at some home improvement stores.
Also make sure you get a bottle of wood glue, a small box of #17- by 1¼-inch brads, masking tape and sandpaper. For a bit of trim, this project has a strip of veneer on the bottom edge. This is available in small rolls and can usually be found near the molding in stores.
The tray shown here is stained, so select a stain color of your choice. An oil-based stain is typically preferred, but if you'd like to avoid fumes and longer drying time, go for a water-based option. Minwax offers one that comes in a squeezable tube. Finally, select a polyurethane, either oil or water based.