In this tutorial, you’ll learn how to make festive snowflake coasters and a spindle holder using a scroll saw or bandsaw and a few other basic tools. This project would make a great hostess gift or add a touch of Scandinavian-style winter cheer to your decor. If you're new to woodworking, make sure you read our woodworking fundamentals tutorial.
Supplies


- Safety glasses
- Wood various lengths and thicknesses (a 1/4in thickness for coasters and 3/4in thickness for spindle base)
- Scroll saw or bandsaw
- Saw blades
- Pencil
- Sanding paper
- Wood glue
- Scissors
- Dowel rod
- Drill and various drill bits
Safety
- When working with power tools such as saws, it is very important to wear safety glasses at all times.
- Make sure you are fully concentrating on the task at hand as saws and other power tools can do a lot of damage very quickly!
Tools
- For this tutorial, we assume you will be using either a scroll saw or bandsaw. However, all photos included in this tutorial feature a scroll saw.
1. Plot the Project
They say no two snowflakes are alike, but for this project you can make all your snowflake coasters exactly the same or design a variety of different snowflakes for each coaster. The first step is settle on a snowflake shape and then make a paper pattern. Once you have a pattern, trace it on to the wood you will be using for your coasters. In this tutorial, I'm using 1/4in thick oak, but other hard woods would also suit coasters.
The snowflake design needs to be solid enough without any cut-out holes so that condensation from cold beverages doesn’t seep through the coaster. Search for snowflake clip art online or cut out an original snowflake design from folded paper for inspiration. Your final design should be approximately 4in (10cm) across.


2. Cut Out the Design
Using a saw, cut around the outside design of the snowflake. The key to nice crisp lines is to move slowly as you cut. Rushing with an intricate design like this may lead to wobbly snowflake edges and to cutting outside the traced pattern.


3. Drill the Center
Measure the center of your coaster and mark it. Next, drill a hole where the mark is. Make sure to use a drill bit that is slightly larger than the dowel you're using as the spindle part of the coaster base.


4. Sand the Edges
Carefully sand all the edges of your snowflake. If some of the corners are small or tight, try tearing off a bit of sandpaper and rolling it up to get in all the nooks and crannies. At this stage, you can paint, stain or use a sealant such as polyurethane to add some color to your project. I left my pale oak in its original state for a touch of Scandinavian style and simplicity.


5. Craft the Base
Step 1
Using a straight edge (like a ruler or another piece of wood), draw two lines from each diagonal corner. The spot where these lines intersect is where you will place the dowel rod for the spindle of the coaster base.


Step 2
Carefully line up the drill bit where the lines intersect each other. Use a drill bit that is the same size as your dowel rod piece. Make sure you don't drill all the way through the base. Drill approximately two-thirds of the way through the base so the hole is deep enough to insert and support the dowel.


Step 3
Once the hole has been drilled, finish the base by sanding off any pencil lines and sanding all the edges of the coaster base.


Step 4
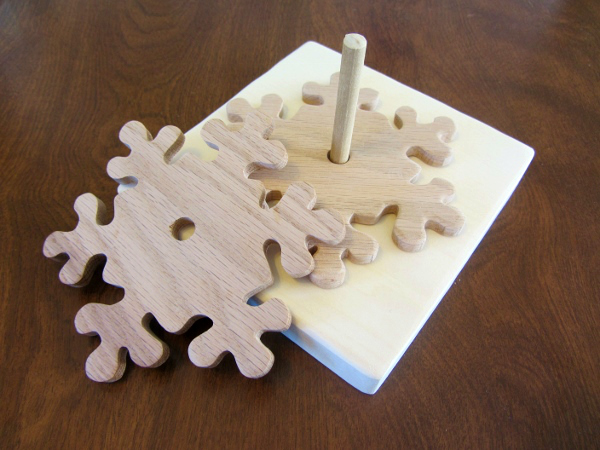
Now all you need to do is place a drop or two of wood glue into the hole and gently tap the piece of dowel rod into place. Now your spindle-style base is ready for the snowflake coasters!


Relax With Your Favorite Beverage
In this tutorial, you learned how to draw a design on wood, cut it out using a scroll saw, and use a drill to make holes to make snowflake coasters and a spindle-style base.


This is a great project to hone your woodworking skills, and it would also make a fantastic handmade present!
Are you enjoying our woodworking tutorials? Let us know what other projects you'd like to see in the comments below.