

By Rob Robillard
“Shake” things up with a classically styled peg rail that offers both form and function.
The Shakers, known for building their furniture with utility and simplicity in mind, are also known for their famous peg rails. It’s a standard feature in American mudrooms.
The shakers used these peg rails for hanging candle sconces, small cupboards, clothes, specially adapted hanging shelves and as a way of storing chairs when sweeping the floor. The pegs essentially provided the shakers with ample storage space for practically anything you can imagine. Shakers were big on efficiency and disliked clutter; peg rails left the floors clear and rendered cleaning more efficient.
As a do-it-yourselfer you have to respect the utility and simplicity of the Shakers’ craft. In fact, that is what I like most about their furniture and work, as well as their motto:
“Don’t make something unless it is both necessary and useful; but if it is both necessary and useful, don’t hesitate to make it beautiful.” ~ Shaker saying
With the Shakers in mind, I decided to build a very simple but useful Shaker-style peg rail above two toy-box style benches I had recently made.
The Shakers installed their peg rails all around the rooms of their homes, usually 6-7 ft. high and spaced approximately 12 in. apart. I decided to install two peg rails, one above the other, so the kids could use them for hanging their coats and book bags, leaving the top rail for adult use.
I used poplar for my mounting rail since everything was going to be painted white, and poplar is an excellent paint-grade wood that is usually knot-free and reasonably priced. You could also make this out of cherry, oak or other stain-grade wood as well, as long as you can get the pegs to match.
I also decided to use a closer peg spacing—6 in. on center, instead of the traditional Shaker 12-in. on center.
Lay Out the Peg Rail
The first thing I did was buy some 1×4 poplar stock long enough to span the wall above my built-in seats, maple pegs and plugs.
I made sure my boards were 1/4-in. longer than the wall spacing I needed. I can trim this later when I’m ready to install them.
I wanted the 6-in. maple pegs spaced evenly so I found the center of my peg rail and marked it. From the center I measured 3 in. to the left and to the right of the center mark.

Once I had these two marks, I measured and marked the board every 6 in. to the left and right respectively from my first marks.
After I had my spacing evenly laid out, I measured the width of my 1×4 board (actual size 3-1/2-in.) and found the center to be 1-3/4 in. Using a combination square set at 1-3/4-in., I made cross marks at every 6-in. spacing for the pegs.

I was installing two identical rails, so I made sure to line up my boards and marked one side of each board as “left,” and then transferred my layout marks.
Drilling the Screws
I used my drill-bit gauge to measure the radius of the maple pegs. They fit snug in the 1/2-in. index hole.

I chose to use a 1/2-in. Forstner bit because it gives a crisp, clean hole with no tear-out. I bored all of the holes at my cross marks—drilling all the way through the board.

After all of the peg holes were drilled I used a palm sander to sand the mill marks out of the board. Sanding at this point is critical, because once the maple pegs are installed; sanding will be impossible by machine and very difficult to do by hand.

Rout the Edge
If you’ve ever seen a Shaker peg rail you know there’s a beautiful, small bead along the top and bottom edges. They most likely did it with hand planes—we’ll use a router
I used a 1/4-in. edge-beading router bit with a ball-bearing guide installed in my router table. To rout this bead, the board has to be on its edge. You could do this with a handheld router, but that’s much more difficult
I set the bit in the router table and used scrap of wood to get the bead just to the edge of the board so that it does not leave any mill marks. Any slight mill marks can be sanded out later.

Even though this bit has a ball-bearing guide I prefer to use an auxiliary fence and set it to the edge of the guide. This allows me to safely apply board pressure downward as well as against the auxiliary fence. On edge, the board has a tendency to wobble—the fence eliminates this.

I routed both edges on the face of the board.
Installing the Pegs
Now comes the fun part. I used a dab of Gorilla woodworking glue applied to the ends of the maple pegs and then tapped them lightly until they were seated in the hole and against the peg rail.

As I worked, I used a damp rag to clean up any glue that squeezed out.
Mounting the Peg Rail
The peg rail was being installed on a wall between a wall corner and door trim. If you remember, I made my boards 1/4-in. longer. Now is the time to trim them. I started by holding my peg board on edge with the pegs facing out. I then cut a 5-degree back angle to the side marked “left.” I only took off enough material to get the back angle. I find that most plaster walls have rounded corners, and a back-cut helps the board sit tight against the wall.
I then positioned the left side of the peg rail into the left wall corner and held it against the door trim. Using a utility knife, which gives better accuracy than a pencil, I marked the edge of the door trim on the top of the peg rail.
I then cut the same back angle at this knife mark. This back angle is barely noticeable but it allows for a super-tight fit. This can always be caulked later.
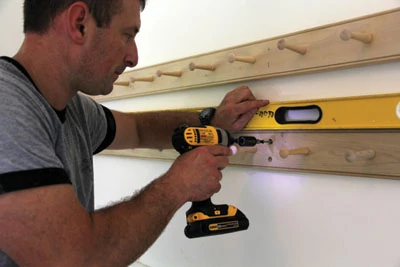
Prior to fastening the rail to the wall, I located the wall studs. I installed two 2-1/2-in. screws at every other wall stud and covered the screws with maple 1/2-in. wood plugs. It’s important to screw into the wall studs because coats and book bags can be heavy.
For a uniform look, I used my square to make two vertical marks, 1-in. down from the top and up from the bottom edge of the board. Making sure both boards have the “left” mark on the same side, I laid out all of my screw hole marks to both boards, taking pains to be consistent.
Using the same 1/2-in.Forstner bit, I drilled a 3/8-in. deep hole at both vertical marks along the peg board. The plugs were not that deep, but I wanted to leave room for the screw head.

After drilling the plug hole I used a 1/8-in. drill bit to bore a pilot hole for the screw.
Holding the board to the wall was easy since I cut it to fit snug. I installed one screw on the far left side and then, using a 4-ft. level, I installed a screw on the far right side.

Once the peg board was secured to the wall, I filled in all of the screws. To plug the holes, I applied a dab of wood glue to the maple plugs and then tapped them gently into the holes, leaving them consistently, slightly proud and wiping off any glue with a damp rag.

Installation of the plugs completes the project, and brings to mind another shaker credo:
“Beauty rests on utility.”
Remember, when doing your own projects at home try to work like the Shakers . . . “Do your work as though you had a thousand years to live and as if you were to die tomorrow.”
Tools & Materials
• 1×4 board, long enough to span your project
• Enough wood pegs for your needs
• Wood plugs
• Mounting Screws
• Wood glue
• 1/4” edge beading bit
• 1/2” Forstner bit
• Random orbital sander
• Router
• Miter saw
• Drill and driver
Editor’s Note: Robert Robillard is editor of the blog, A Concord Carpenter (www.AConcordCarpenter.com), and principal of a carpentry and renovation business located in Concord, Massachusetts (www.RobertRobillardCarpentry.com). Rob also hosts the “Concord Carpenter” Cable TV Show, offering the DIY audience in Boston‘s Metro West region expert advice on home repairs and maintenance.
