

 Scroll Saw This Commemorative Portrait
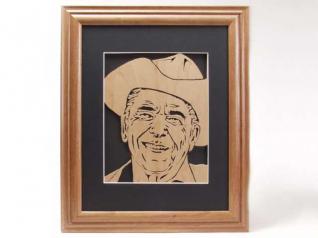
Ronald Reagan wore many hats before he was elected the 40th president of the United States in 1980. He was a sports announcer, motion picture and TV actor and governor of California before his election to the presidency at age 69. Your friends and customers who admired the late president will appreciate this portrait of him wearing a cowboy hat.
You can make the 11″ x 14″ portrait shown here or a smaller.
9″ x 10″ version. If you prefer, you can use 1/8″-thick plywood instead of 1/4″-thick plywood.
Whenever you are cutting a pattern that you know will be popular, cut at least two at the same time, especially if you are cutting plywood. This stack cutting technique not only helps to support the fragile pieces but also gives you a second project without seriously slowing down the rate of speed at which you feed the wood into the blade. Cutting two of these portraits at the same time reduces your cutting time by 50 percent.
Step 1: Preparing and adhering the pattern. Photocopy the pattern. Using temporary bond spray adhesive, transfer the pattern to the wood. Remember to spray the pattern, not the wood, with the temporary bond spray adhesive. If your pattern lifts up or tears as you are cutting, try covering the entire wood cutting surface with painter’s tape. This tape is typically blue and leaves little to no residue when removed. Spray the back of the pattern and the surface of the painter’s tape with a heavy coat of temporary bond spray adhesive. Then, place the pattern on the top of the painter’s tape right away for a good bond.
If you decide to stack cut, place a few wood blanks under the top piece and tape the surface of the cutting area with 2″ clear packaging tape. I wrap about 2″ around the back side. The tape sticks well, will hold a stack together and is easy to remove. The tape also helps in lubricating the blade so the wood won’t be as likely to burn.
Step 2: Making blade entry holes. Next drill your blade entry holes in each cutout section of the pattern. Choose as large a bit as you can for easy blade feeding.
Step 3: Cutting the pattern. Cut out each area, starting from the center of the pattern and working out to the four edges. As you move from the center to the edge, cut the area closest to the one you just cut.
Step 4: Removing the burrs. Once the cutting is done, remove the tape. On the backside of the portrait, remove any burrs caused by the blade. I use a rotary tool with a small drum sander attachment held at about a 30-degree angle to the wood and lightly go over each cutout area. Wear safety goggles and a dust mask if you try this.
Step 5: Sanding the project. Using a palm sander, lightly sand the front surface of the wood with a few grades of sandpaper. The weight of the palm sander is distributed, so it does not tend to break the fragile pieces of the portrait. Be sure you don’t push down with too much pressure. The weight of the sander itself is usually enough pressure. I start with 100-grit sandpaper, move to 150 grit and finish with 220.
Step 6: Applying a protective finish. Spray a clear coat on the surface of the wood to protect it from the sun or leave it as it is.
Step 7: Framing the portrait. Hot-glue the background felt or material to the wood on the back side and insert the portrait into a frame behind glass. A black background material will create greater dimension in your finished portrait, especially if you buy your frame and no matte is used. If you use 1/4″ stock and the wood bulges out a bit from the frame, you can install a wire hanger and two cushioning tabs (self-adhesive) on the bottom two corners of the back of the frame opposite the wire hanger. This will lift the frame away from the wall enough to make room for the bulge on the back of the frame. Be sure to sign your work.
Attachments
Reagan Pattern


