Diagrams, plans, and instructions for building a 7-by-12-foot gable-roof shed or playhouse

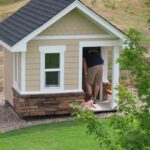
Classic lines and a straightforward design make this gable shed the most popular among shed styles. The door, which runs from eaves to bottom plate, opens onto a rectangular interior space adaptable to any number of uses, from storage to a work or play area or simply a cozy retreat.


Shed Design
The small scale of this shed requires only skids or concrete piers for a foundation, though poured footings will give it greater stability and are recommended if it will be used as an office or children’s playhouse.
The shed shown here is 7 by 12 feet, fronted by the centrally located door and symmetrically placed windows on both sides. If your site is not large enough to accommodate these dimensions, the design can easily be adapted to a smaller footprint by shortening the front and back walls and eliminating one of the windows.
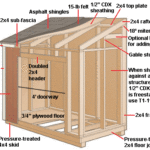
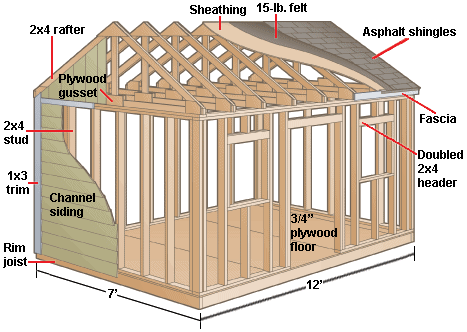
The roof is constructed of simple trusses, which are easy to build and make for a stable structure. Roofing materials can consist of asphalt or cedar shingles (in regions where cedar is allowed) laid over plywood sheathing and 15-pound roofing felt or battens, respectively.
Materials
- Pressure-treated skids, precast concrete piers, or concrete for footings
- Floor and rim joists (2x4s)
- Pressure-treated runners (2x6s)
- Top/bottom plates and wall studs (2x4s)
- Ceiling joists, rafters, and truss supports (2x4s)
- Plywood gussets (5/8-inch)
- Roof sheathing (5/8-inch), 15-lb. roofing felt, asphalt shingles, and roof caps, or cedar shingles and battens
- Cedar channel siding (1x6s)
- Cedar soffits, fascia, and end caps
- Cedar window trim (1×3)
- Galvanized nails and outdoor screws
- Anchor bolts
- Metal framing brackets and fasteners
- Windows and door
Shed Construction
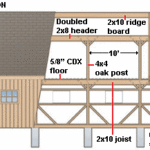
A skid foundation can be made from three 4-by-6 pressure-treated beams laid 3 feet apart.
Precast concrete piers or poured footings should be set in 6 inches along the front and back sides of the shed and spaced 3 feet apart. Along the length of the shed, they are set in 16 inches and spaced 56 inches apart. The piers or footings are spanned with 12-foot pressure-treated 2 x 6s and attached with anchor bolts.
1 To construct the floor frame, start by cutting the rim joists and floor joists from 2 by 4s. Cut the rim joists 7 feet long and the floor joists 141 inches long (12 feet minus 3 inches).
Lay the floor joists along the rim joists, 16 inches on center, and attach them with 16d nails or joist hangers.
Place the frame on 2-by-6 pressure-treated runners and make adjustments with shims until the frame is level. Also check that the frame is square to the runners and then toenail them together. Complete the floor with a layer of 3/4-inch plywood sheathing.
2 The walls are constructed independently and then raised.
Start by cutting the top and bottom plates and the wall studs from 2 by 4s. You will need 10 6-foot-long king studs, spaced 16 inches on center.
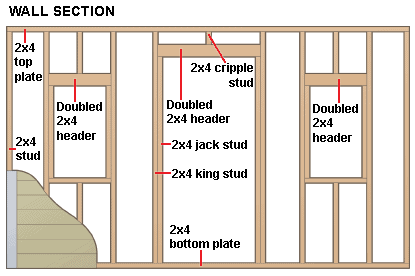
When the frame is assembled, make the cuts for the door and window openings, adding the required headers, cripple studs, and jack studs.
3 To affix the walls, raise the first wall, drive 3-inch screws through the bottom plate into the frame, brace it in place, and repeat with the other three wall sections.
After checking for plumb, attach the walls at the corners. Mark the locations for the roof trusses 24 inches on center on the double top plates and attach them. Cut the bottom plate for the door.
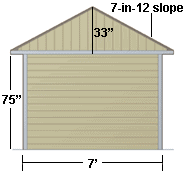
4 The roof framing consists of seven trusses, spaced 24 inches on center, with each one composed of an 8-foot-long ceiling joist and two 50-inch-long rafters that meet a 21-inch-long truss support; the members are held together with a 5/8-inch plywood gusset.

5 Attach each end truss to the double top plates so they overhang front and back equally and are flush with the wall frame’s sides. Position the other five trusses on the marks you previously made on the double plates so they align with the end trusses and then attach them.
6 If you are roofing with asphalt shingles, lay 5/8-inch plywood sheathing on top of the trusses, working from the bottom up, and then cover it with 15-pound roofing felt, the shingles, and the ridge caps. If you are roofing with cedar shingles, install 1-by-4 battens spaced for the desired exposure, and then, working from bottom to top, attach the shingles.
7 To finish the walls with cedar channel siding, start 3/4 inch below the bottom plate and install the siding horizontally until you reach the top plate. Install the siding vertically on the gable ends above the top plate. Finish by installing all the exterior trim.
8 Install the windows and hang the door. Trim the windows with 1-by-3 cedar.