

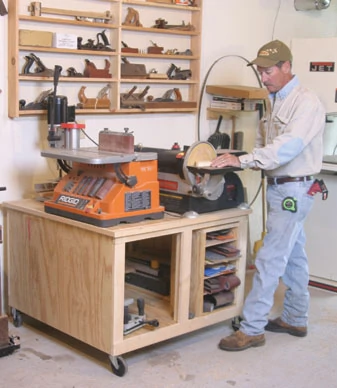
So many bench-top style tools are available today it’s easy to accumulate several, including table saws, jointers, sanders, scroll saws, planers and others. With either purchased or shop-made individual stands, the tools can take up a lot of room.
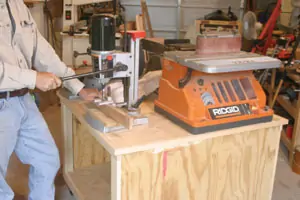
The bench/cabinet shown can easily be rolled out for access to a variety of tools placed on top. It features a large bench top with locking rollers, and the huge storage cabinet beneath provides space for other bench-top or tool accessory storage with access from both front and back. When you aren’t using any of the tools on the bench top, merely roll the cabinet against a wall or into a corner out of the way. I keep the cabinet against a wall most of the time, using the front as a bench top for a sanding station, including a spindle sander and combination disc/belt sander. The rear of the bench top holds tools less frequently used—a mortising machine is bolted in place, and a scroll saw is positioned on one corner, but not fastened down. The same space can be used to hold a dovetail jig that is bolted to a board. The board is simply clamped to the bench top to hold the jig firmly in place. A bench-top router table is also fastened to the bench top in the same manner when needed. A bench-top clamp dog is used in both instances to secure the tools in place. A power strip is fastened to one side of the cabinet, and the tool cords are plugged into it. This prevents having lots of cords entangling the bench top. I didn’t place doors on the unit because I wanted easier access to the tools and accessories, but doors could easily be added, along with a locking hasp as was shown in the locking tool cabinet article in Extreme How-To‘s May ‘06 issue. I also didn’t apply any finish to the piece, but it could be stained, varnished or painted.
The cabinet is basically a big plywood box constructed of CD or “good one side” fir plywood. Because this box will normally hold quite a bit of weight, 2-by-2 stiffeners are used on the inside for bracing.
Locking casters allows the table to roll and spin, for easy access to all sides.

MATERIALS
A. Sides, 3/4 plywood, 24 x 38-1/2”, 2 req’d.
B. Top, 3/4 plywood, 40 x 40”, 1 req’d.
C. Bottom, 3/4 plywood, 38-1/2 x 38-1/2”, 1 req’d.
D. Corner vertical stiffeners, 1-1/2 x 1-1/2 x 24”, 4 req’d.
E. Horizontal stiffeners, 1-1/2 x 1-1/2 x 35-1/2”, 8 req’d.
F. Center vertical stiffeners, 1-1/2 x 1-1/2 x 19-1/2”, 2 req’d.
G. Horizontal facers, 3/4 x 2-1/4 x 40”, 4 req’d.
H. Vertical facers, 3/4 x 2-1/4 x 19-1/2”, 4 req’d.
I. Center vertical facer, 3/4 x 1-1/2 x 19-1/2”, 2 req’d.
J. Top facers, 3/4 x 1 x 43”, cut to fit, 4 req’d.
4” locking casters, 4 req’d.
Construction
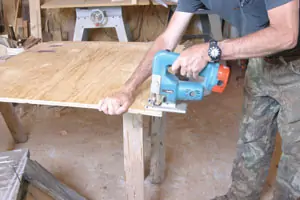
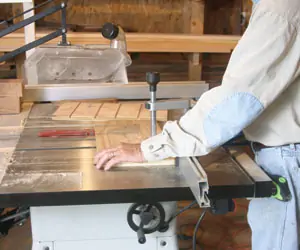
First step in construction is to cut the plywood sides, top and bottom to size and shape. One thing I hate is manhandling 3/4-inch, 4-by-8-foot plywood sheets into my shop and onto the table saw, although the saw is plenty big enough to handle cutting the sheets. I’ve developed an easier method of “rough-cutting” the plywood to shape. With care, you can actually cut the plywood to final shape, using a portable circular saw and a fine finishing blade to prevent splintering. I bring the sheets home in the back of my pickup. Then I place a pair of waist-high sawhorses behind the truck bed and simply slide the sheets off onto the sawhorses. A sheet-rock square is used to mark the plywood for the cuts. To rip the plywood, set the saw blade to just below the thickness of the sheet, allowing it to cut into the sawhorse top about 1/16-inch. To cross cut, place a pair of 2-by-4’s across the sawhorses, place the plywood on top of these support boards, again with the blade just barely protruding past the plywood thickness.
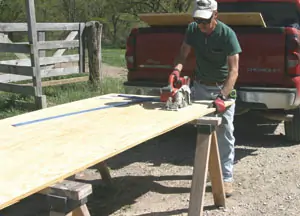
An easy way to cut plywood sheets is to use a portable circ saw and sawhorses placed next to the delivery truck. When ripping, set the blade to just barely cut through the plywood.
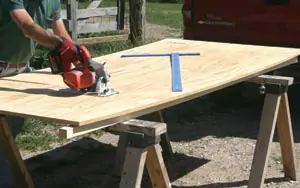
For cross-cutting, a pair of 2×4’s placed across the sawhorses can be used to support the plywood sheet.
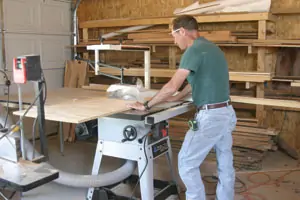
Plywood sheets can be finish-cut on a table saw.
After cutting the plywood to shape, rip 2-by-4’s to create 2-by-2’s (1-1/2-by-1-1/2 inches) for the stiffeners. Cut the stiffeners to fit around the inside edges of each side. Fasten in place with glue and screws, finish nails or with an air nailer. Stand one side up in place on a smooth flat surface and fasten the two bottom front and rear stiffeners in place with glue and 3-inch wood screws driven through the sides and into the ends of the stiffeners. Fasten to the opposite side in the same manner. Cut notches in the plywood bottom to fit around the corner vertical stiffeners. Then place the bottom down on the bottom stiffeners, make sure the assembly is square and fasten the bottom in place with glue and screws or finish nails.
Stiffeners are ripped from 2×4’s and fastened around the inside edges of the sides, and then used to join the two sides together.
Notches are cut in the corners of the bottom so it will fit around the corner stiffeners.
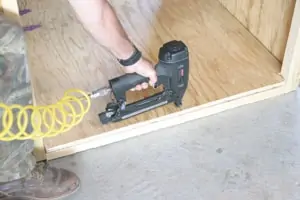
The bottom is then fastened in place with glue and finish nails or screws.
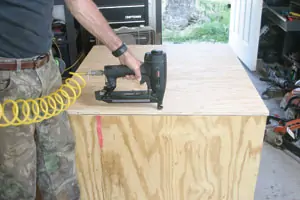
The top is then installed with glue or finish nails and screws.
Fasten the top front and rear stiffeners between the two sides and then fasten the top down on the side and front and rear stiffeners with glue and countersunk screws or finish nails. Again, make sure the assembly is square.
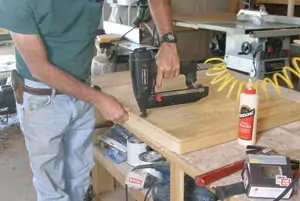
Turn the assembly over with the front positioned up. Rip facer boards from 3/4-inch stock and cut the bottom and top facer boards to the correct length. Fasten in place with glue and finish nails. Cut the side facers and fasten them in place in the same manner. Cut the center stiffener and fasten it in place between the top and bottom stiffeners with glue and countersunk screws. Cut the center facer and fasten it down over the center stiffener with glue and finish nails. Install the casters on the bottom front of the cabinet. Then turn the assembly over to repeat the steps on the rear.
Finally, cut the top facers and fasten them in place around the top edge using glue and finish nails. Note their corners are mitered. Then finish to suit, or add doors, or interior shelves as desired.
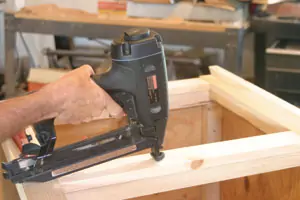
The front and rear facers are installed.

The top edge facers are installed, mitering their corners.
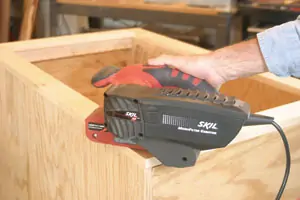
Any rough joints are sanded smooth.
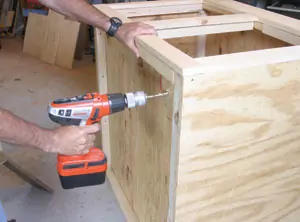
Holes are drilled for the casters and their mounting brackets are installed.

Then the casters are tapped in place.
SIDE NOTE:
Sandpaper Rack
Because I use the bench/cabinet as a sanding station, I decided to build a rack to hold sandpaper to slide into one corner of the storage area. The rack holds discs, belts and sheet sandpaper. The rack is assembled using scrap plywood from the cabinet, plus a bit of 1/4-inch plywood.
First step is to cut the sides, top and bottom from the plywood scraps. Then set up a table saw with a 1/4-inch dado head or simply repeat cuts to create 1/4-by-3/8-inch dadoes in the sides for the 1/4-inch shelves. A miter gauge is used to guide the sides across the saw blade or dado head. Then fasten the sides to the top and bottom with glue and countersunk wood screws. Cut the 1/4-inch plywood shelves to size and slide into the dadoes. Finish as desired.
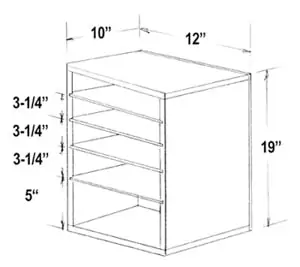
MATERIALS
Sides, 3/4” plywood, 10 x 18”, 2 req’d.
Top and bottom, 3/4” plywood, 10 x 12”, 2 req’d.
Shelves, 1/4” plywood, 10 x 11-1/4”, 4 req’d.
The shelves for the sandpaper rack are fitted in dadoes cut in the sides. Dadoes are easily cut with a table saw and miter gauge.
