

By Clint C. Thomas, Esq.
Photography by Zoe Thomas
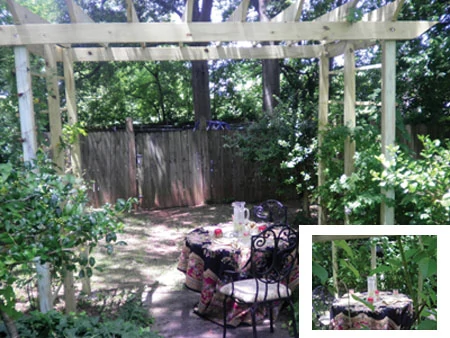
A Rose By any Other Name. Build a wooden rose arbor to enhance your home’s outdoor appeal.
Webster’s New World Dictionary defines an arbor as a place shaded by trees or shrubs, or, especially, by vines on a latticework. Most men would define an arbor as a “honey-do.” As in, “Honey, do this for me.” This is just what happened to me. My wife, Shellye, asked that I build her an arbor for two running rose bushes that had been neglected for many years.
The two bushes were growing on either side of a cement walkway that led from a patio to the children’s play area. The yard between the patio and the fenced-in play area is terraced, causing the pathway to slope downward from the patio. Fortunately, the rose bushes were located at the bottom end of the walkway on level ground, making the installation much easier than if they had been growing on a slope.
Design for the Site
To begin this project my wife cleared away the unwanted foliage around the rose bushes and along either side of the concrete walkway. By clearing the ground, she provided me with an unencumbered work area to lay out the posts that would support the arbor.

My wife wanted to have three posts on either side of the walkway, so I took some basic measurements of the area in question and found that it measured 6 ft. in length and slightly over 9 ft. in width. I divided the 6-ft. length into equal thirds and dug holes 12 in. deep at the 1-, 3- and 6-ft. marks. I dug these holes with a post-hole digger.
I learned a handy trick for digging holes in hard Earth. Dig as much as you can and then fill the hole with water from your garden hose. Let this sit several hours and repeat the process. After the water from the second filling has settled deeper into the ground, dig out what dirt you can and then repeat this process if needed.
I repeated the same layout process on the other side of the walkway, making sure that I measured from the outer most edge of the walkway to the center of each of my of holes to ensure that the posts on both sides of the path would be the same distance from the path. In other words, you don’t want to have the posts on the right-hand side 2 ft. from the edge while the posts on the other side are 3 ft. from the edge. This would look unbalanced to say the least.


Length and width measurements are not the only ones that need to be taken at this juncture. The majority of the construction on an arbor is on its top. Therefore, it is of paramount importance to make sure that all of the posts are the same height. Very few pieces of Earth are completely flat. It seems like everywhere has its ups and downs. The best way to rectify this problem is to start in one corner and treat it as your control point. I chose to start in the corner that gave me the most room to maneuver and that was on the higher end of the walkway. Remember, the ground that I was working on was flat, but the walkway sloped from a higher terrace down to ground level. Therefore, I had to make sure that a person taller than 6 feet would not hit their head when they started down the walkway.
By measuring up from the walkway’s highest point and then taking another vertical measurement from the bottom of the walkway at ground level, I determined that I needed to use 10-ft. 4×4 posts for the support beams. The first foot of each post would be buried
in the ground and this would give me another 9 feet for headroom. This may sounds excessive, but once you take into account a 2-ft. tall terrace on the high end of the walkway it only leaves 7 feet of clearance. Most doorways are 6 ft., 8 in. high, making my 7-ft. height just about perfect.

Base Construction
Start with the control post and cement it into the first corner hole. Be sure that you check for level and plumb. This can be done by holding a twenty-four inch level on two adjacent sides of the 4×4 post and moving the post until the bubble reads level on both sides. A handy gadget is a post level, which is made to fit over a corner of a post and will give you two measurements at once.


Follow this by standing another post in the hole at the opposite end without any cement. The best method to check if the two posts are level is by using a string and a line-level. I hammered a small finish nail into the top of each post before I erected them and ran a high-visibility colored string from the control post to the post at the opposite end and hung a line-level from it. The height of the post at the opposite end, and any posts in between the two ends can be raised or lowered by adding or removing dirt from the holes.
Be sure to tamp the bottom of the hole to compact the dirt if you add any dirt to the hole. Otherwise, it will naturally settle, causing the post to sink which can then create possible structural problems over time.
Once the two corner posts are cemented into place it is an easy task to position the middle post. Make sure that it is no higher than the string line running between the two end posts, and to be doubly safe, have someone hold it level and plumb and then stand back and look down the axis of all three posts. They should all line up in a perfectly straight row. If they do not, then you will need to adjust the malfeasant post accordingly. This is why it is a good idea to dig each post hole to a larger diameter than is needed— you can make small adjustments to the post by simply moving it around inside the hole.
A word of caution should be given here. The old adage of “measure twice, cut once” is very important when performing this type of project. If the posts are out of alignment along any axis then the entire project will be off. The last thing that someone wants to do is cement six posts into the ground only to find out later that some of them are too tall, or even worse, too short or not in a horizontal line with the other posts. So, measure, measure and measure some more.
Once all three posts are set in place on one side it is now time to set the other three on the opposite side. This is done in the exact same way, except that it is important to make sure that the second set of three posts are the same vertical height as the first three. This is also done with a line level. Work off of the original control post on the first side and stretch the string across the walkway to the corner post immediately opposite it. Using the line-level as the guide, add or remove dirt from the hole to adjust the height of the new corner post.
Once all six posts are anchor-ed into the ground with cement it will be necessary to wait three days for the cement to harden and cure before you begin any other construction. This is one of the reasons that this type of project makes a perfect weekend project. The posts can be set one day and then the top can be built the following weekend.
Arbor Terrace
The construction of the top of the arbor will go much faster than erecting the posts, since the time-consuming part of checking multiple measurements is done. Begin building the top by wrapping a 2×6 band around all four sides. I chose to use 12-ft. long pieces of treated 2×6 across the front and back of the arbor so they will overhang each side by a foot. For aesthetic purposes alone, I cut a decorative pattern on each end in each of these one foot spaces. Any pattern can be used, and almost anything can be used as a template’ I used a carving from a piece of antique furniture because my wife and I liked the curved shaped.


Attach all four pieces of 2×6 with carriage bolts, making sure to use flat washers on either side. I found that it was easier to mark where the posts would fall on the front and back pieces and then drill holes in the center of the marked areas while they were still on the ground. My son, Sterling, and I then held each of these two pieces in place against the support posts and marked the location of these holes with a pencil. This way we could drill accurate holes in the posts without having to hold a heavy board in the air at the same time. We attached the front and back pieces first and then filled in between these with 2×6 for the sides of the band.
With the top banded all of the way around all four sides, the next step was to attach rafter pieces so they were running perpendicular to the front and rear horizontal pieces. A simple measurement revealed that the best spacing for these pieces would be every sixteen inches on center. By extending my tape measure along the length of each of the front and rear horizontal pieces I was able to make a mark every 16 inches.
Each rafter will need to have the same decorative pattern cut into it as the front and back horizontal pieces, and they will also need to have the edges sanded to remove any rough edges. I found that it was easier to attach these with 3-in. long outdoor decking screws, toe-screwing them at an angle.


Once the top was built the final step was to attach 1-in. long horizontal strips on each side that the roses would grow through. To save money, I opted to buy six pieces of 1x4x8 treated planks. I then ran these through my table saw with the fence set to give me exactly a one inch wide finished product.
These strips were installed with screws directly into the 4×4 support posts. Another word of caution is recommended here.


Pressure-treated lumber can become extremely brittle, and a 1-in. wide strip is prone to splitting or cracking when a screw is run through it. To remedy this problem, I pre-drilled the screw to the same diameter as the screws. For added security, washers can be added to the heads of the screws.


The final part is to determine the layout of for the horizontal strips. This will vary with personal preference as much as it will with every project. The best way to do this is to hold a tape measure along the outside edge of each corner post extending from the ground to the top of the support post. Then, decide where to mark your lines. For my project, my wife and I chose to have these horizontal strips one foot apart, so I made a pencil mark every 12 inches on one post and used a laser level to shoot a line across the other two posts.

Like all of my classmates in school, I never thought that I would use any of the math that we were being taught. I was convinced things like fractions, geometry, and how to determine area were a waste of my time to learn. Fortunately, my father thought otherwise. Many construction projects utilize all of those mathematical formulas and rules that I shunned as a child. Building an arbor is a simple process with the application of a few of those mathematical principals. If a person can use a tape measure accurately and can dig a few holes in the ground, then they can build an arbor and turn a “honey-do” into a “honey-done.”
SIDE NOTE
Sakrete Paver Set
Polymer-fortified sand is specially designed for locking joint sand in place in paver installations. It provides a lasting solution for paver patios and walkways versus traditional non-modified sands that will wash out over time. Sakrete Paver Set polymer sand also inhibits weed growth between the pavers. Paver Set comes in 50-lb. packages or a 40-lb. pail with handle. (www.sakrete.com)

V-Angle Paver Brush
The V-shaped angle and tough wire bristles of Bon Tool Co.’s unique patio brush make it easy to clean mud and dirt from tight paver joints. The stiff bristles measure 1-1/4-in. for complete reach into the joint. The V-angle brush comes with a 4-ft. wooden handle and makes routine cleanup of sidewalks and patios a breeze. (www.bontool.com)
 Rocksteps
Made of durable reinforced concrete with a solid lightweight core, RockSteps present an easy way to make outdoor landscaping more attractive. Each step is sculpted to provide a natural look, a level surface and a consistent 6-in. height. RockSteps are manufactured in a variety of sizes and widths with a naturalistic broken face or weathered edge that adds to the rustic appearance. Choose from several color options. The steps vary in weight for each size, but generally weigh 75-percent less than natural stone, enabling two workers to set the steps without the need of heavy equipment. rocksteps.com
Other Landscaping Articles
