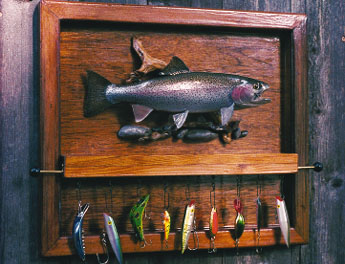
If you’re looking for a way to organize those choice lures or just keep them in view as a reminder of past fishing adventures, consider building a version of this lure rack. The one shown here is made with a red cedar frame and plywood backing, but you can modify the wood types to your needs. The dimensions can easily be made larger or smaller to accommodate any number of lures or space restrictions. A nice touch is the area above the lures, which is left open to display photographs or a trophy fish mount.
Like many of our woodworking projects, the fishing lure rack is very simple to build but looks professional when finished. It can be completed with basic hand tools and a circular or table saw. Building it won’t eat up your entire weekend, either. The rack can be made in just a few hours. No doubt it will add character (and a bit of clutter control) to your fishing camp, cabin, workshop or even the office.
What You Need
- Miter box saw
- Table saw or circular saw
- 10 feet red cedar, 1½ by 1½ inches
- 2 feet red cedar, 2 by 1½ inches
- Sheet of ¼-inch plywood
- Epoxy and wood glue
- Hammer and framing nails
- 1-inch wood screws and screwdriver
- Stain
- Two pivoting brass hooks
- Large snap swivels and lures
- 24-inch brass rod (3/16 inches in diameter)
- 2 threaded ¾-inch brass ball ends
**1. **Begin by cutting the framing pieces to size with a miter box saw. Each end should have a 45-degree angle cut. This design measures 21 by 18 inches and calls for 1½- by 1½-inch red cedar.
**2. **For backing, use ¼-inch plywood cut to 19 by 16 inches. With each piece of the frame, use a table saw to cut a ½-inch lip on the bottom inside. Place wood glue on each lip and attach the frame pieces to the plywood backing to form the foundation of the rack. (Tap in small nails to each joint for extra strength, if needed.)
[pagebreak] 3. The lure holder is made from a 1½- by 2-inch piece of red cedar with a 3/8-inch-wide by ½-inch-deep groove cut in the bottom. Cut the groove with a table saw or circular saw. Connect the lure holder to the frame by screwing through the back of the plywood. Add a stain, then screw in a pivoting brass hook to each end of the lure holder.
**4. **Slide your desired number of snap swivels onto a brass rod that’s 24 inches long and 3/16 inches in diameter. (The swivels hold the lures.) Then secure a threaded brass ball (¾-inch diameter) onto each end of the rod with epoxy or super glue.
5. With your lures connected to the swivels, hang the rod in the groove of the lure holder. Add pictures or a mount to the open space and hang the rack on the wall. Fish mount courtesy of Doug Melvin (www.twinriverstaxidermy.com).